
Cerbo GX – the best system monitoring solution for campervans and boats
If you’re planning to install Victron products in your next campervan conversion, you may have already come across the Cerbo GX. However, having read the product description, you might still be scratching your head and wondering how it works and whether or not you actually need it.
If you’re new to campervan electrics, have a read of our campervan electrical systems guidebook page before finding out about the Cerbo GX.
What is the Cerbo GX?
The Cerbo GX is a central communication centre which monitors and controls multiple Victron devices to maximise the efficiency of the entire electrical system. If you have chosen multiple Victron products for your off grid electrical set-up, the Cerbo GX is a great way to connect them all together, making sure they can communicate and work together harmoniously. With the ability to access information and adjust settings, the Cerbo GX gives you ultimate control and awareness of your campervan’s electrical system.
Victron devices such as inverters, battery chargers, MPPT charge controllers, BMS’s and battery monitors can all be plugged into the Cerbo GX so that it can read their inputs and outputs and adjust their operational settings.
The information collected from these devices is displayed so that you can monitor each device individually and find out how much power is being generated or consumed. For example, you could find out how much energy your solar panels are harvesting, monitor how much current is being drawn by the DC and AC loads, and keep an eye on your leisure battery’s state of charge.
As well as monitoring the system’s power distribution, the Cerbo GX can also connect to secondary devices such as tank level indicators, temperature sensors and digital inputs to provide even more information and control over your campervan’s systems.
All the information and settings can be viewed and controlled from the Victron Connect app on your phone or tablet. You can also view your system from anywhere in the world using the VRM Portal, as long as your Cerbo has a stable internet connection.
You can also connect a GX Touch screen. Simply mount it on your campervan wall and plug it into your Cerbo GX. The GX Touch is available in two screen sizes, 5” and 7”.


What can the Cerbo GX do?
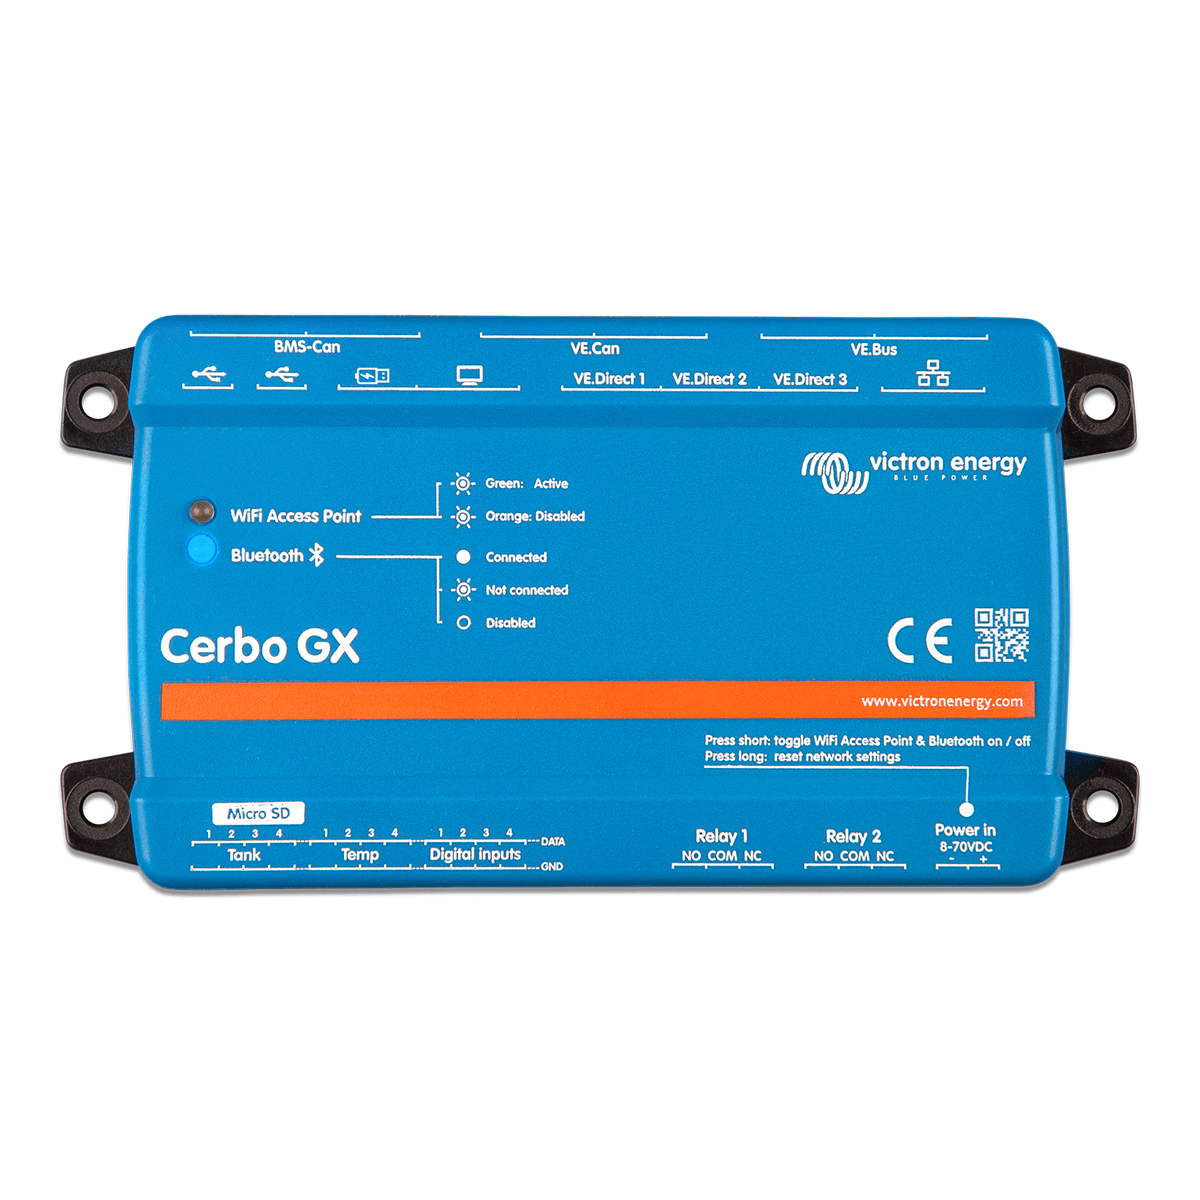
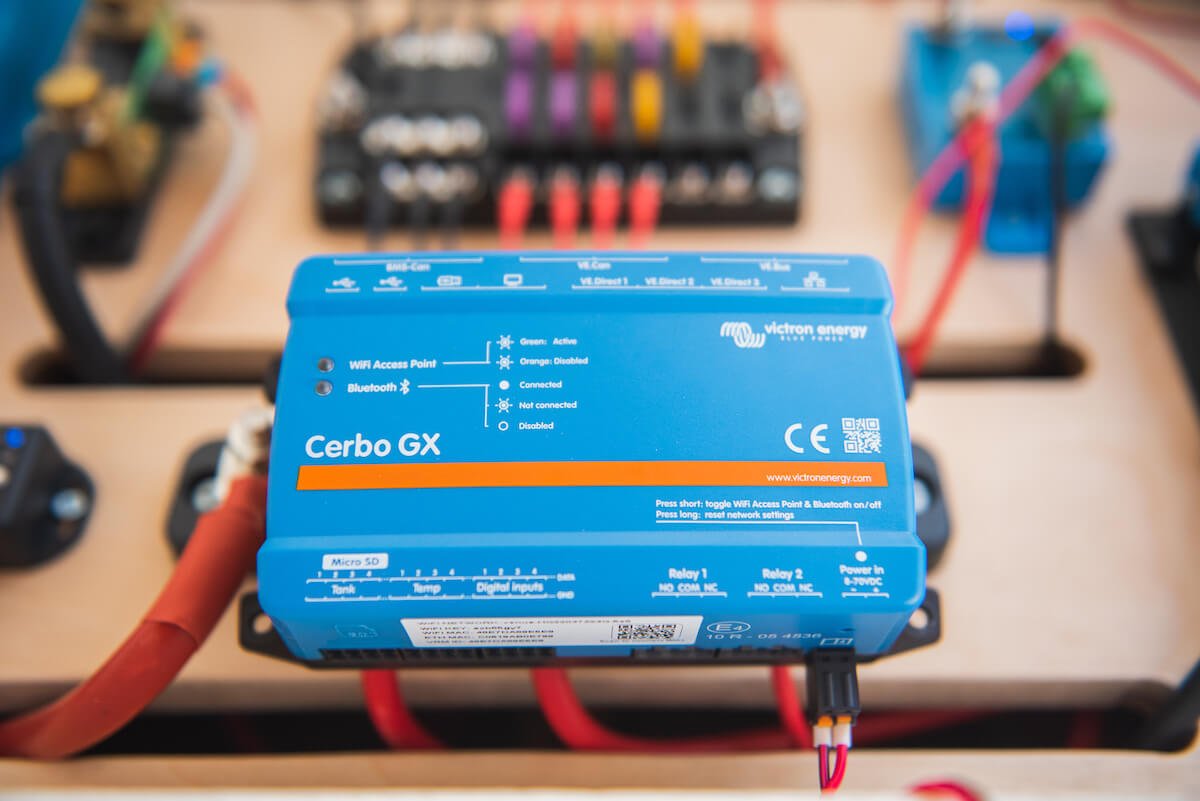
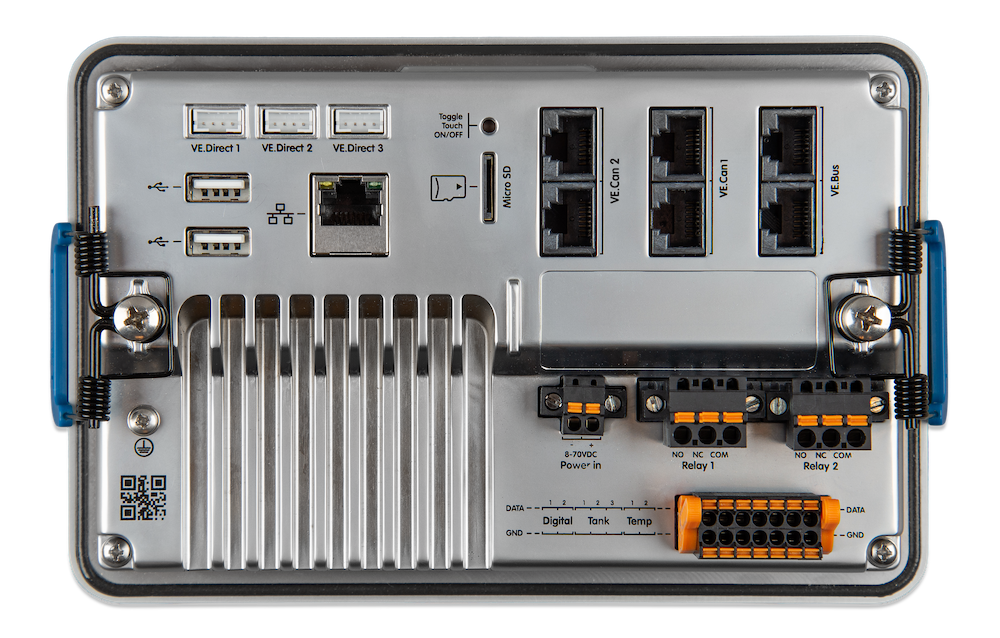
At first glance, the Cerbo GX looks pretty simple, but there are actually 30 ports on either side of the device which allow for a whole range of connections and capabilities. Understanding what all these ports could be used for will give you a much clearer idea of how the Cerbo GX works and what it is capable of.
Victron device ports
The first set of ports are all for Victron devices which manage, monitor or transform the power coming in and out of your battery bank (such as inverters, chargers, MPPT charge controllers, and battery monitors).
- BMS.Can ports (x2) for Victron’s Battery Management Systems which are essential for managing Victron lithium leisure batteries.
- VE.Bus ports (x2) for the Victron MultiPlus which is a combined inverter/charger. These can also be used for other Victron VE.Bus products such as Quattro’s.
- VE.Direct ports (x3) for Phoenix inverters, BlueSolar and SmartSolar MPPT charge controllers, and for battery monitors such as the SmartShunt or BMV 712.
- VE.Can ports (x2) for some larger MPPT solar charge controllers, the Lynx Shunt and some other inverters.
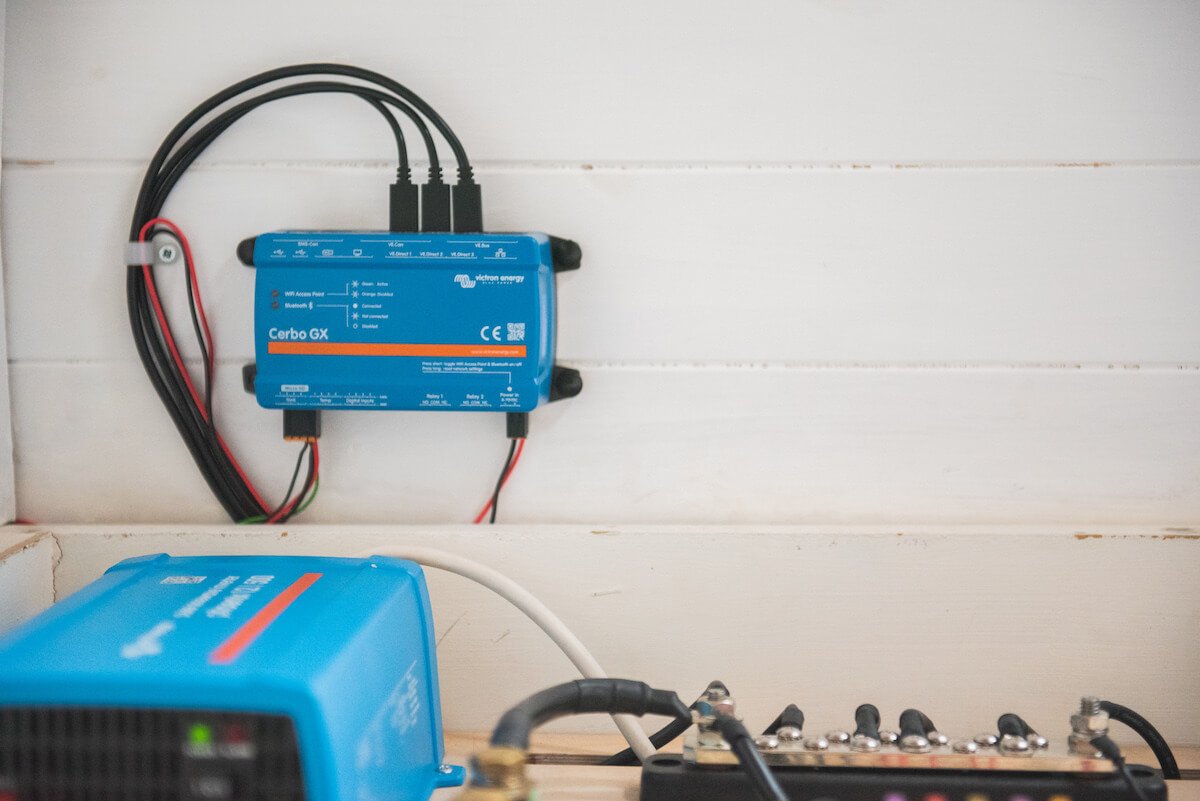
A Cerbo GX with three VE.Direct cables and two tank sensors connected
Sensor input ports
This set of ports accommodates input readings from various sensors.
- Tank level inputs (x4) for fresh water, grey water, gas, or fuel tanks.
- Temperature sensor inputs (x4) for monitoring the state of the leisure battery, starter battery, the fridge, or indoor and outdoor temperatures.
- Digital inputs (x4) from anything which produces an on/off (digital) signal, such as a door switch, bilge pump, or a burglar/smoke/CO2 alarm.
Relay ports
The Cerbo GX has two relays (a relay is just a switch which is triggered by a small current). A device or load which is wired into the relay port will be activated or deactivated by the relay and you can choose which input signal you want to trigger the relay. This means you can use the relays to control equipment or parts of your electrical system based on an automatic input signal.
If you’re feeling creative, there are endless opportunities to match up input signals to trigger certain outputs in your campervan. You could activate a charging source if the battery’s state of charge drops too low, or disconnect a certain load if the current rises too high. You could use a digital door-open sensor to trigger lights on your doorstep, a CO2 alarm could activate an extractor fan, a temperature sensor could turn on the heater power – the possibilities are endless.
These relays can also be activated manually and remotely, so if you’re out for a walk in winter, you could turn on the heater so the van is warm when you get back, or if you’ve left a dog in the van, you can keep a close eye on the campervan’s temperature and turn on a fan if it gets too hot.


The Cerbo GX has two relays, one of these is programmable (relay 1), and the other must be activated manually from the Relay menu in the Remote Console or VRM portal.
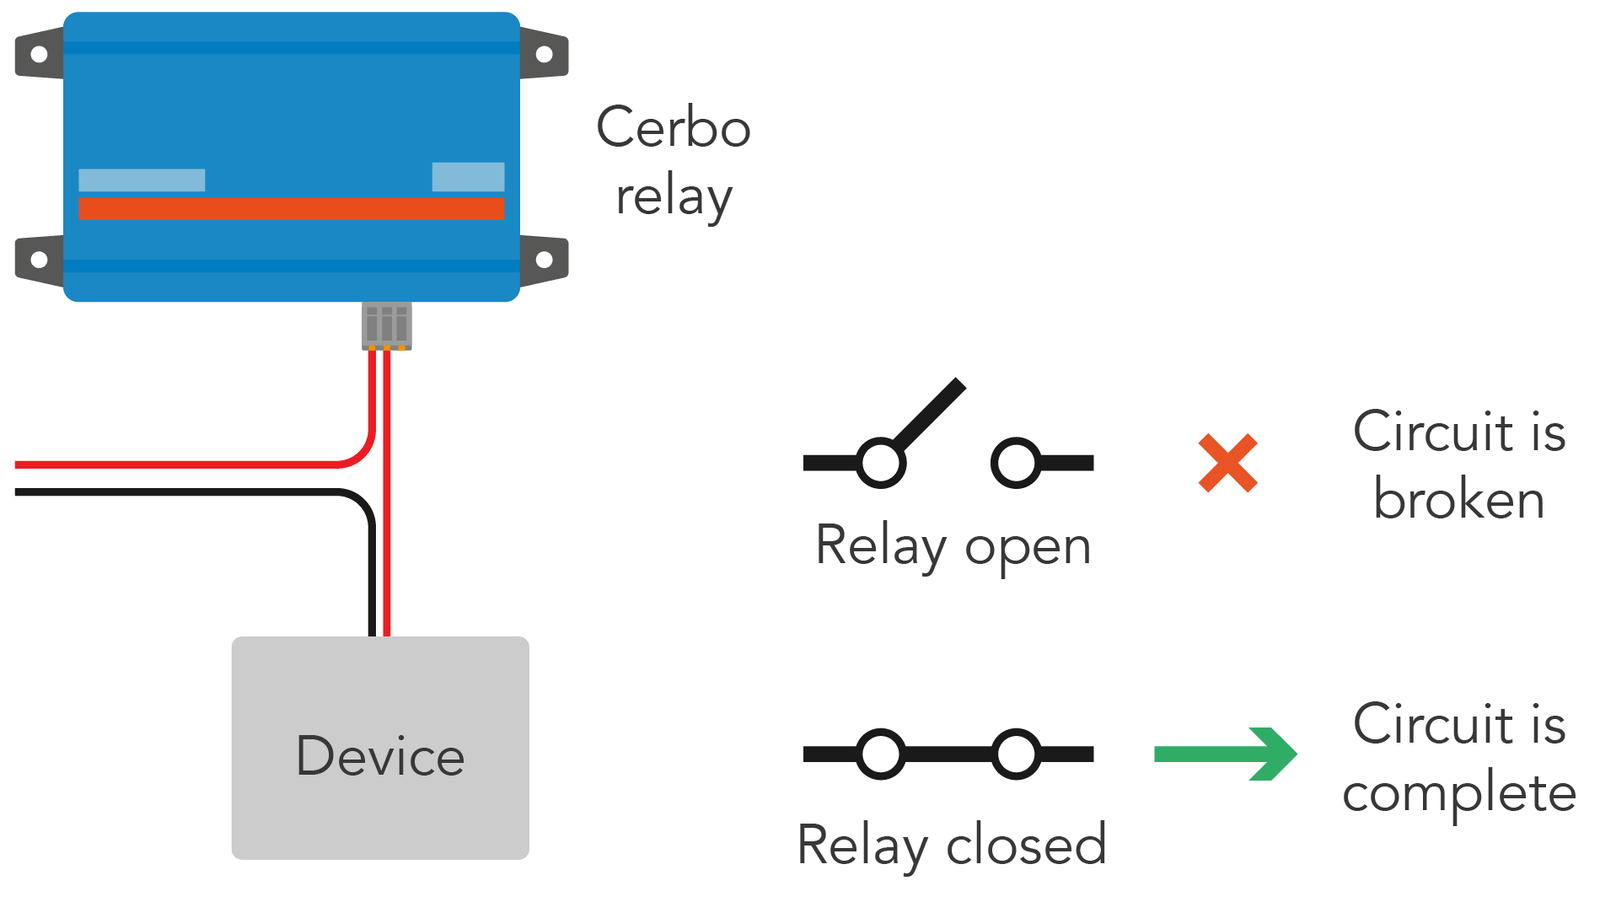
These relays work on a very simple principle – they act just like a switch – that is to say, they connect or disconnect the two wires which are secured into the ports. When the relay is closed, a connection is created, closing the circuit and allowing current to flow. When it is open, the wires are disconnected and current no longer flows.
NO or NC?
The relays in the Cerbo GX can be used in two different ways. You’ll need to choose whether you want the relay to be normally open or normally closed.
The relay has three ports, labelled NO (normally open), COMM (common), and NC (normally closed), but you’ll only need to use two of them. To choose your configuration, use either NO and COMM, or NC and COMM.
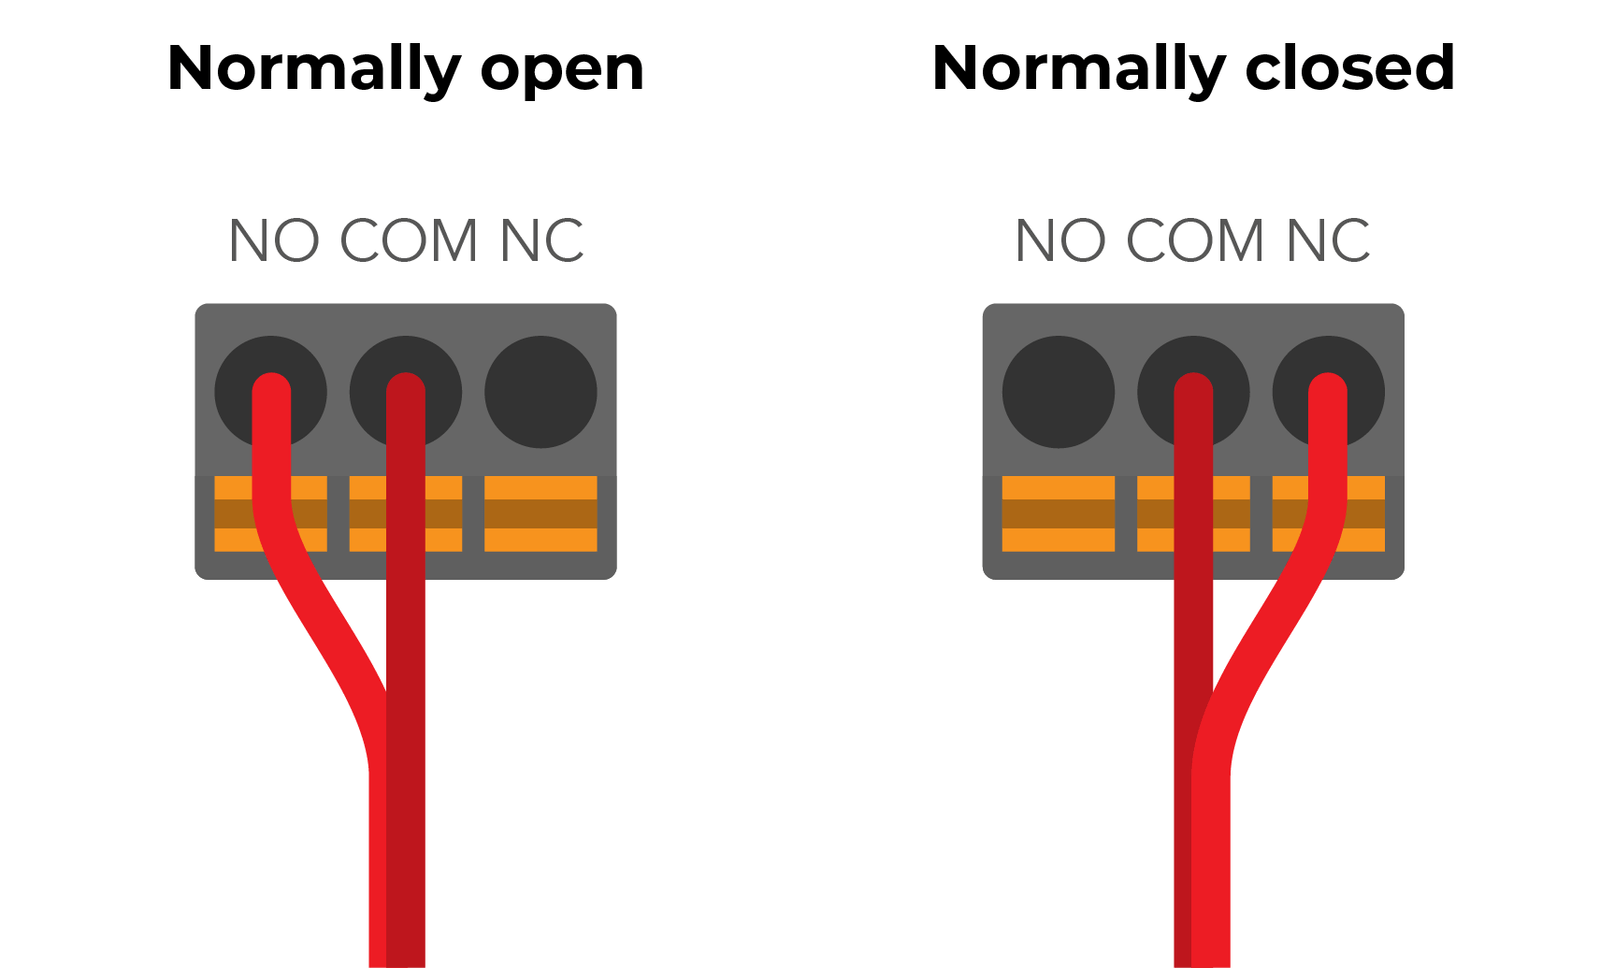
If you want your device to turn on when the relay is activated, choose the normally open configuration. If you want the device to be turned off when the relay is activated, choose the normally closed configuration.
Other ports
The Cerbo GX also has three USB ports which can be used for GPS modules, WiFi dongles, a keyboard, or the GX GSM which acts as modem, supplying the device with mobile internet.
Finally, there is an ethernet network port to connect to an internet router, a SIM card port for firmware updates and data logging and a HDMI port which is used for the GX Touch screen connection.

Monitoring tank level with the Cerbo GX
If you want to use your Victron Cerbo to monitor more than just your other Victron products, you can purchase a number of additional components. One example of this is a water tank level sensor which can be installed in any water tank to accurately monitor water level.

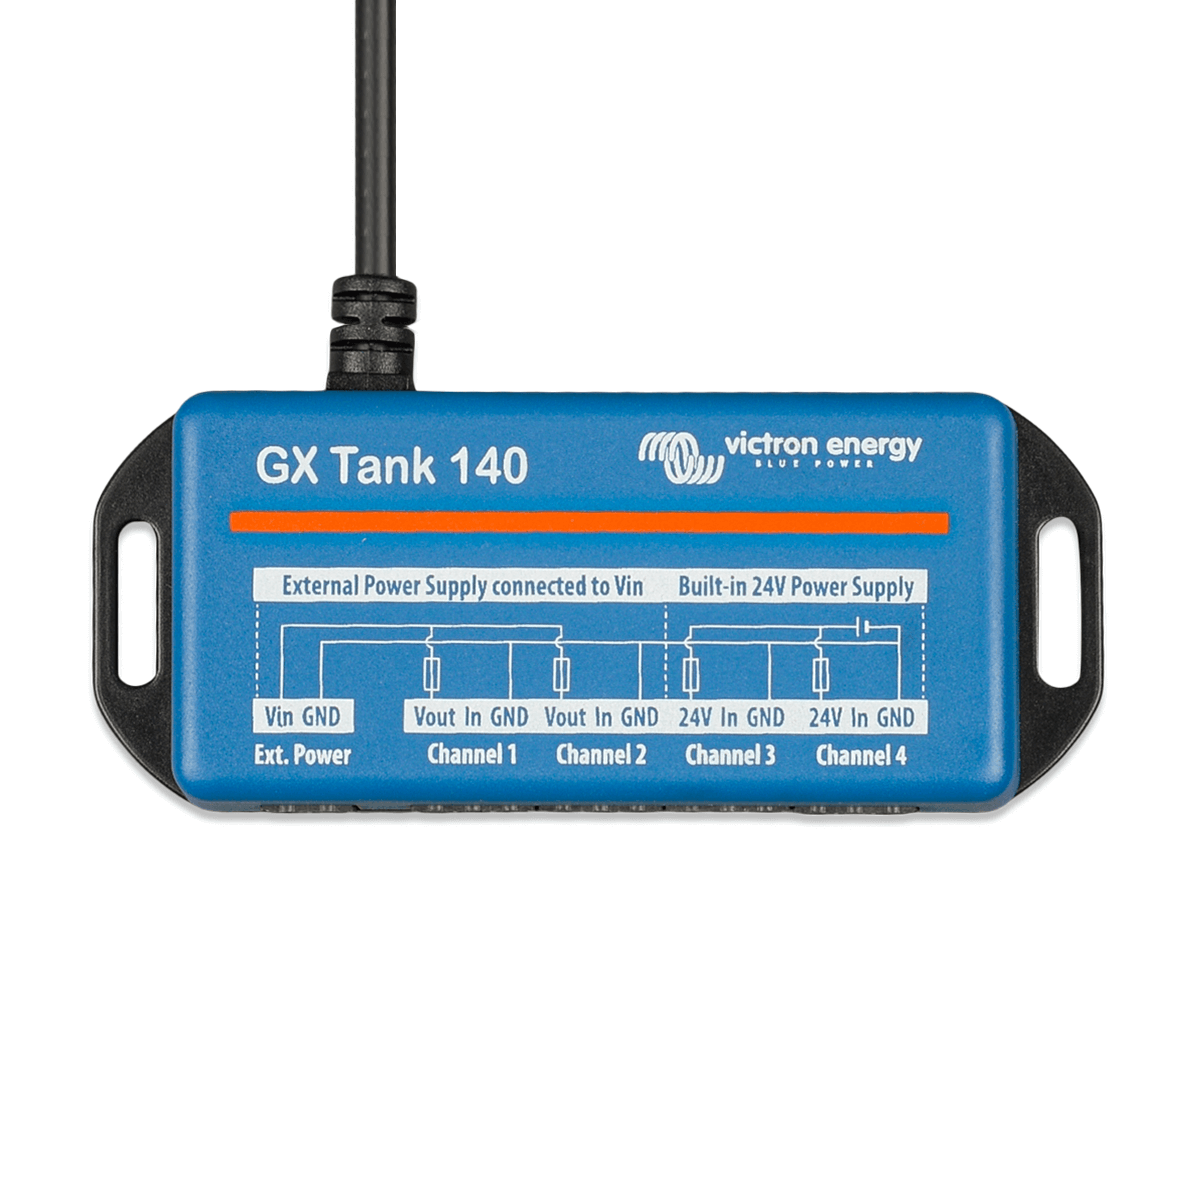
The Cerbo GX has four tank level ports to connect resistive tank level senders. If you have tank level sender which outputs a voltage, you can connect a GX Tank 140 to your Cerbo as these are compatible with voltage output senders.
The four ports allow you to monitor multiple tanks such as fresh water, grey water, and even toilets, fridges and additional diesel tanks for diesel heaters.
If you have a resistive sensor for your LPG tank, this can also be connected to the Cerbo GX. This will allow you to accurately monitor exactly how much gas is left in your LPG tank.
We’ll cover exactly how to install water level senders and LPG gas sensors shortly.

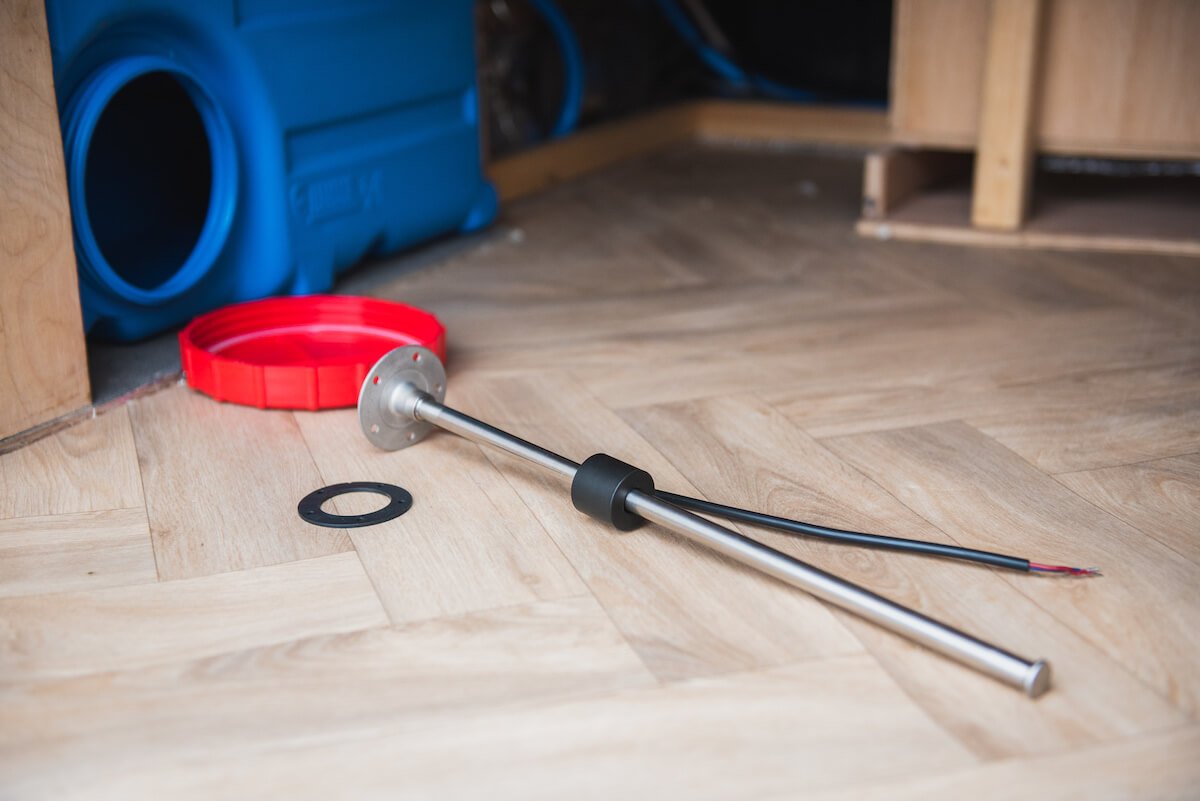
Preparing to install a resistive tank sender into a water tank
Monitoring temperature and humidity with the Cerbo GX
If you’d like to take your system monitoring to the next level, you can purchase a RuuviTag. These allow you to monitor temperature, humidity and air pressure inside and outside your campervan, boat or house. You can even pop one in your fridge to make sure your food is staying cool!
There are two main types of RuuviTag available:
- RuuviTag – 4 in 1: Temperature, Humidity, Motion and Air Pressure
- RuuviTag Pro – 3 in 1: Temperature, Humidity and Motion


Ruuvi typically recommend that the standard RuuviTag is used indoors, and the RuuviTag Pro is used outdoors. The RuuviTag Pro 3 in 1 is IP67 certified. This means it can stay wet for up to 30 minutes. Therefore, this is perfect for mounting on the underside of your van, or even inside a wing mirror. Just ensure it won’t be wet for more than 30 minutes, and the Bluetooth can be picked up from wherever your Cerbo is mounted.
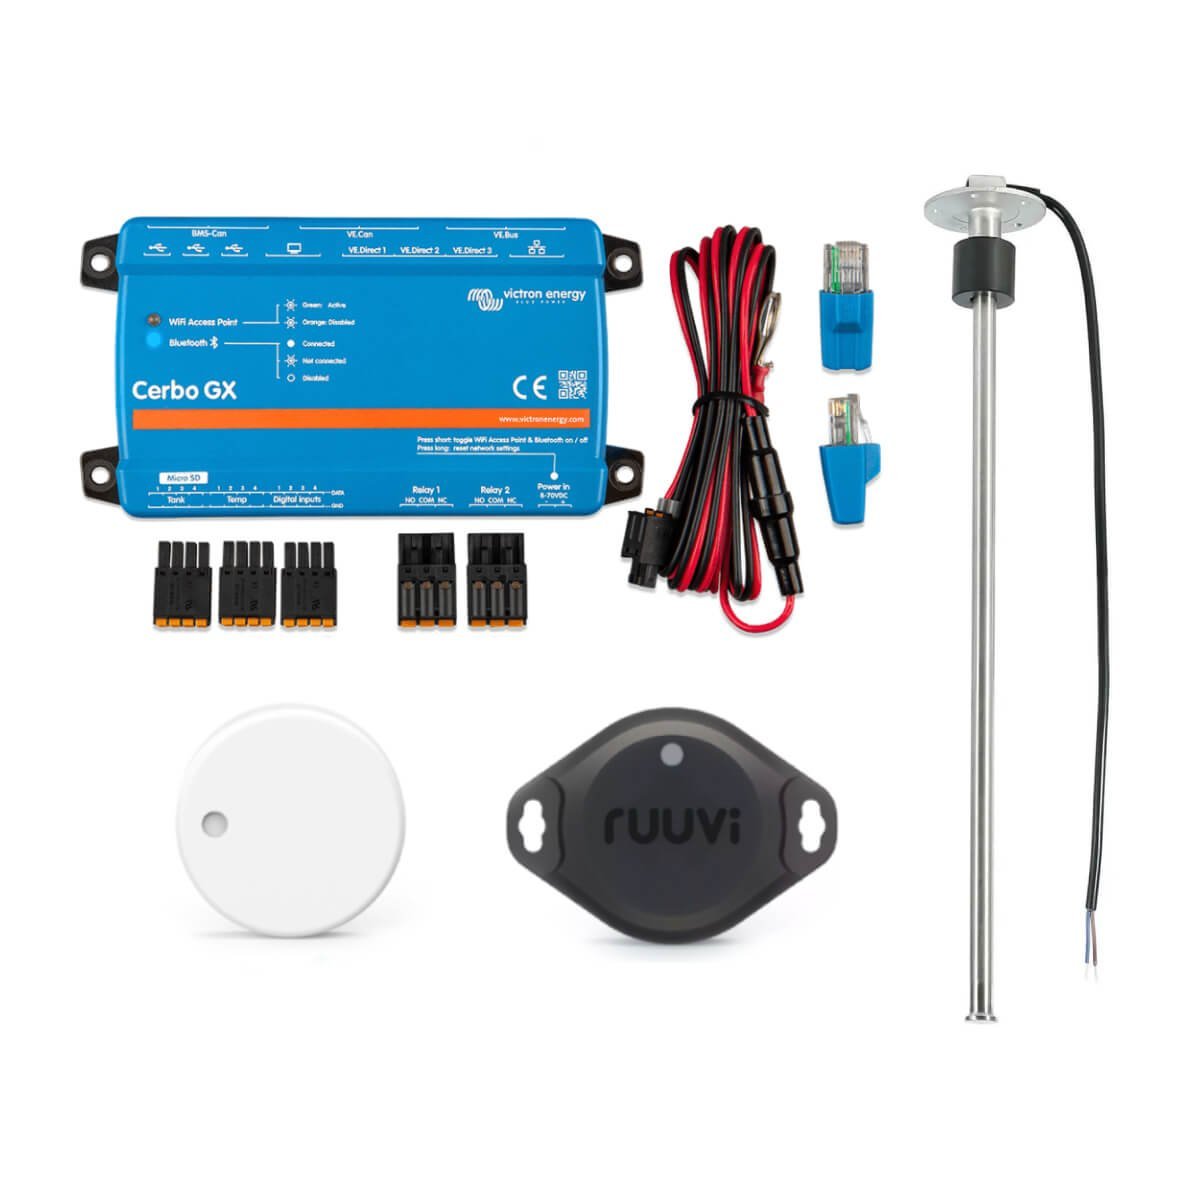
If you’d like to incorporate full system monitoring into your Cerbo setup, we have a Cerbo monitoring bundle available, which includes both RuuviTags, and water level sender and the option to include one of the GX touch screens.
How do I operate the Cerbo GX?
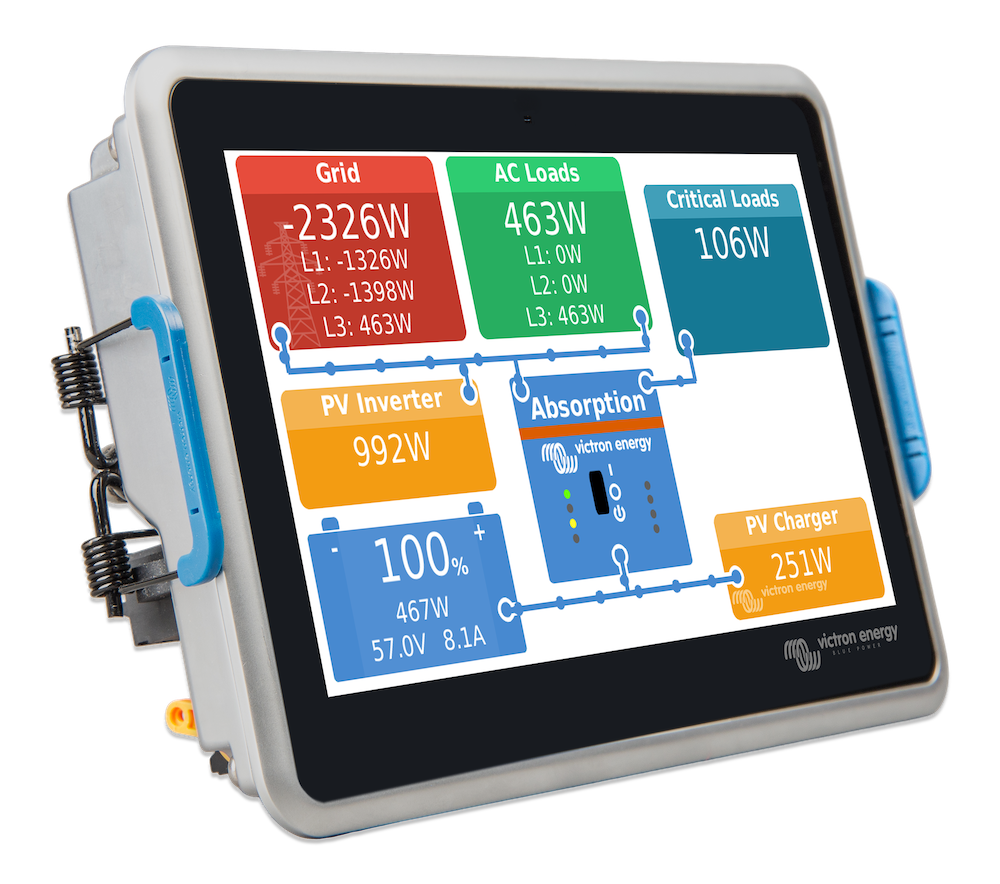
The GX touch screen
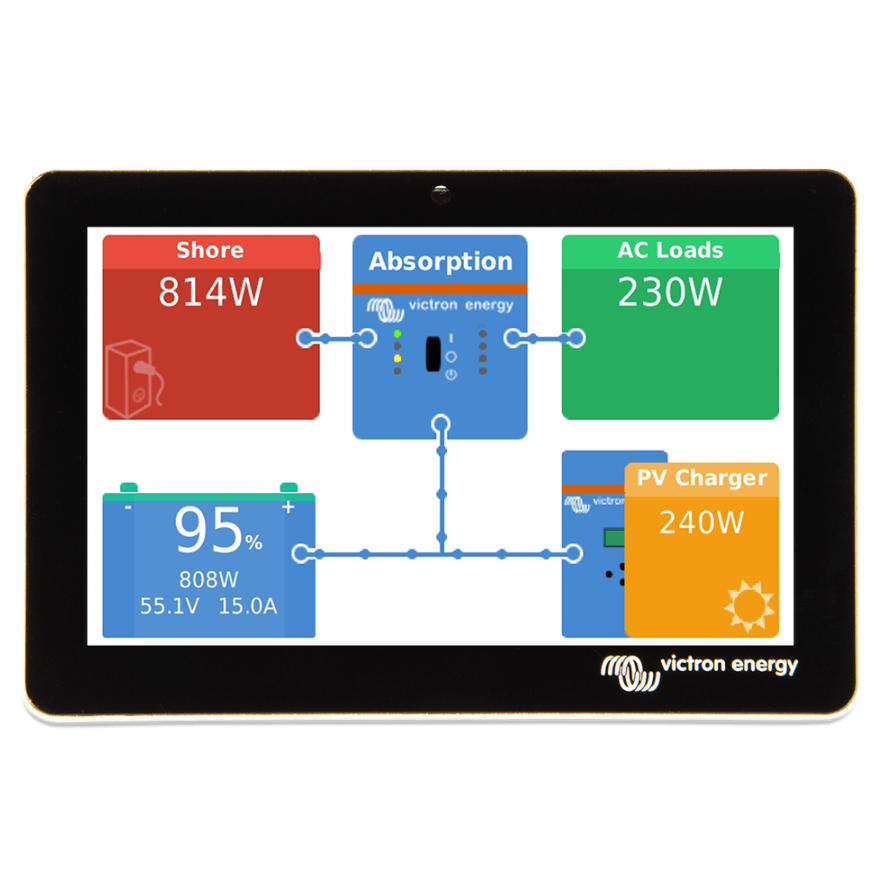
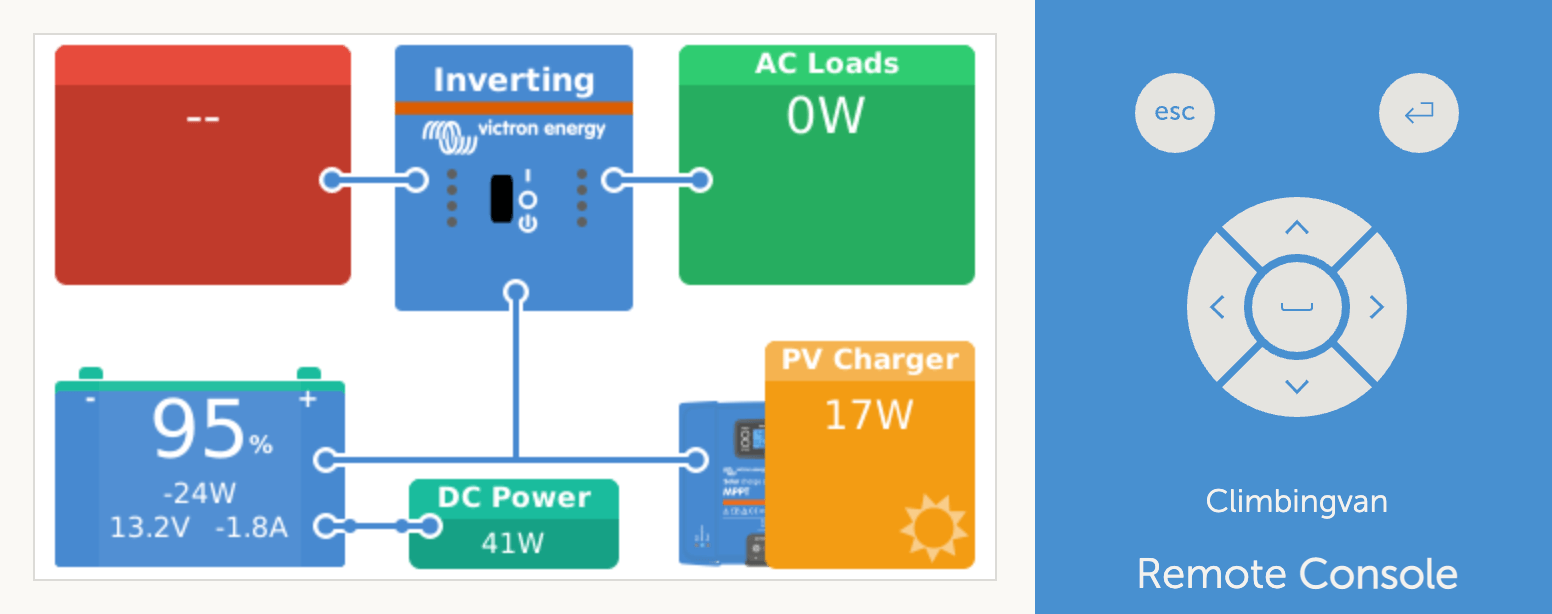
The Cerbo GX can be accessed and controlled directly from a touchscreen called the GX Touch. The touchscreen illustrates how the power is moving between systems, from charging sources, to the battery, and then to your AC and DC loads. It also provides access to all the settings for the Cerbo GX.
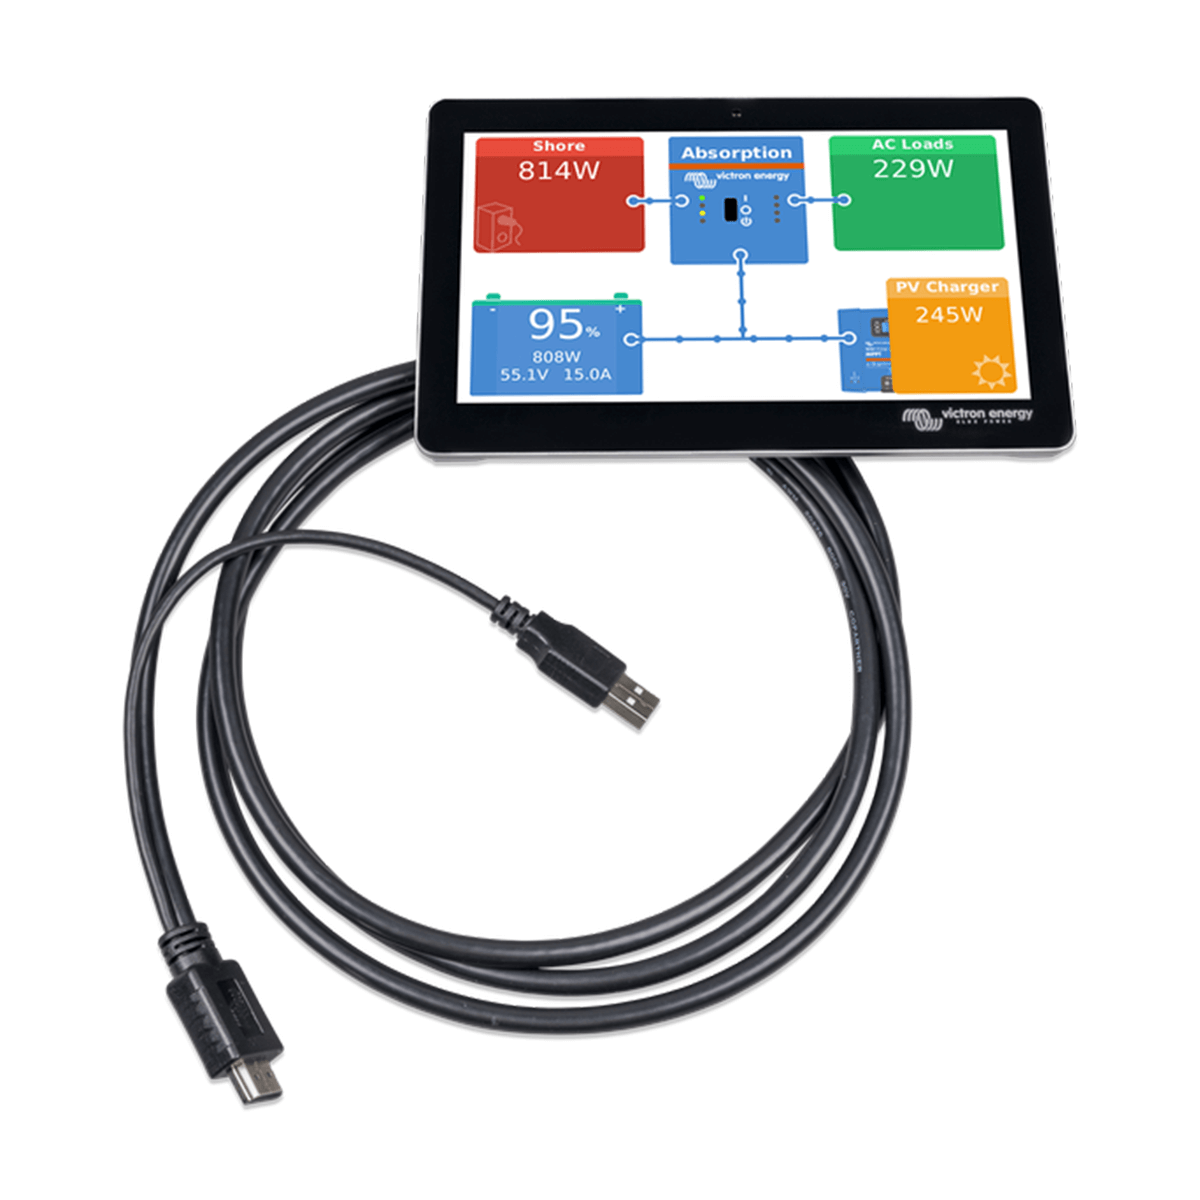
The GX Touch comes in either 5” or 7” and is easy to install – the backplate can be bolted or screwed to the wall and then the screen just clicks into place.
VictronConnect app and VRM Portal
In addition to the touch screen, you can also access your system through the VictronConnect app or the Victron Remote Management online portal. As long as the Cerbo GX has an internet connection, the VRM Portal allows you to monitor your electrical system wherever you are in the world, even when you’re out and about or away from your van.
You can wirelessly connect the Cerbo GX to an internet router (using the built-in WiFi) or you can use an ethernet cable. If you have a campervan WiFi dongle which picks up to 3G, 4G or 5G signal, you can use this as your router. If you have a Starlink, you can connect your Cerbo to this as the internet connection. Alternatively, you can use Victron’s self-contained modem, called the GX GSM, which picks up mobile internet and plugs directly into the Cerbo GX.
If you don’t have a campervan router or the GX GSM, you can still access the Cerbo GX from your phone through the VictronConnect app, as long as you’re within range to connect via Bluetooth or WiFi.
Once you’re connected through either method, you’ll have access to the Remote Console which looks just like the console on the GX Touch screen. From the VRM portal you can even set-up email alarms so you can be alerted of any unusual or unsafe parameters when you’re away from your van.
Remote help
If you decide to include a Cerbo GX in your system, we’d highly recommend connecting it to the internet for remote management. Once your system is online, with your permission, we can access your system through the portal and help you diagnose any problems you’re having!
Other companies will provide this service for a fee of around £200, but if you purchase your system through Nohma, we’ll help you out for free!
Connecting your devices to the Cerbo GX
The Cerbo GX connects to other Victron equipment by either a VE.Direct or VE.Bus cable. This means that you don’t need to include smart Bluetooth connected inverters, inverter/chargers or charge controllers in your system design, saving you this additional expense.
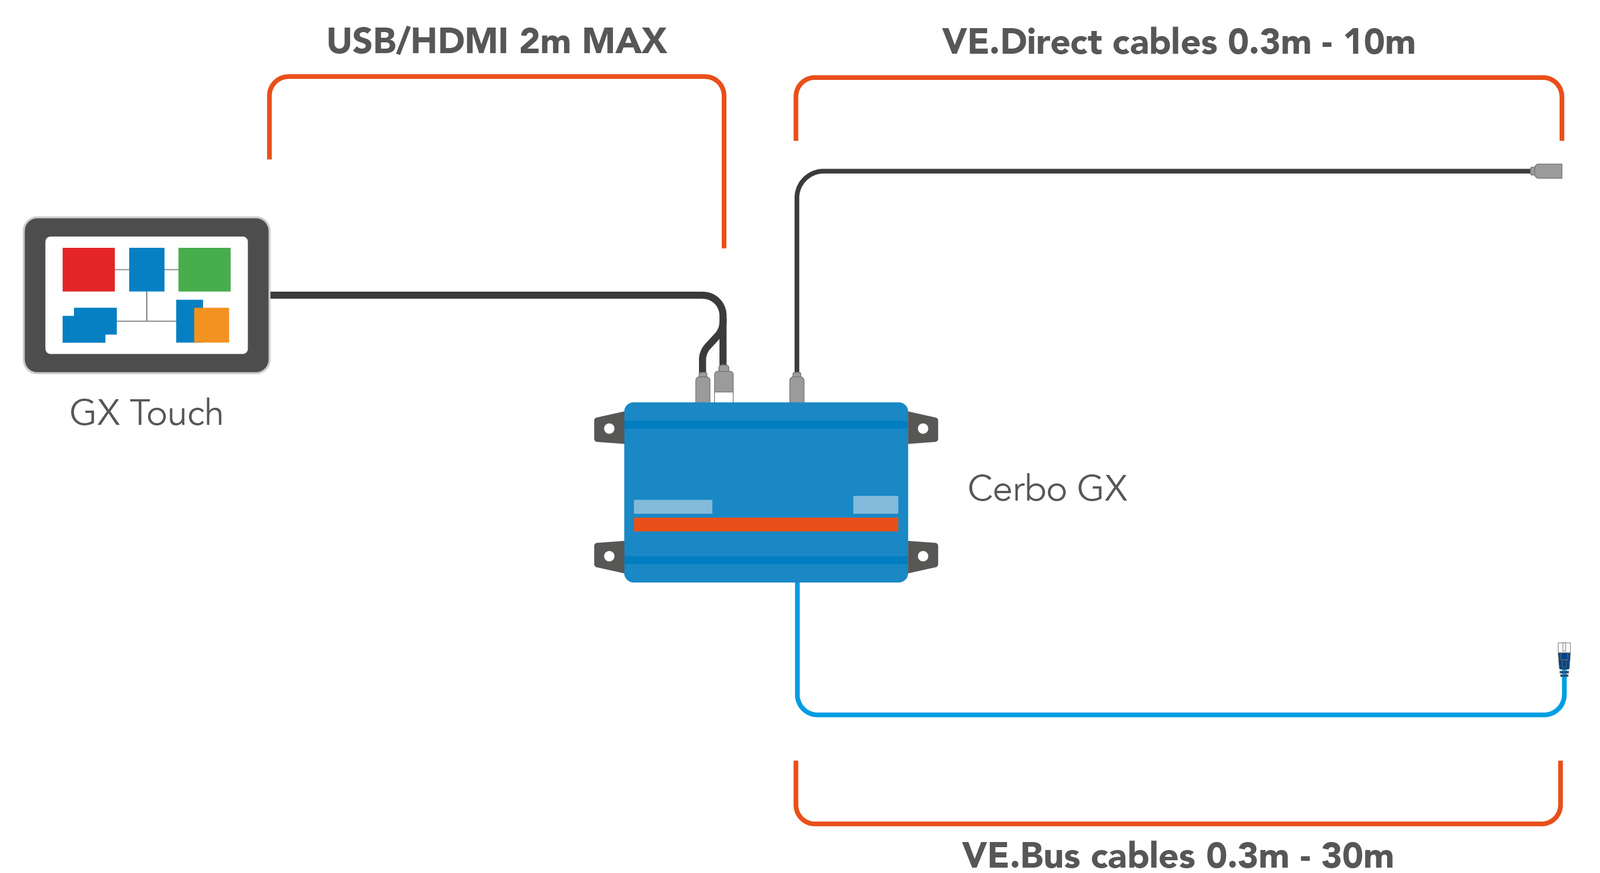
The VE.Direct cable is available in lengths of 0.3m, 0.9m, 1.8m, 3m, 5m and 10m.
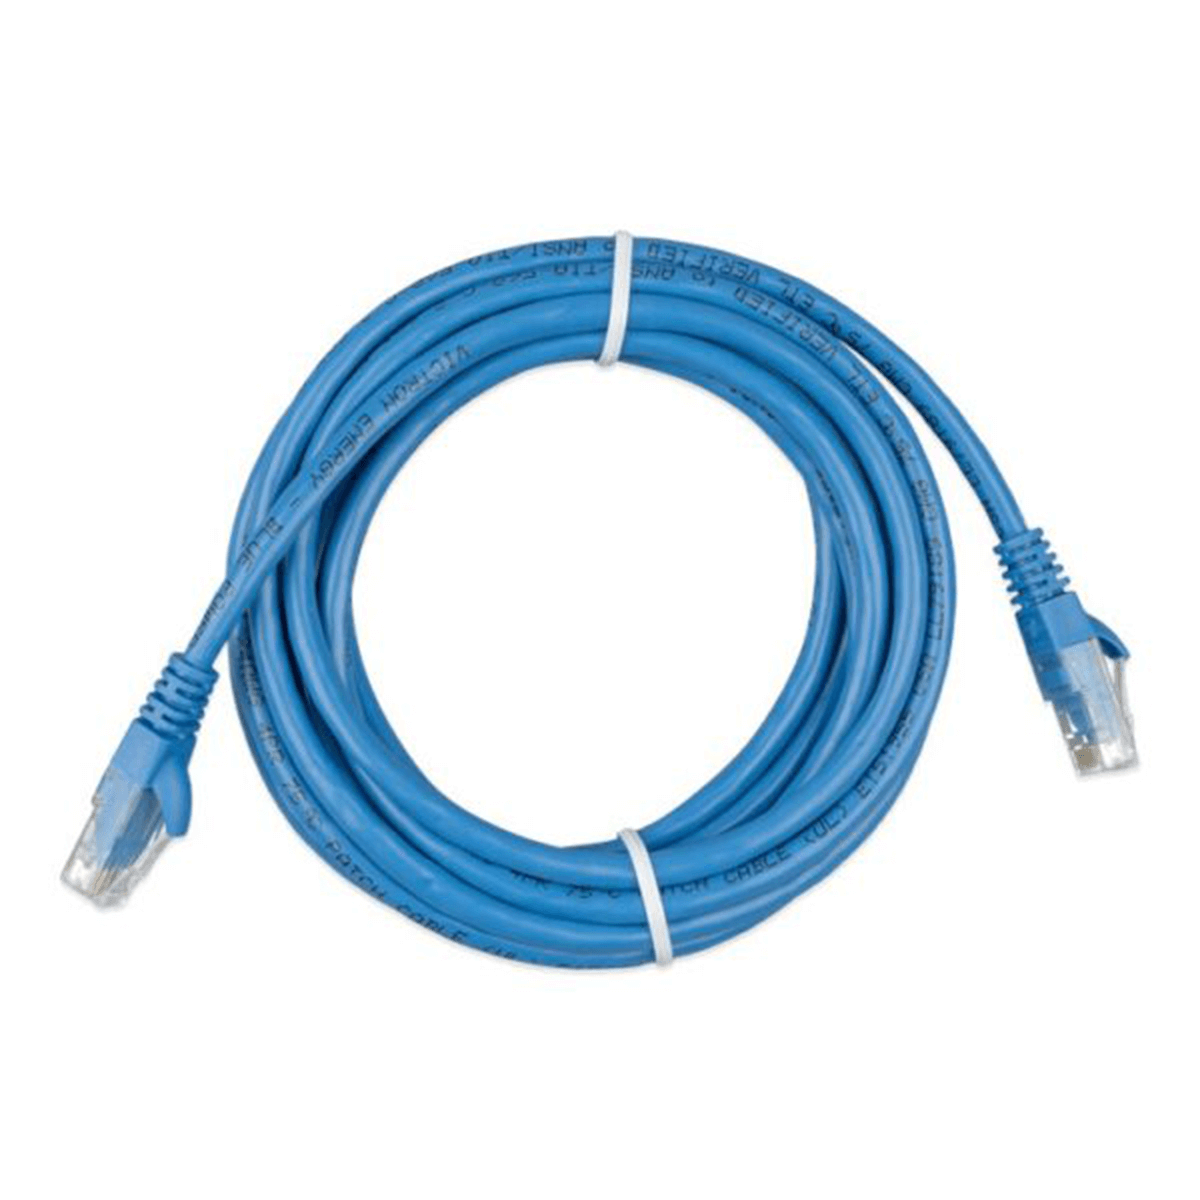
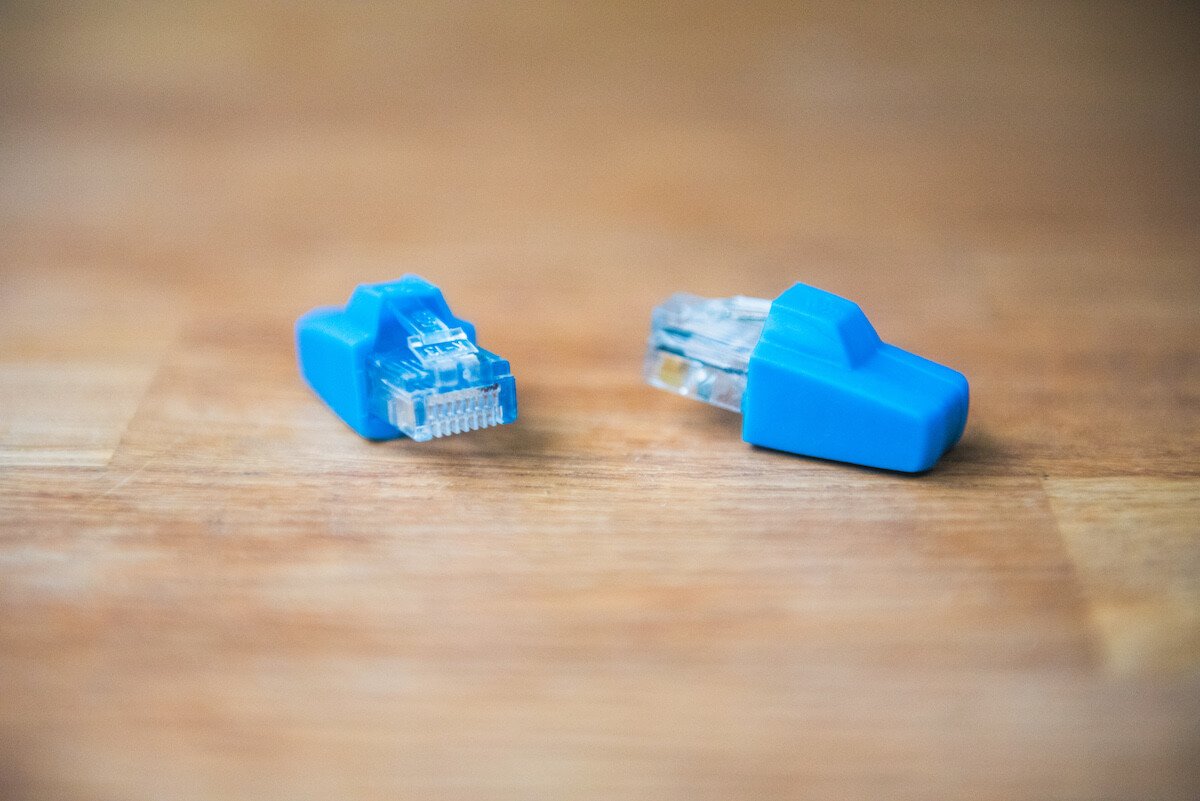
The VE.Bus (RJ45) cable is available in lengths of 0.3m, 0.9m, 1.8m, 3m, 5m, 10m, 15m, 20m, 30m.
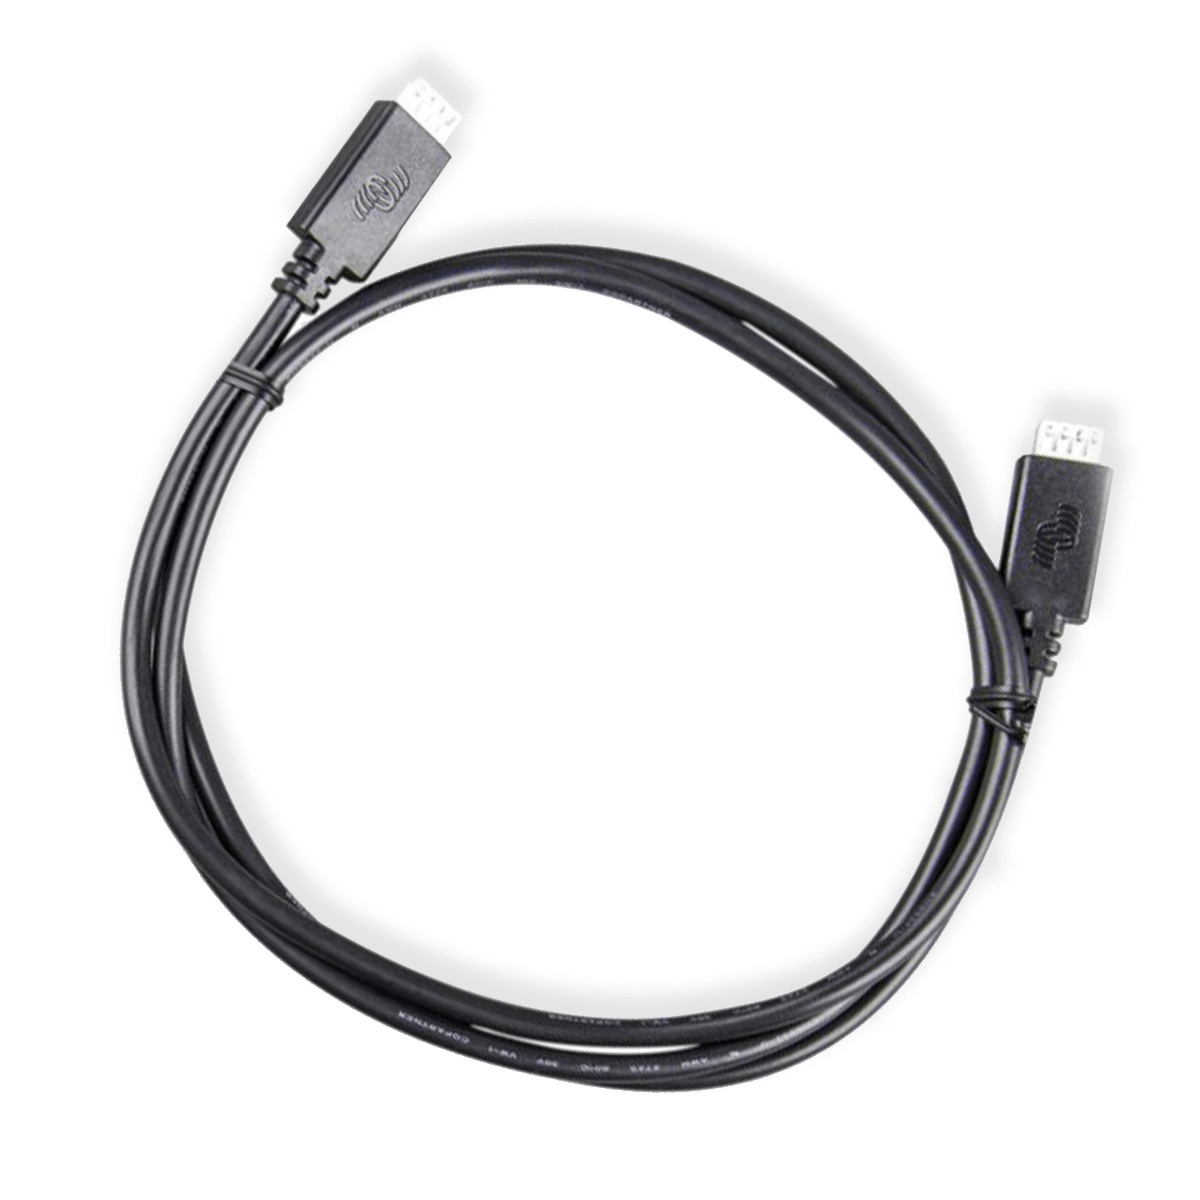
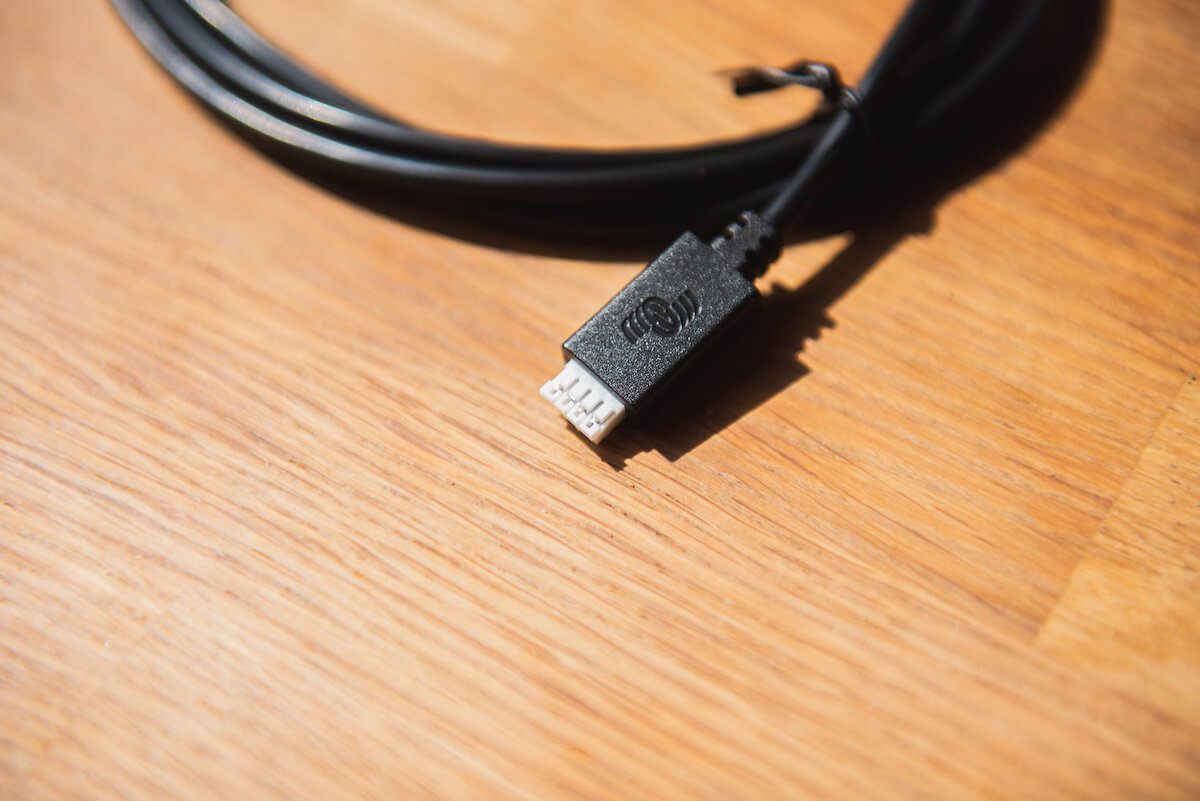
VE.Direct cable to connect VE.Direct devices to the Cerbo GX
An important consideration when deciding where to put your GX Touch is that the USB/HDMI cable is only 2m long and cannot be extended. Therefore the GX Touch and Cerbo GX will need to be positioned within 2 meters of one another. This may mean that the Cerbo might not be able to live next to the rest of your electrical system. However, all of the other cables used to connect to the Cerbo can be much longer so you can still position the screen and Cerbo further away from your electrical system if required.
How much does the Victron Cerbo GX cost?
The Victron Cerbo GX currently costs around £250. If you aren’t bothered about an external screen, just monitoring the Cerbo from your phone makes the system more cost effective.
As with most elements of an electrical system, changing one thing usually impacts another. Thankfully, in the case of the Cerbo GX, you might actually reduce some costs.
For example, you may be planning a system which includes the following elements:
- BMV battery monitor
- SmartSolar MPPT charge controller
- VE.Bus Smart Dongle for your inverter/charger
If you go with the Cerbo GX, you’ll be able to swap out the components above for something a bit cheaper:
- BMV battery monitor → Smart Shunt = £70 saving
- SmartSolar → BlueSolar = ~£30 saving
- VE.Bus smart dongle → No dongle needed = £85 saving
Saving = £185
You will need to purchase 2x VE.Direct cables (£33 for 2x 3m)and 1x VE.Bus cable (£12 for 1x 3m) to connect your SmartShunt, charge controller and MultiPlus to your Cerbo. So, the total saving would work out at £140.
Therefore, although the Cerbo itself costs around £250, the savings made on other components brings the total cost down to around £110. For an extra £110, you’ll be adding a whole lot more functionality to your camper’s electrical system.
Do I need the Cerbo GX?
Still not sure if you need the Cerbo GX in your campervan? It really depends on the rest of your system, how many Victron devices you have, and what level of monitoring you want for your electrical system.
If your system is pretty simple, with only a leisure battery, electric hook up and a handful of DC loads, the Cerbo GX may be overkill. However, if you want to maximise the lifespan and efficiency of your Victron products, then the Cerbo GX will definitely help you get the most out of your set-up.
If you utilise all of the Cerbo features available, such as connecting water and LPG tanks as well as your electrical components, you will have a constant awareness of what’s happening in your system and you’ll be able to fine tune it from a single console, from anywhere in the world.
The Cerbo GX is little but mighty!
If you want to dig even deeper into the Cerbo GX before buying, have a read through the manual which goes into detail about all of its features and functions.
If you decide against the Cerbo GX, a battery monitor would be a slightly cheaper alternative. We can offer some advice on how to choose the right battery monitor.
How to install the Cerbo GX
First, connect your Cerbo to a power supply via the Power in V+ connector. This can be done using the supplied power cables which have an inline fuse. Alternatively, connect it to your 12V fuse board using a blade fuse of the same size (3A). We found the supplied inline fuse was very fragile and easy to break, so we opted to connect via the fuse board.
Connecting to the Cerbo via Bluetooth
Once the Cerbo has power, you can connect to it via the Victron Connect app on your phone. To connect via Bluetooth:
- Download the VictronConnect app.
- Turn your phone’s Bluetooth on.
- Make sure you’re within 10 metres on the Cerbo GX.
- Open the app – the Cerbo will be automatically detected.
- Enter the default pin (000000).
- At this point you will be prompted to change the pin. Make sure you make a note of this so you don’t forget it!
- From the Cerbo GX page, you’ll be able to access the Remote Console, the VRM online portal, and adjust settings.
Connecting the screen
If you have chosen to install a 5″ or 7″ touch screen with your Cerbo, you can connect it at this point. Both screens connect via a HDMI and a USB connection.
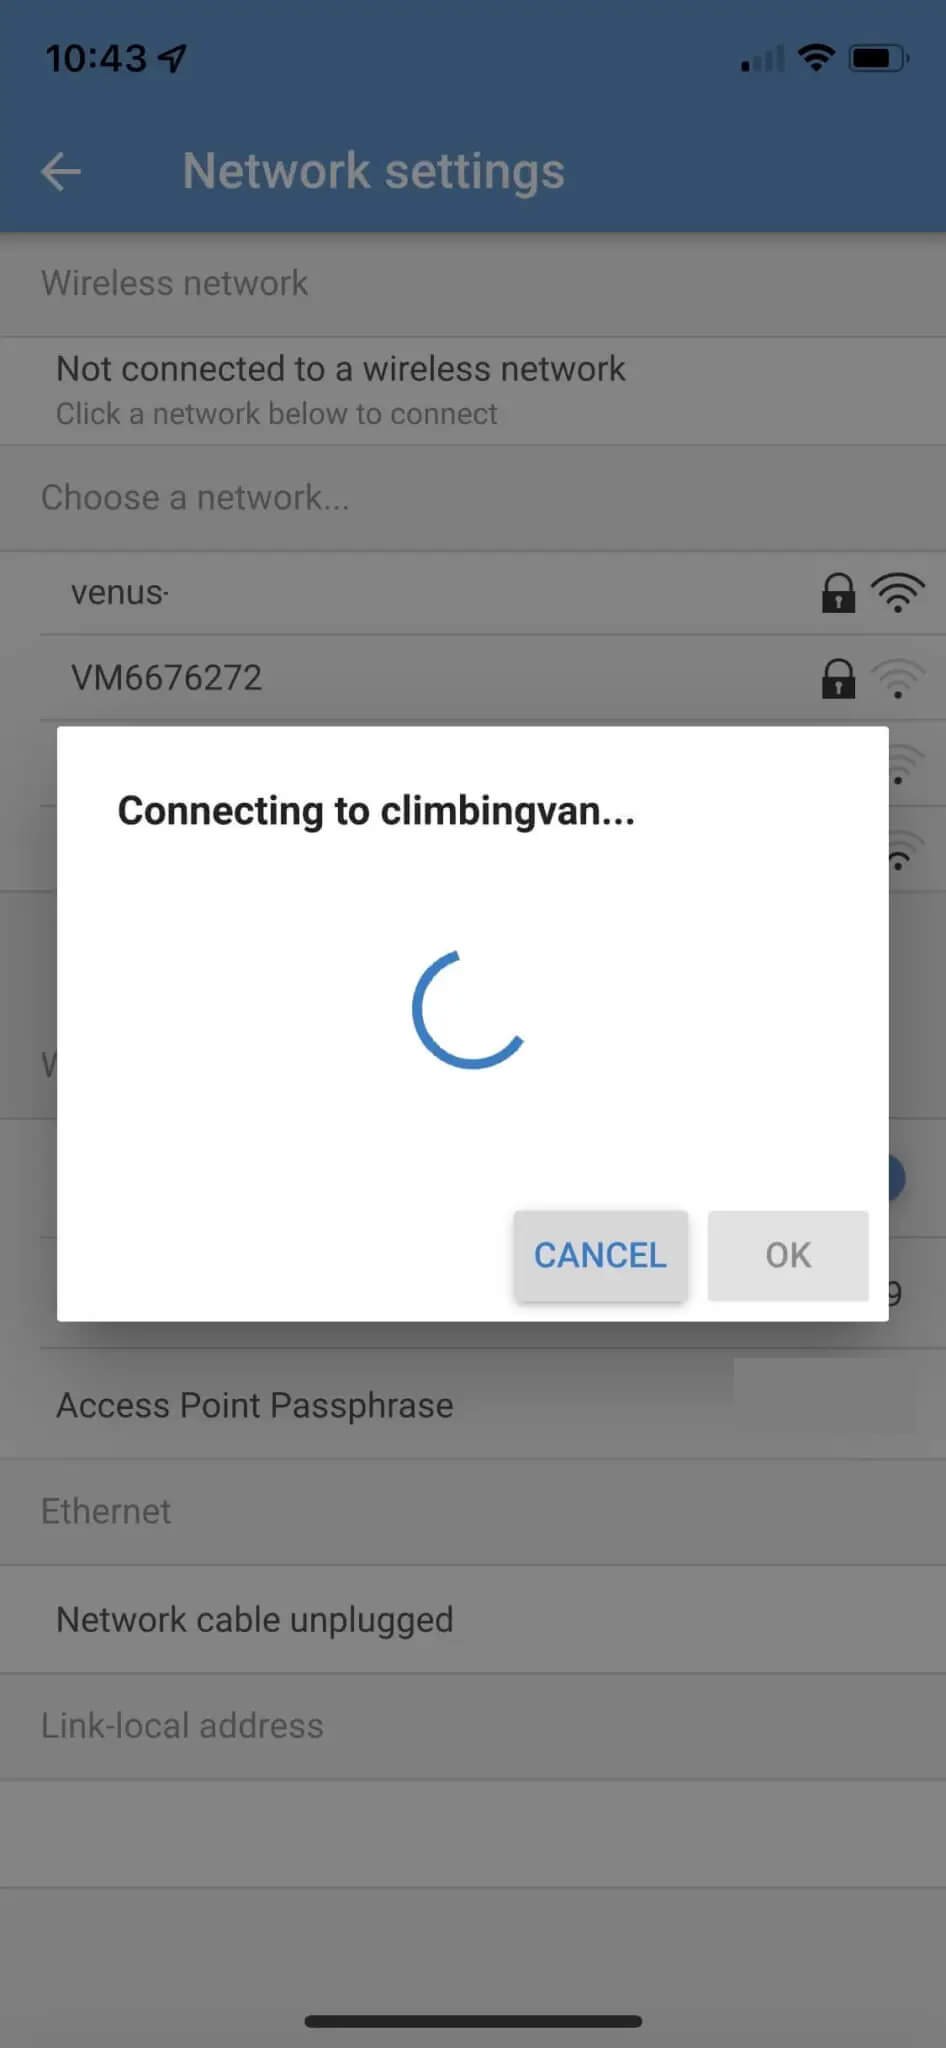
Connecting the Cerbo to WiFi
Once you’ve either connected via Bluetooth or plugged in the screen, you can connect your Cerbo to a WiFi network. Click Settings > Network and then select your WiFi network from the list.

Connecting Victron devices
To connect your Victron components to your Cerbo GX, simply plug a VE.Direct or VE.Bus cable into the port on the component and the port on the Cerbo. The Cerbo GX has:
- 3x VE.Direct ports
- 2x VE.Bus ports
- 2x VE.Can ports
- 3x USB ports
- 1x HDMI port
VE.Direct devices
To connect your VE.Direct devices to the Cerbo (e.g. smaller charge controllers, smaller inverters, SmartShunt), simply connect the VE.Direct cable to the Cerbo and the device.
If you want to connect more than three VE.Direct devices to your Cerbo, you can purchase a VE.Direct to USB interface cable. This allows you to connect the device via one of the USB ports.
If you need to connect more devices again, you can purchase a USB hub to further increase the number of USB ports available. Please note: you cannot connect more than 15 VE.Direct devices to the Cerbo GX.
VE.Bus devices
VE.Bus devices are connected in the same way as VE.Direct devices, but with an RJ45 cable rather than a VE.Direct cable. Simply connect this to the Cerbo and your VE.Bus device (e.g. MultiPlus, Quattro).
VE.Can devices
To connect a VE.Can device, connect an RJ45 cable to both the Cerbo and the device. You will need to terminate the connection at both ends using a VE.Can terminator (2 are provided with the Cerbo GX).
VE.Can terminators provided with the Cerbo GX
If you want to install multiple VE.Can devices, these can be connected together using RJ45 cables. Then, connect the final device in the chain to the Cerbo.
After a couple of minutes, the connected devices should appear on the screen and/or the VRM Portal.
How to connect tank level monitors
Water level senders
The tank level ports in the Cerbo GX work by measuring resistance, so you’ll need to use a resistive tank sender. The tank level port can be configured to work with either European (0-180 Ohm) or US tank senders (240-30 Ohm). If your tank sender has a slightly different resistance (e.g. 0-190 Ohm or 240-33 Ohm), you can change the exact values within the settings.
Victron doesn’t supply tank senders, so you’ll need to make sure the one you choose is compatible. The full list of compatibility requirements for the tank sender can be found in the Cerbo GX manual. The tank level sender available on our website is a resistive sender compatible with the Cerbo GX.
Once you have installed your tank level sender, simply connect both cables to the sensor to one of the inputs on the Cerbo GX labelled ‘Tank’. It doesn’t matter which way around the cables are connected, just ensure they’re both in the same port. There are four ports, and each is numbered.


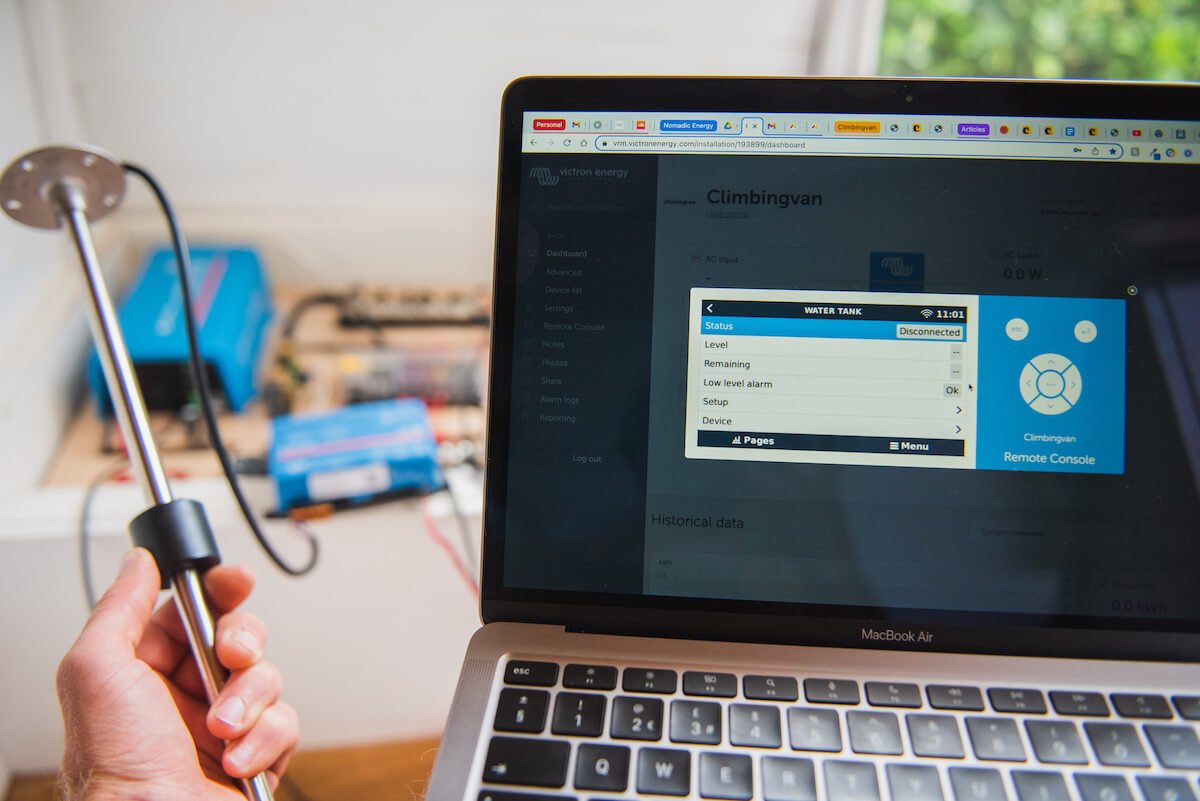
It's a good idea to test the tank sender works before drilling holes in your water tank!
Gas level senders
If you have a resistive gas level sender, such as on the GASIT LPG tanks, this can be connected to your Cerbo GX. These senders have three cables: red, black and green. The red cable provides power to any screens usually used to provide a reading, so this doesn’t need to be used. Just connect the black and green cable to one of the Cerbo tank inputs.
IMPORTANT: Ensure you don’t connect any voltage outputting cables to the Cerbo resistive sender inputs. If you do, this will break the analogue tank inputs on the Cerbo and they will no longer work.
Next, navigate to Settings > I/O > Analogue inputs. Turn on each tank level input that you have connected a tank sender to.
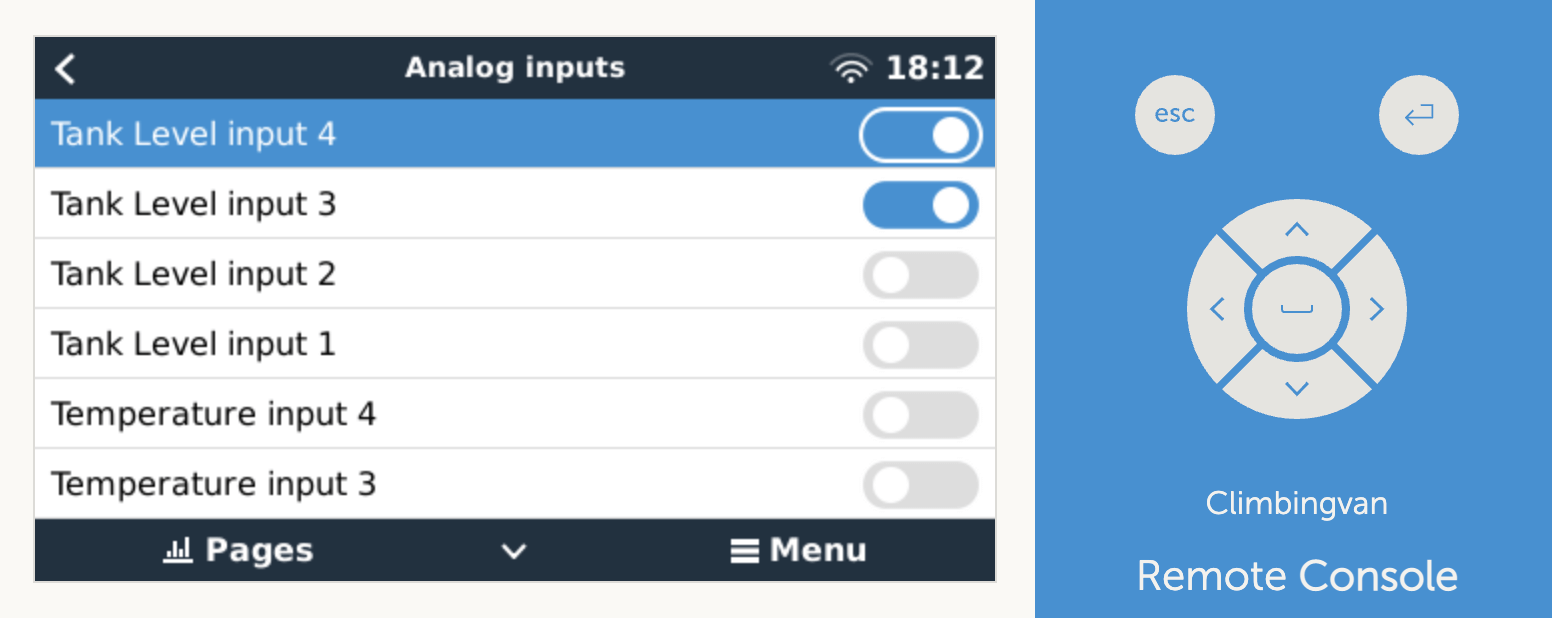
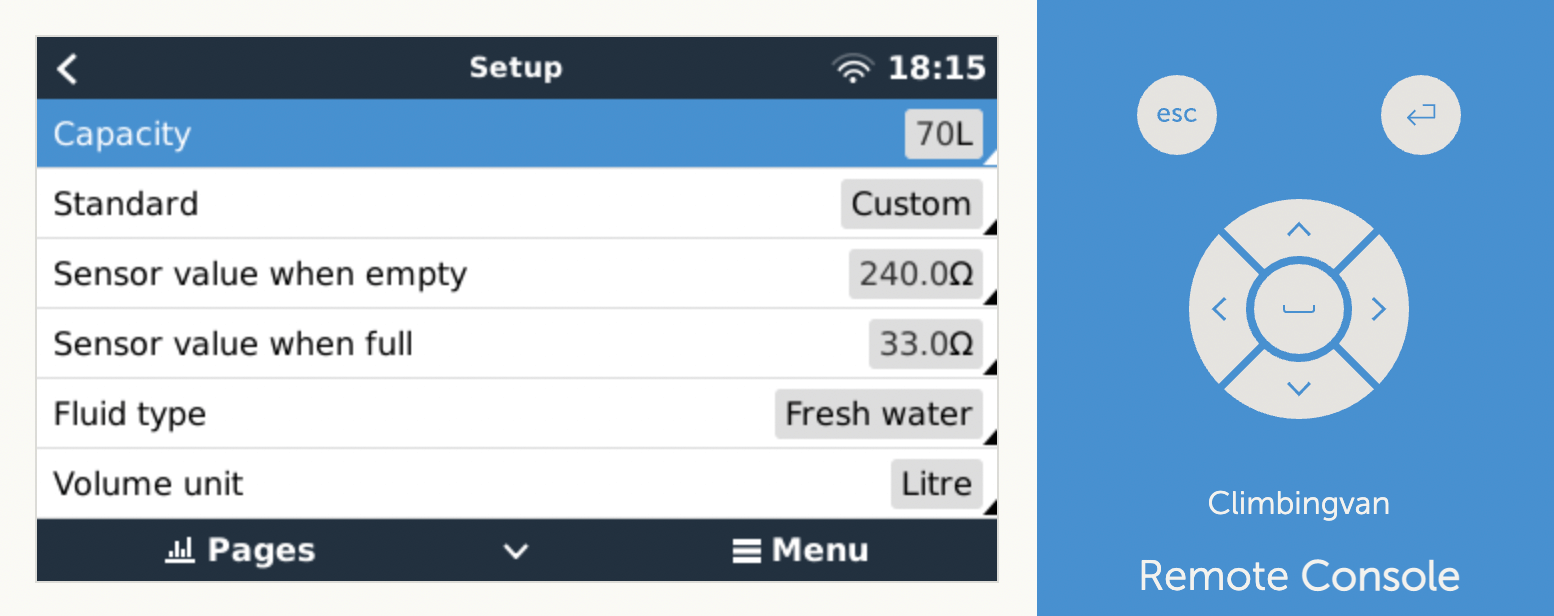
Once you’ve done this, navigate back to the ‘Device list’ and click on the tank sender. Under ‘Setup’ you can define the unit of measurement for the tank – litres (L) or cubic metres (m3). Set the size of your tank, and adjust the minimum and maximum resistance values. You can also define the tank fluid type.
How to connect RuuviTags
Connecting RuuviTags to your Cerbo GX is extremely simple. RuuviTags are Bluetooth enabled, so they can be connected wirelessly. First, update the firmware on your Cerbo. This will enable the ‘Bluetooth sensors’ option, which is only available with firmware v2.89 and above.
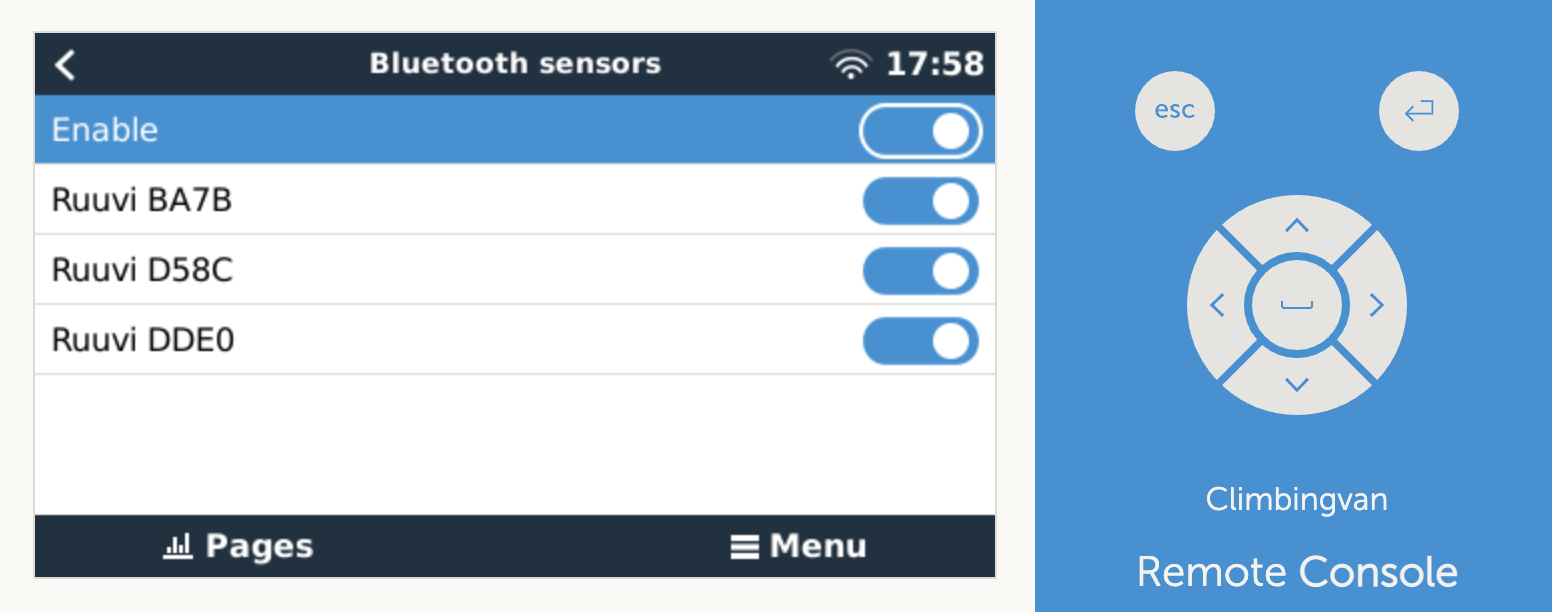
Once the firmware update has been installed, navigate to Settings > I/O > Bluetooth Sensors. Turn on the ‘enable’ option. At this point, any RuuviTags in the vicinity should appear below. Turn on each one. Next, navigate back to your ‘Device list’ and the sensors should have appeared.
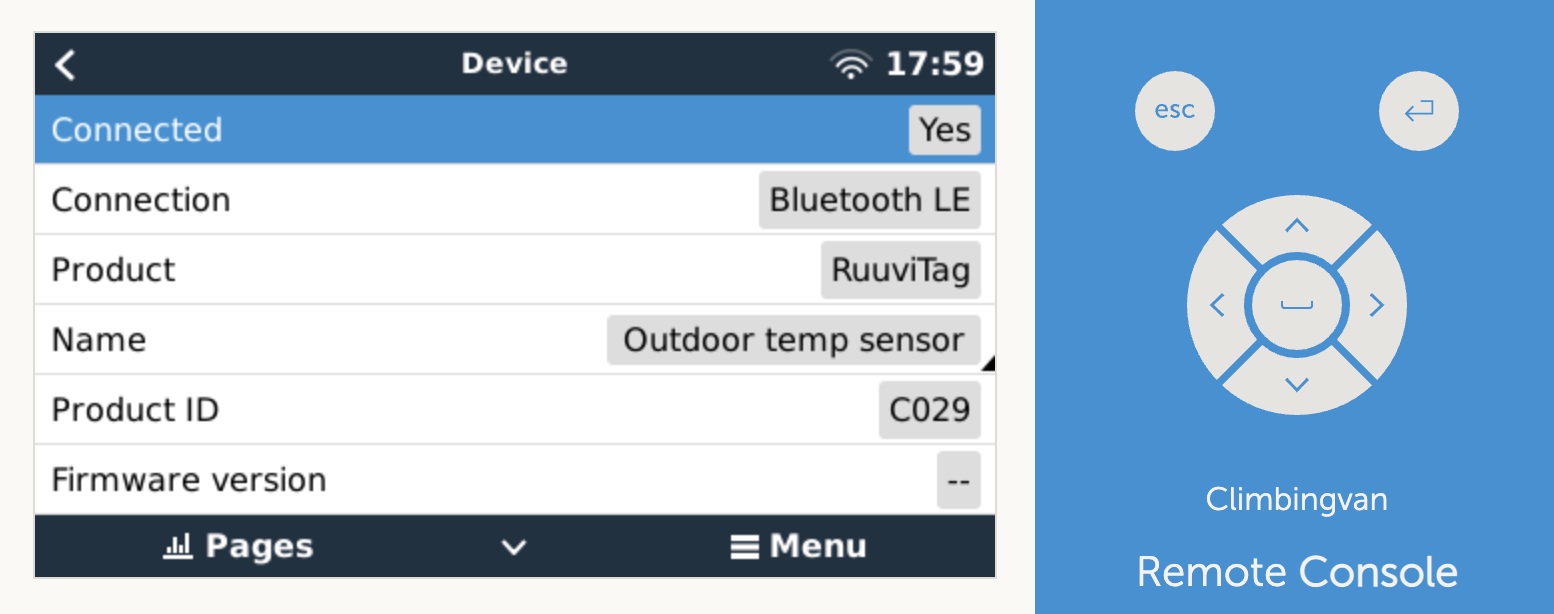
If you click on the sensor in this list, then go to Device, you can rename the RuuviTag to reflect whatever you will be using it to monitor.
How to wire in a relay
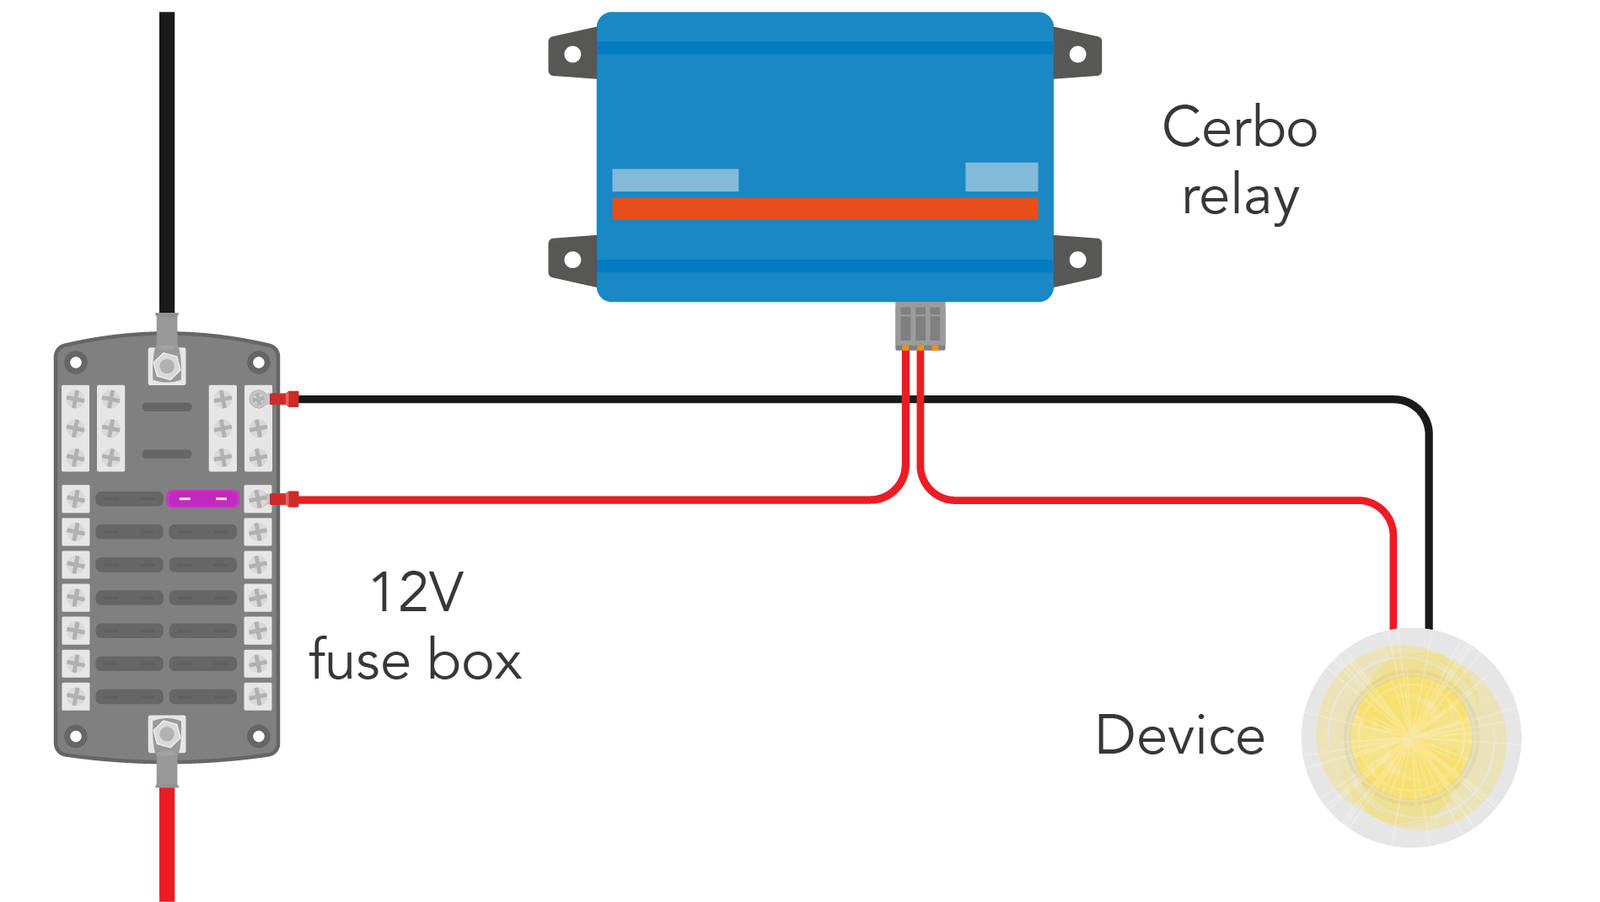
The relays in the Cerbo GX can be used as an on/off switch, wired in line with the power source to your device, or they can be used to send a small signal current to your device.
To use as a switch: wire the relay in line with your power source, using the COM port and either the NO or the NC port depending on your application.
Maximum current rating for the Cerbo GX relays:
- DC up to 30VDC: 6A
- DC up to 70VDC: 1A
- AC up to 125VAC: 6A
Notice that you won’t be able to power a 230V appliance through these relays.
If you want to use the relay to activate a device with a higher current or voltage, you can use the relay as a signal source. For this, you will need to use a device which can be activated from a digital signal input, such as a generator with a switching signal input.
How to use the Cerbo GX relay for automatic generator stop/start
There are several different ways to connect a generator to a relay, so you’ll need to consult the manual specific to your generator. If your generator requires a start and stop pulse, as opposed to a continuous signal, Victron has provided a wiring solution.
Once you have connected the relay to your generator, you can use the Cerbo GX to fine tune the settings. From Settings, go to the Relay menu and select ‘Generator start/stop’ as the relay function. This will create a new heading in the main settings menu called ‘Generator start/stop’. From here, you’ll be able to manually start the generator or set-up the automatic start/stop function and choose the activation conditions.
You can use any of the following parameters to trigger the stop/start of your generator:
- Battery state of charge (SOC)
- Battery current
- Battery voltage
- AC consumption
- Inverter high temperature
- Inverter overload
- Periodic test run
If you want a bit more detail, you can read the Generator stop/start menu in the Cerbo GX manual for more information.
How to configure your Cerbo in the VRM Portal
If you set up your Cerbo GX with an internet connection, you can access the Cerbo GX remotely, from any device, through the VRM online portal.
- Go to the VRM Online Portal in your internet browser.
- Create a login for the VRM portal.
- Select Cerbo GX and add your installation ID. This can be found on a sticker on the bottom of the Cerbo.
- Name your installation.
Once you’re in, you’ll be able to monitor every aspect of your system which is connected to the Cerbo GX, in real time!
You’ll be able to see how the power is moving through your system, and keep an eye on any temperature gauges or level sensors.
If you want to see an example in action, you can browse some electrical systems which are online right now!
The Ekrano – the new all in one solution
Released earlier this year, the Ekrano GX is the newest incarnation of Victron’s GX devices. It incorporates all of the features of the Cerbo GX, combined with a built in 7” Touchscreen. They work perfectly for that OEM look system control panel. It allows you to display your electrical system with an easy to read infographic, keep an eye on tank levels (Water, Waste, Fuel and Gas) and also program your full electrical setup to ensure everything is perfectly fine tuned.

Victron have a habit of engineering products to last and the Ekrano GX is no exception. This is not just in their superior build quality, it is part of their whole approach, with open source software and continued support. I frequently come across systems installed 15+ years ago that still work exactly as intended. There is no inbuilt obsolescence here!
Adam Husband, Nohma’s Technical Sales Manager
Cerbo GX FAQs
-
You can use the Cerbo GX without the GX Touch. The Cerbo GX can be controlled using the VictronConnect app (which uses WiFi or Bluetooth) or through the VRM online portal, as long as the Cerbo GX has internet access.
-
The amount of data the Cerbo GX uses depends upon the amount of devices connected and how they operate. Victron provides an estimated usage of 200MB for a system containing one MultiPlus inverter/charger, one BMV battery monitor, and one MPPT. This estimate is based on a log interval of 15 minutes. Reducing the log interval will reduce your data usage and can be adjusted in the VRM settings.
-
While the Cerbo GX is mainly designed to be used with other Victron products, there are a few non-Victron products with which it is compatible.
The Fogstar Drift PRO batteries have a VE.CAN connection, allowing you to connect your Fogstar batteries directly to your Cerbo GX.
The Cerbo is not compatible with any Renogy products, or any other non-Victron products, unless specifically stated.
-
The Cerbo GX has built-in WiFi and can be wirelessly connected to an internet router. You can also use the built-in WiFi to connect to the Cerbo GX from your smartphone, using the VictronConnect app to monitor your system and adjust settings.
-
You can access and control your Victron GX from an app on your phone or from the GX Touch screen which plugs into the Cerbo GX. This can be mounted on the wall inside your campervan.
-
The Victron Remote Console (or VRC) is the same console which is seen on the GX Touch screen, but it can be accessed online through the VRM portal. It displays the power transfer between the different parts of your electrical system, from the charging sources to your leisure battery, to your AC and DC loads.
-
VRM stands for Victron Remote Management. The Victron Energy VRM online portal gives you remote access to your Victron devices, such as the Cerbo GX, and can be accessed via the website or the VRM app. The VRM portal allows you to monitor and adjust your electrical system from anywhere in the world, as long as you have internet access.
-
The GX devices are a family of Victron products which provide a means of monitoring and controlling your off-grid electrical system.
A brilliant article and very informative. Never seen any other site offer this kind of insight into selected products.
Thanks Martin, glad you found our article useful!
Great info.
I would like to point out, to help others, that the HDMI and USB cables can be extended, so you do not need to have the Touch 50/70 within 2m of the Cerbo.
I’ve extended the cables on every installation I’ve done.
Cheers
Hi Joe, Ah how interesting! There’s a note about not being able to extend the HDMI in the manual but it’s good to hear this is still possible! Thanks 🙂
Extremely useful article. Thank you for taking the time to write this!
Hi Gabriel, thanks for your message and glad you found the article useful!