
We explain exactly how to convert a campervan
How to convert a campervan
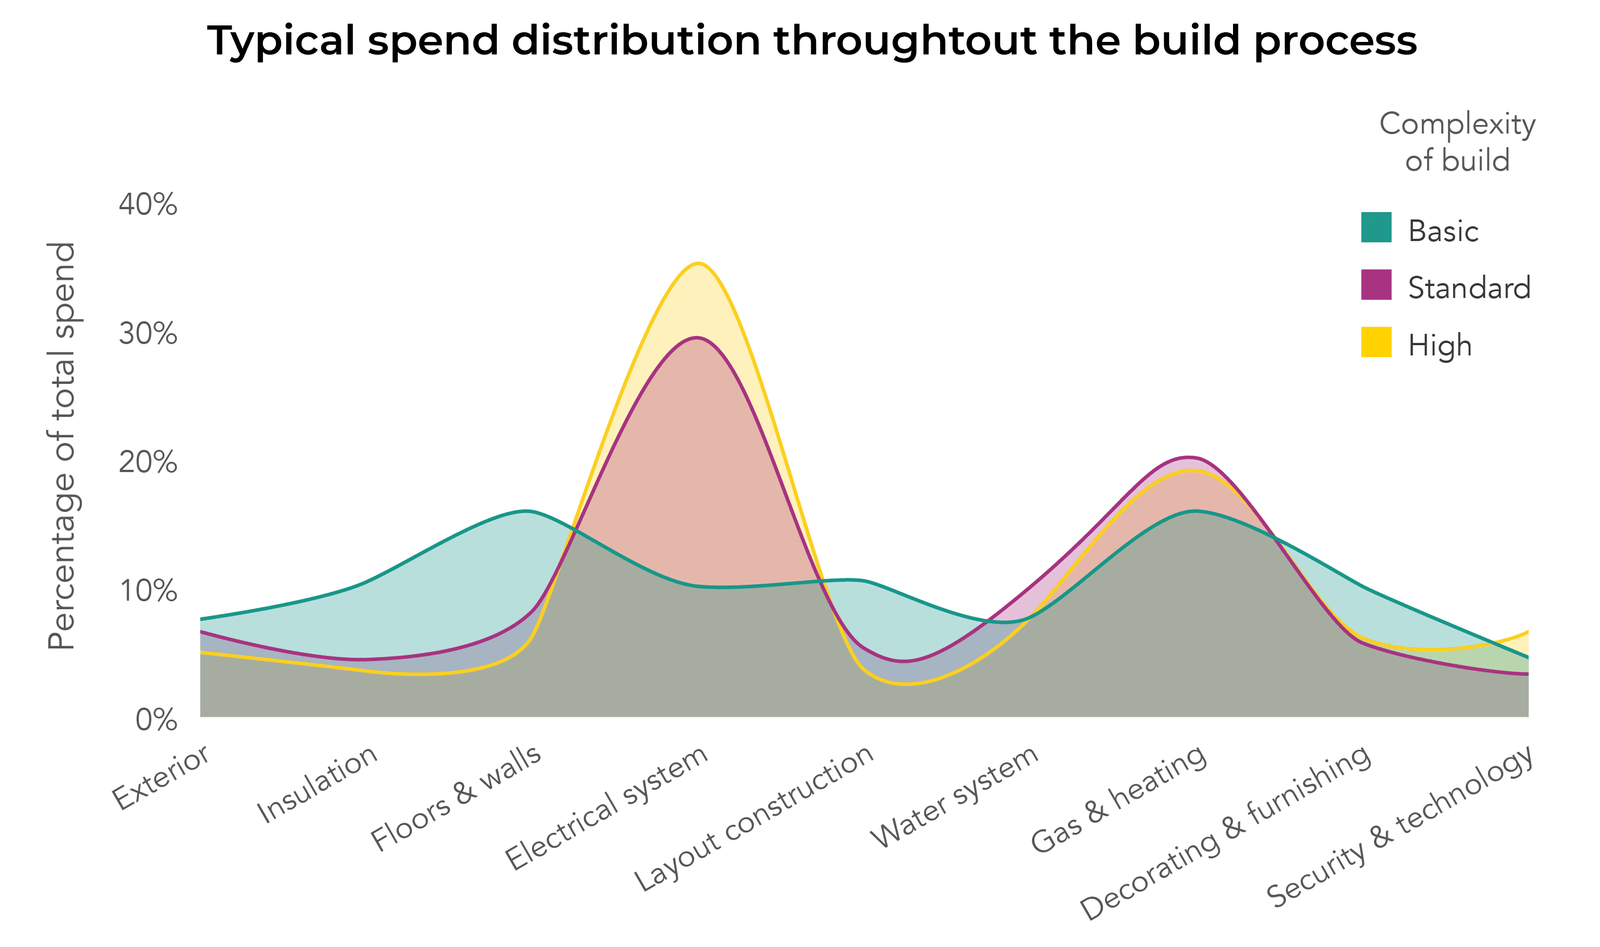
So, you’ve seen van life photos on Instagram and you’ve decided you want your own campervan. For anyone who loves travelling and spending time outdoors, a campervan is the perfect adventure wagon. Instead of committing to a holiday in one location with a non-flexible hotel or Airbnb reservation, you can check the forecast, the snow conditions, the surf report on a Friday afternoon, pack the van and hit the road. But exactly how do you convert a campervan?
In this article we’ll provide a summary of all of the different areas of a camper van conversion. We’ll also include links to more detailed articles on each of the different areas of the conversion process, so that you can dig down into the details of how to convert a campervan. We’ve followed the structure we follow in our bestselling book, The Van Conversion Bible, which follows the rough timeline of a van build. We’ve also included some graphs and illustrations from the book to give you a feel for what’s included.

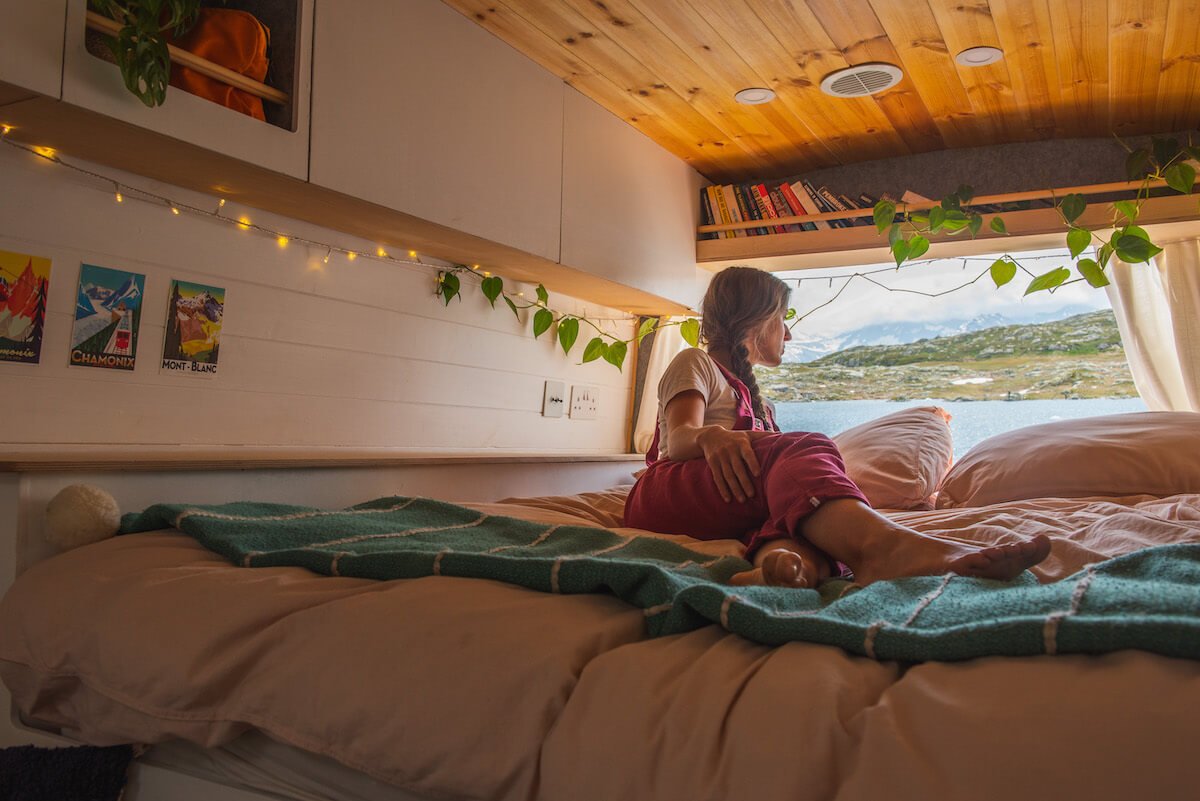
There's nothing better than enjoying a mountain view from your finished campervan
Planning & design
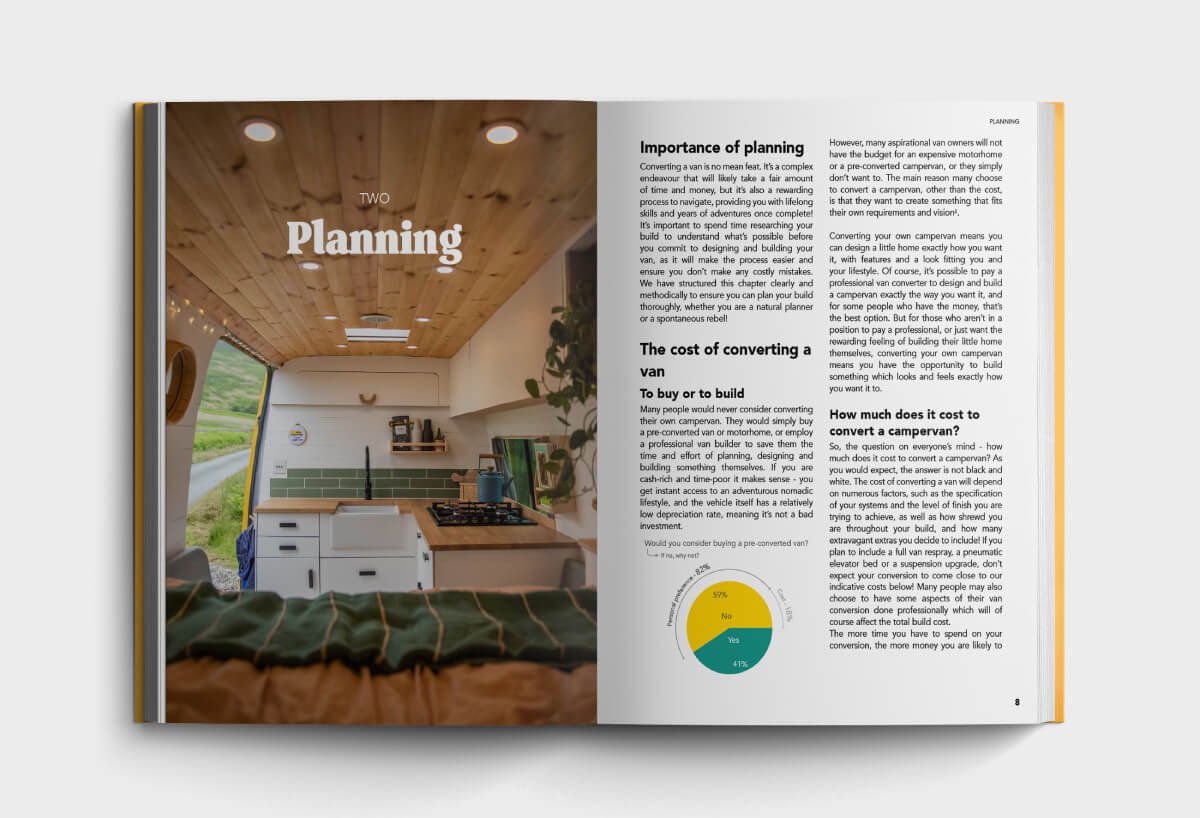
First and foremost, it’s important to plan your campervan conversion before you start building it.
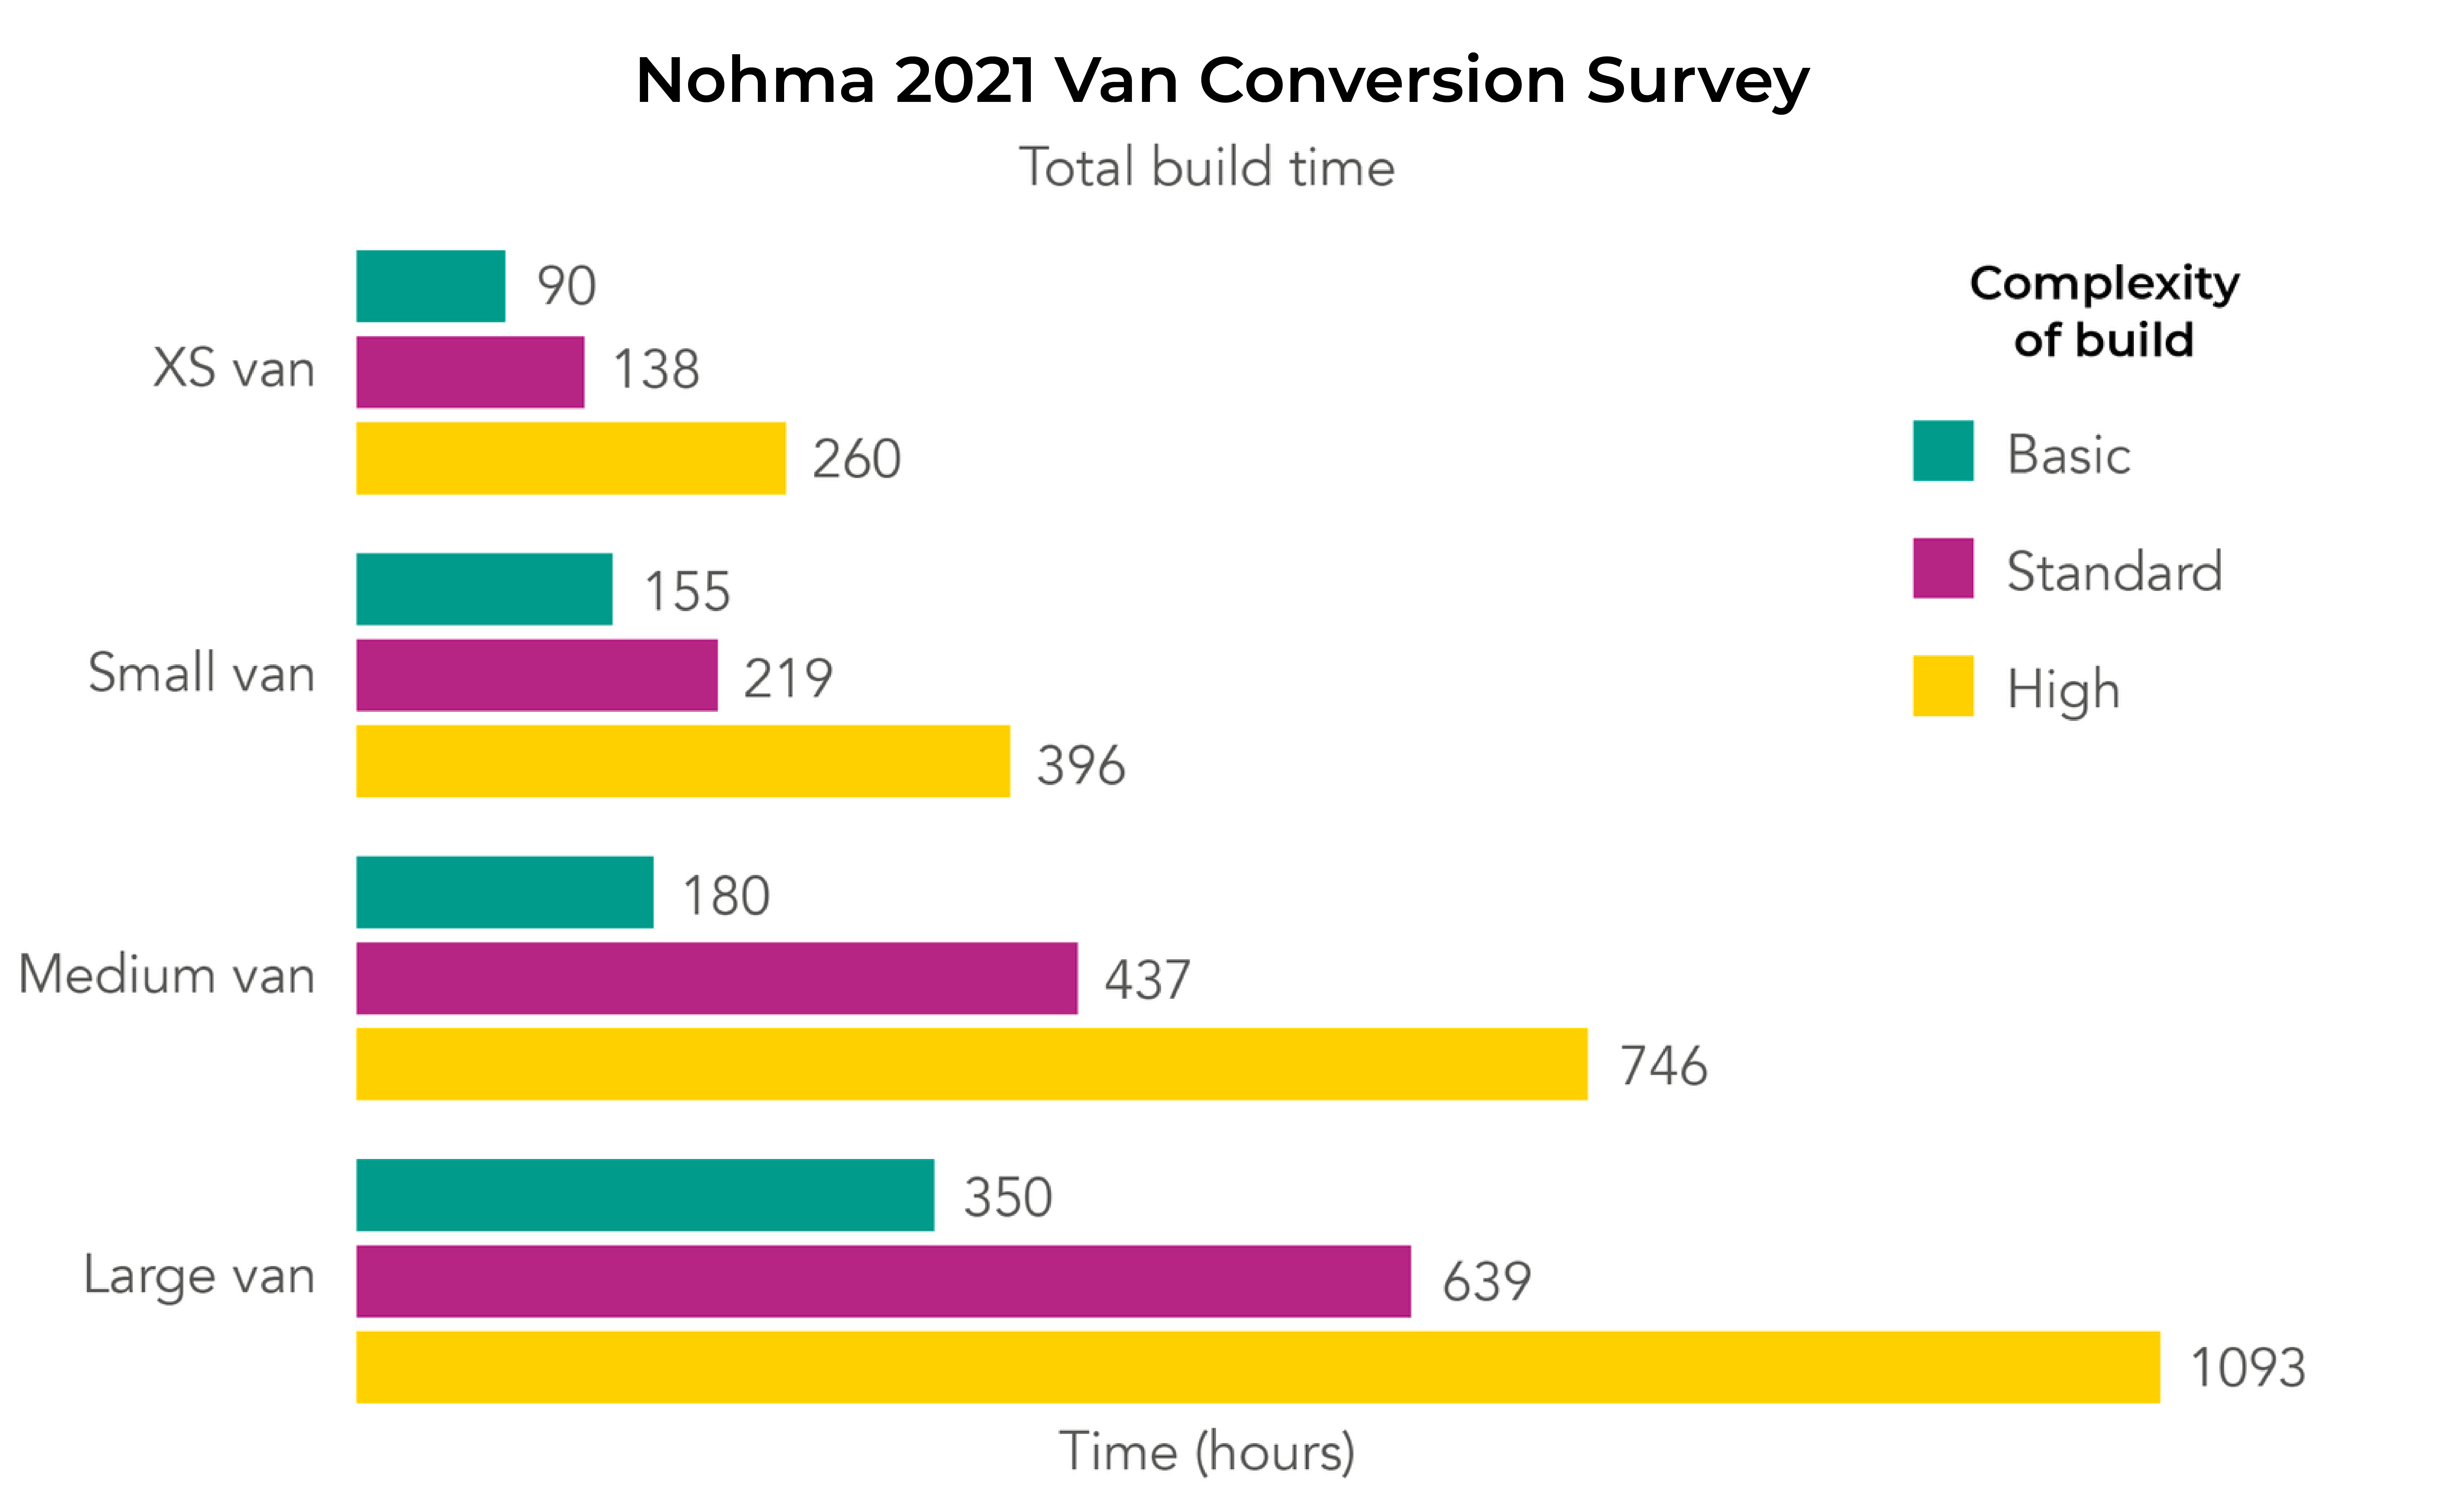
Before you start cutting big holes in your van or building kitchen units, one of the most valuable things you can do is to spend time planning. To work out how long you should spend planning and designing your build, multiply your forecasted build time by 20%. So for example, if your build time will be around 500 hours, you should spend around 100 hours planning your campervan conversion.
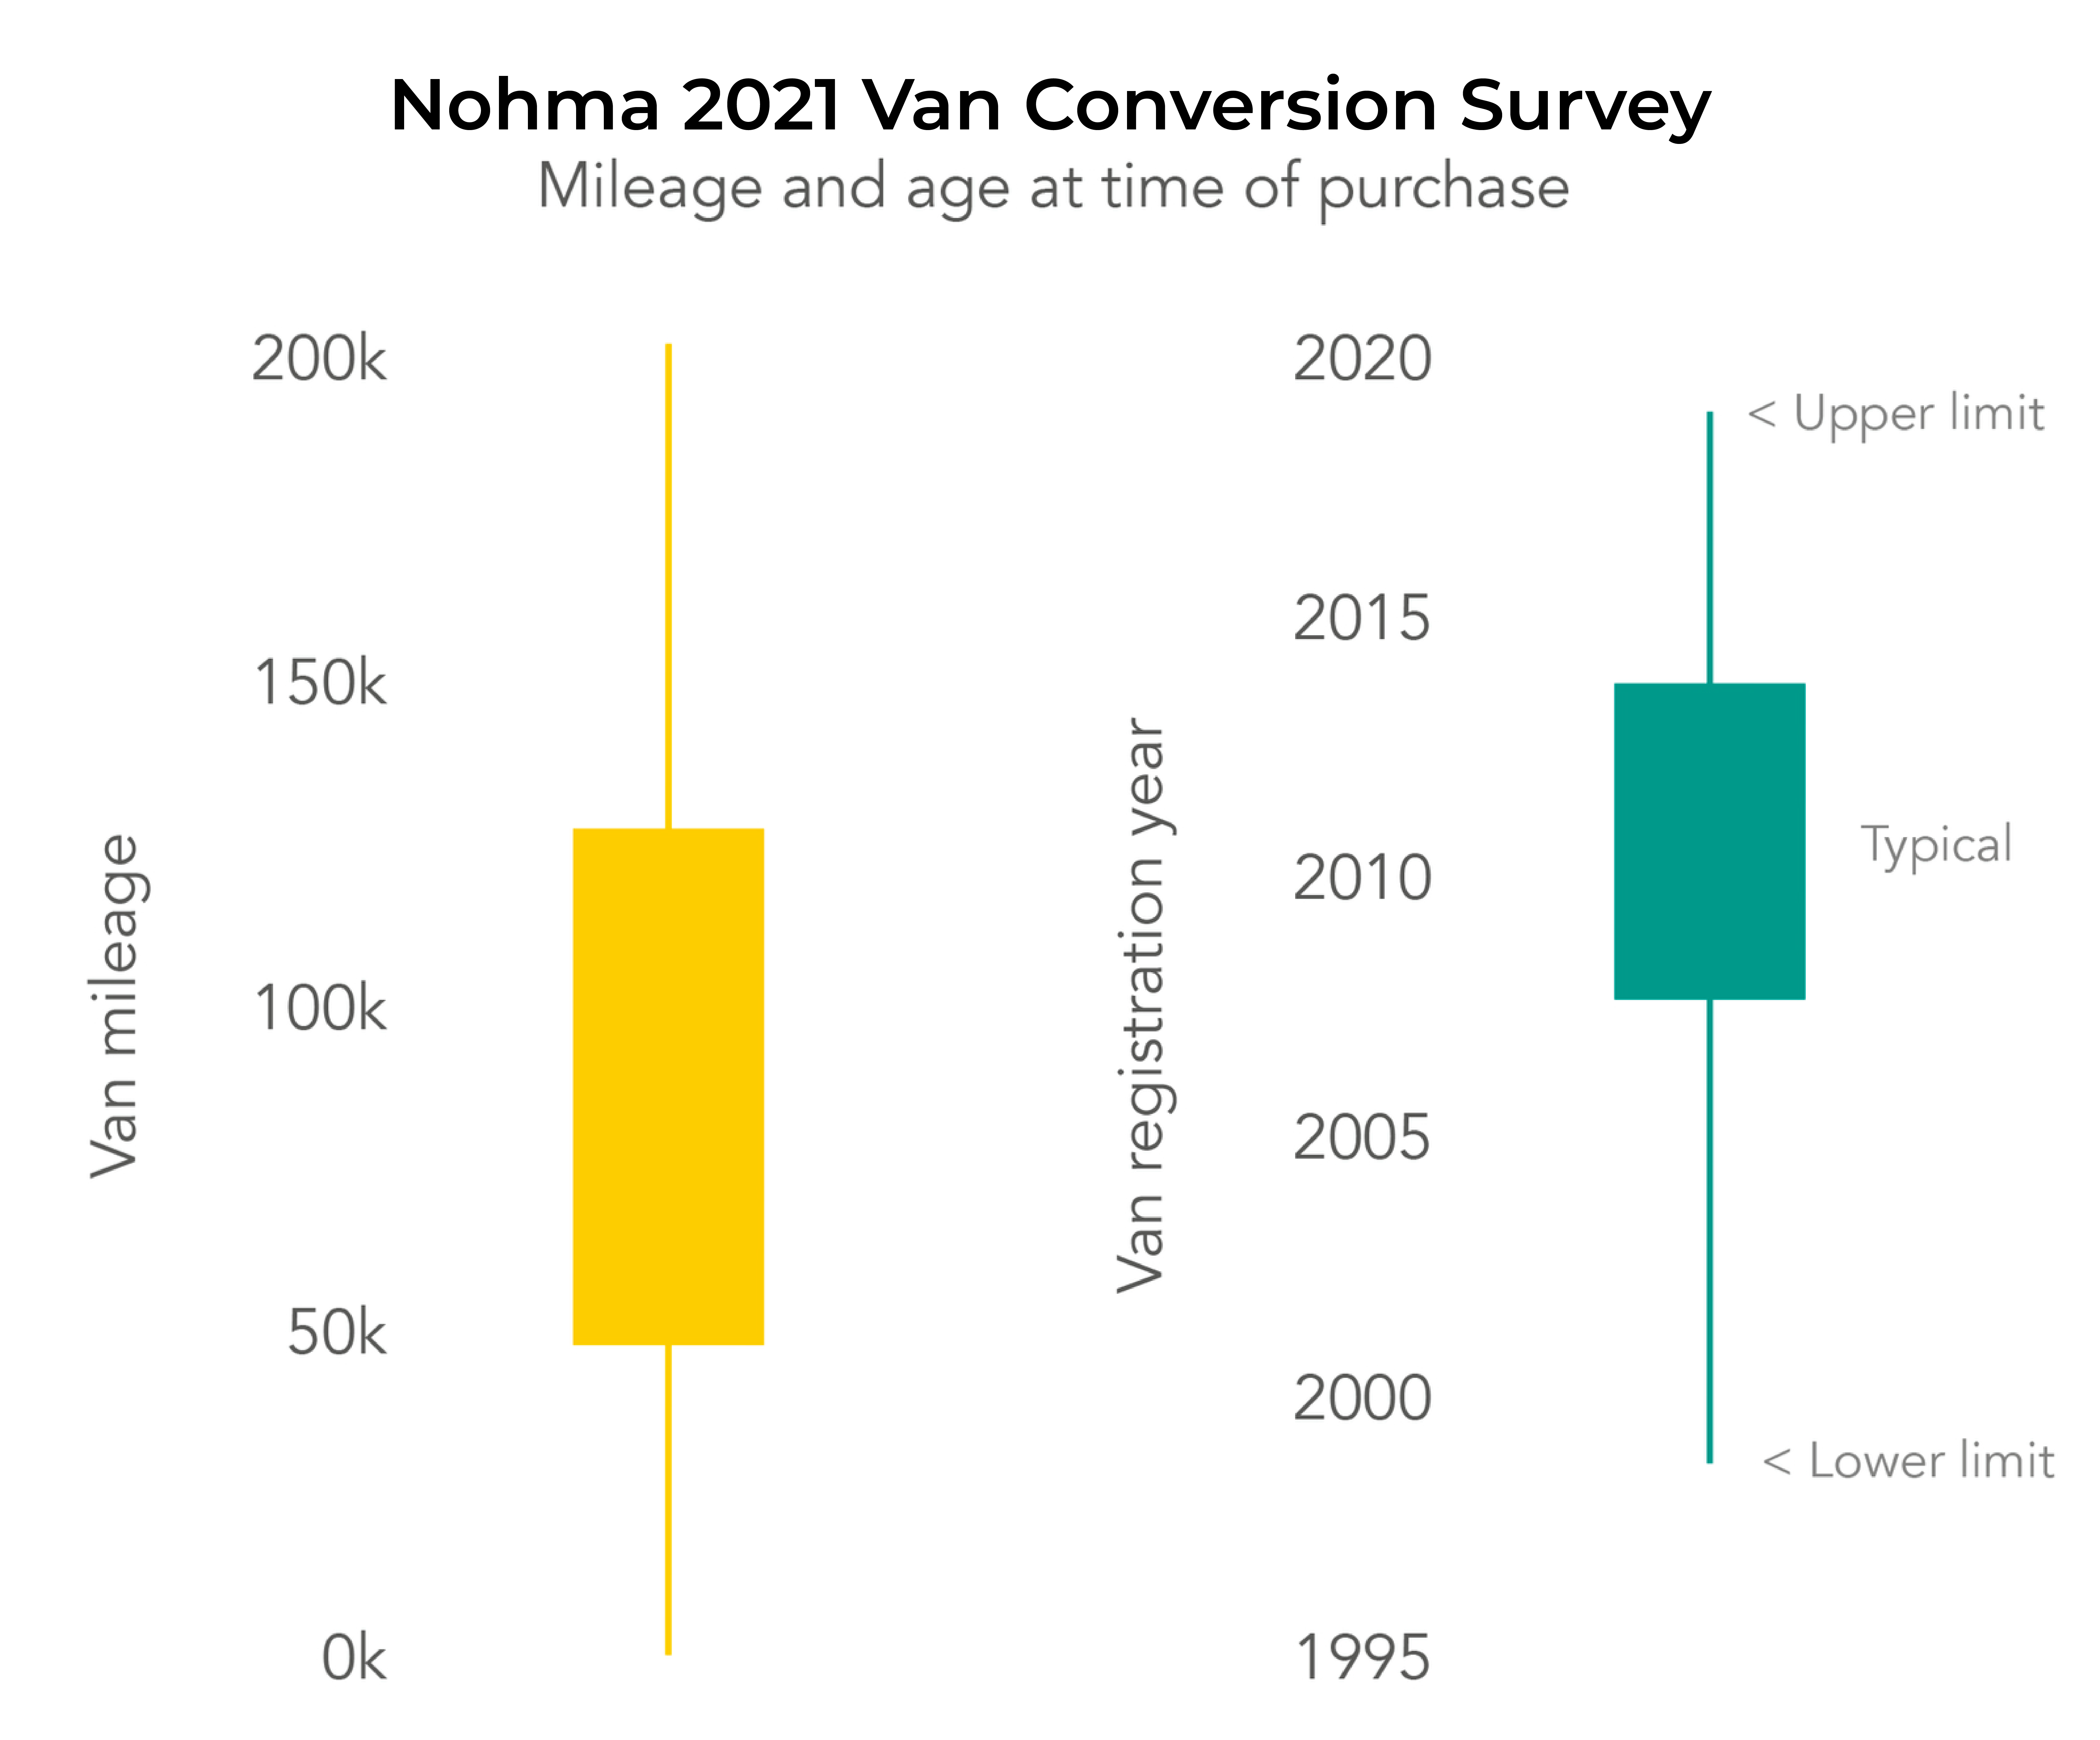
But how do you know how long it will take to convert your campervan before you’ve done it? We used data from our 2020/21 Van Conversion Survey to establish the reference graph below.
Make sure you fully design your campervan layout, and account for things like skylights, solar panels and windows early on. For example, you should make sure you will have room on your roof for all the solar panels you may need to recharge your leisure batteries, and that you have enough room for all of your belongings (e.g. bikes, clothes, etc).
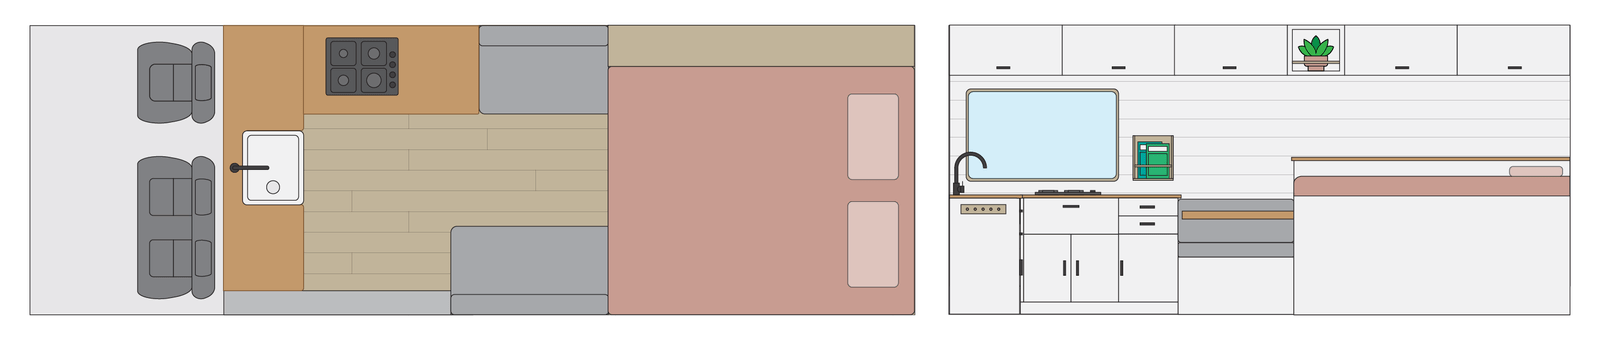
As well as designing your layout, you should also plan your interior design. This will ensure you can ensure you use materials that work with your design and build things in a specific way if required.
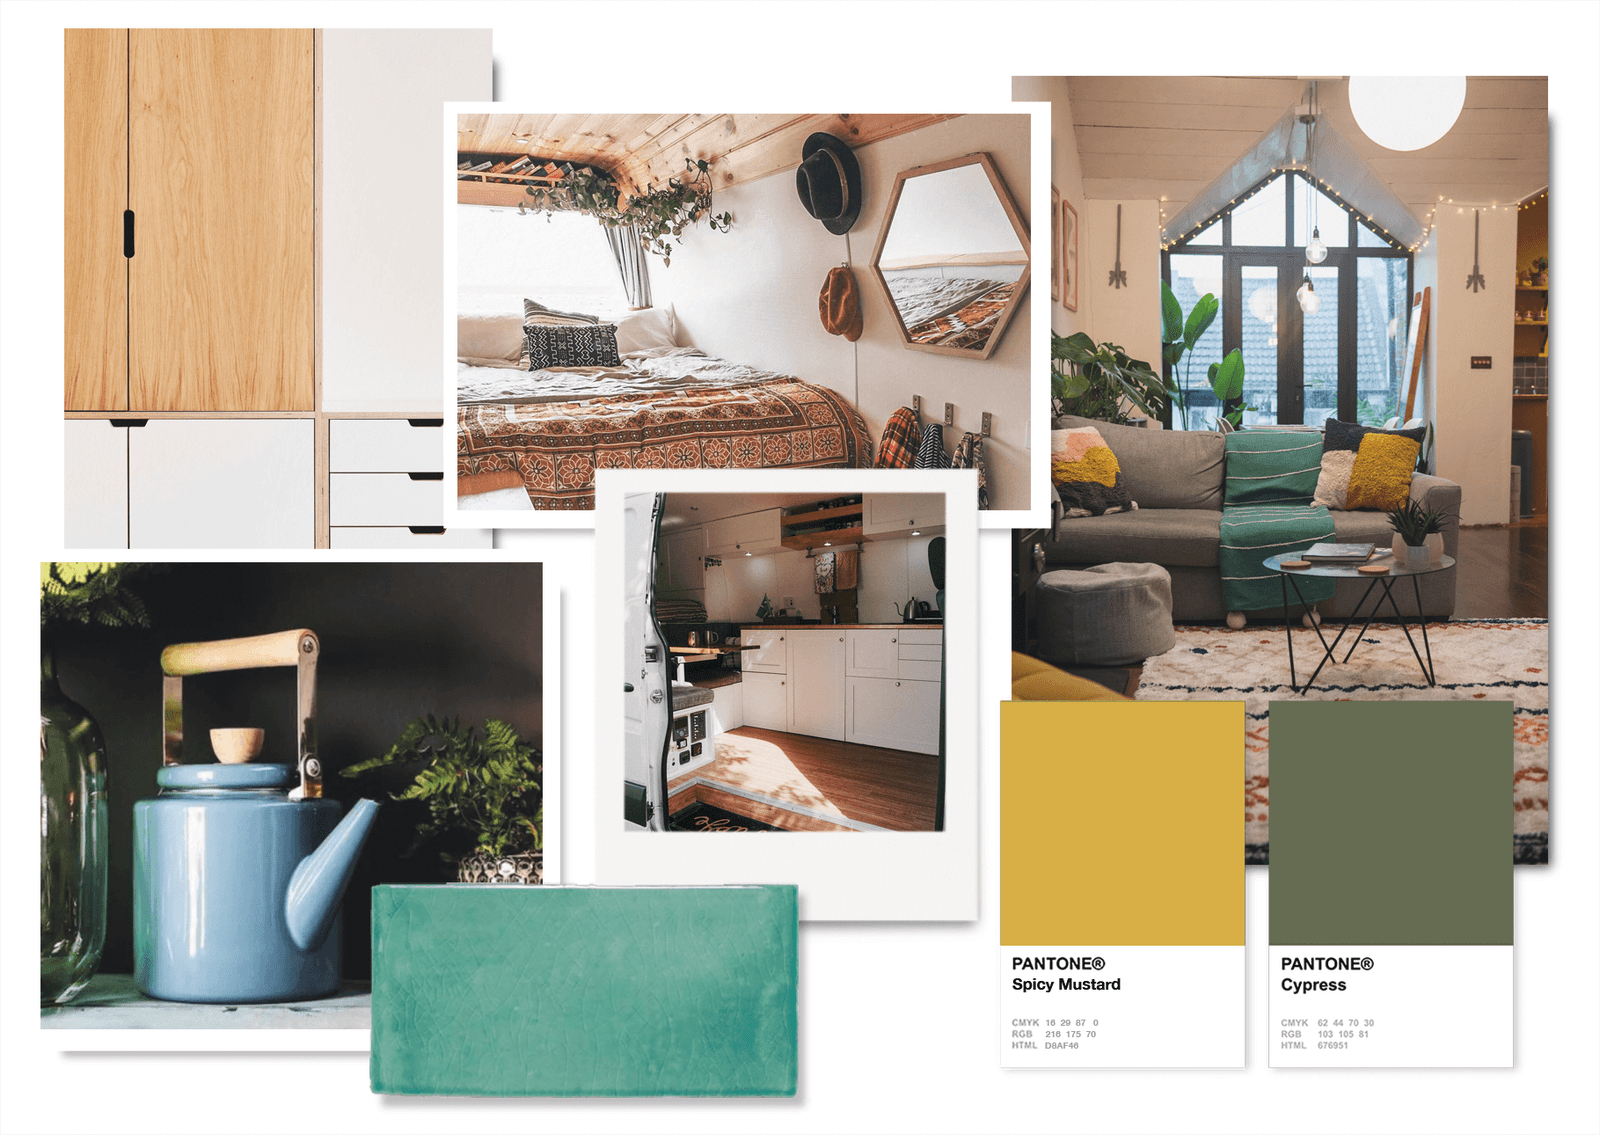
We wanted to achieve a clean, Scandi vibe in our van so we chose to include a lot of exposed wood. This meant we bought high-quality birch ply for visual areas, and attached it from one side to avoid any visible screws. It’s little details like these that are hard to do on the fly and will work much better if you plan ahead.
A great way of doing this is to create a moodboard. As well as photos of vans you love, you can also include products, materials, colours, photos from bricks-and-motar houses – anything that gives you inspiration!
Our bestselling book explains exactly how to convert a campervan.
Buying a base vehicle
Once you’ve planned your conversion and designed your layout, you’re ready to start converting your campervan! Finding the perfect base vehicle for your camper is the first step. Depending on your layout, you may want to opt for a larger van such as a Sprinter or a Ducato, or a smaller van such as a Transporter or Transit Custom.
Large vans
Large vans are available in two main body types. The Sprinters and Crafters aren’t as wide and taper in a lot more at the top, whereas the Ducatos and Relays are boxier. This makes them a good option if you want to have a bed widthways across the van. If you will be going for a lengthways bed, the Sprinter-style vans might be a better choice, as they are a little longer inside.
| Ducato, Jumper & Relay | Sprinter, Crafter & TGE | |
|---|---|---|
| Length | 4.07m | 4.30m / 4.70m |
| Width | 1.87m | 1.78m |
| Height | 1.93m / 2.17m | 1.92m / 2.14m |
Medium vans
As well as the van models mentioned above in a slightly shorter wheelbase, if you want a more medium sized van, the Ford Transit is also an option. Medium vans usually still have enough room to stand up inside, but they’re a little shorter than a large van, making them easier to drive and park.
| Ducato, Jumper & Relay | Sprinter, Crafter & TGE | Transit | |
|---|---|---|---|
| Length | 3.10m / 3.71m | 3.27m | 3.39m |
| Width | 1.87m | 1.78m | 1.76m |
| Height | 1.93m / 2.17m | 1.92m / 2.14m | 1.88m |
Small vans
A smaller van usually won’t have enough room to stand up, but it will have enough room for a bed, a fridge and a surfboard. The ultimate weekend warrior van, a smaller van is more convenient for general vehicle use when not away on a van trip too. As well as the well known VW Transporter, there are a few other options available for small vans such as the Transit Custom and the Expert and Vivaro.
| Transporter & Vito | Expert & Vivaro | Transit Custom | |
|---|---|---|---|
| Length | 2.57m / 2.67m | 2.51m / 2.67m | 2.55m |
| Width | 1.69m | 1.63m / 1.69m | 1.77m |
| Height | 1.41m | 1.40m / 1.28m | 1.40m |
When looking for a second hand van to convert, it’s important to check all of the standard things you would when purchasing any vehicle, such as service history and the all important rust check! We’d recommend checking websites like Gumtree and Autotrader, or getting in contact with van dealerships for ex-fleet vehicles. Ex-fleet vans have usually had very regular services and been driven rather sensibly, so this way you can be sure the vehicle you’re about to spend hundreds of hours converting will be reliable!
Although you might not consider purchasing a second hand car with more than 100K on the clock, it’s important to remember that vans are designed to last a lot longer than cars. A diesel van will typically have a 30% longer lifetime mileage than a petrol car. There are some vans, such as the Sprinters, which will often manage more than 400K miles in their lifetime! We purchased our van at 110K miles, and 30K miles later it’s still going strong.
In our van conversion survey, 49% of people who had converted a van had bought a vehicle with over 100K miles on the clock. The data shows that people typically buy a van with a mileage between 50K and 125K, and a van between six and 13 years old.
If you want some inspiration on what size van might be right for you, check out our article: What is the best van for a camper conversion?
The 'Planning' chapter includes detailed information about van models and sizes, and useful data about age and mileage of second hand vans.
Shopping
Shopping should be an exciting part of the process, and the first step towards converting your design into reality. However, there’s a vast spectrum of items to consider, and if you don’t fully prepare, it’s easy to forget something vital. This can become the source of inefficiency and expense; get it wrong, and you’ll see yourself taking multiple trips a day to the local DIY store.
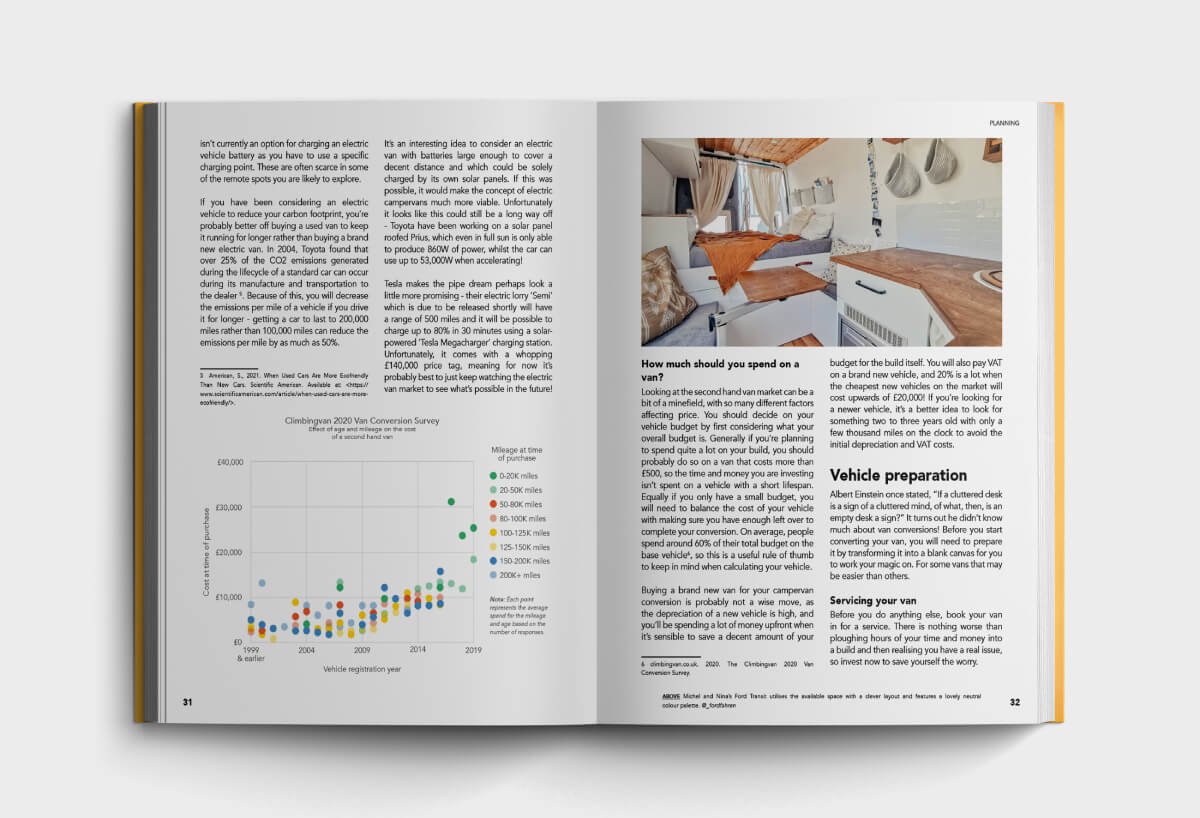
It’s also important to anticipate when you will need to purchase items for your build, as the costs won’t be spread evenly across the conversion process. Some phases of your build will dwarf others in terms of cost (the electrical system in particular!), and the variation in cost will also vary depending on the complexity and finish of your van.
Build
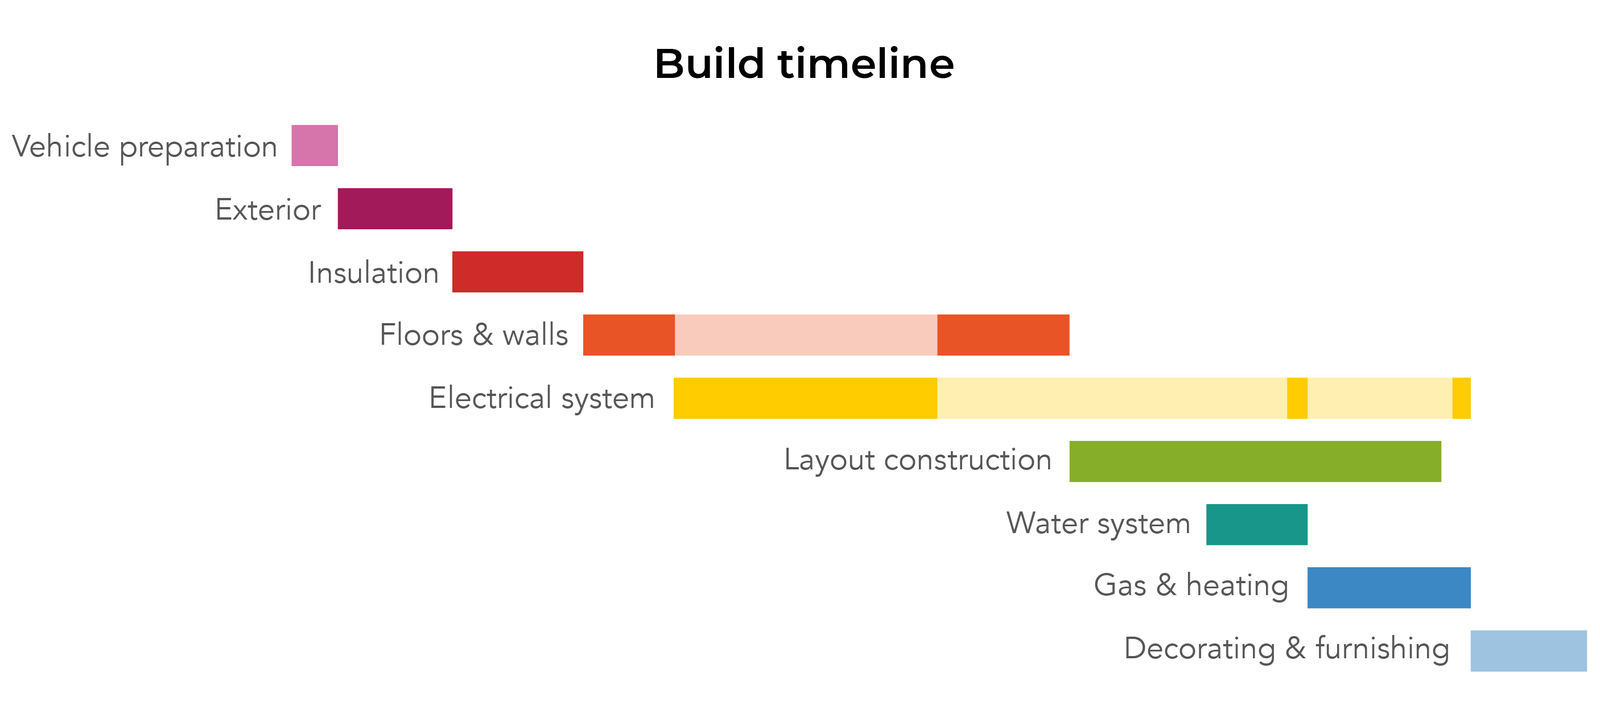
For those of you who have already planned and designed your campervan but not started physical conversion, the ‘build’ phase explains exactly how to convert a campervan. In our book, we split the build down into 9 sub-phases. The timeline below shows how much time you’ll likely spend on each of these.
Exterior (fitting windows, skylights, etc.)
Once you’ve found your base van and you’re ready to start work, you should tackle all of the exterior jobs first. This includes fitting any windows and skylights you may want to include, as well as solar panels, and any exterior mounted inlets such as water fill points and shore power inlets.
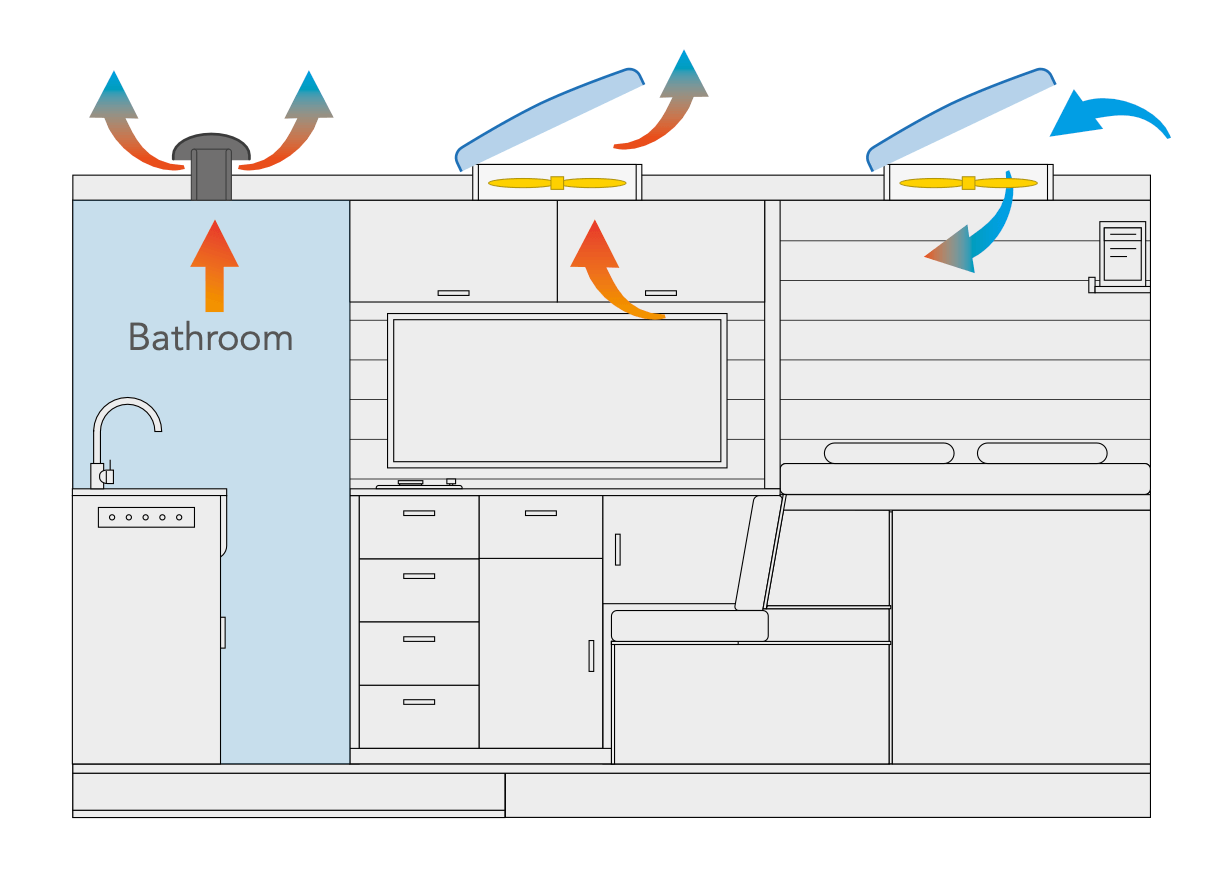
When deciding how many windows and skylights to install, it’s useful to consider which areas of your campervan are most likely to require ventilation. Adequate ventilation ensures that your van doesn’t suffer from any damp or mould issues.
We have a few useful articles which explain exactly how to fit windows, skylights and solar panels to your campervan:
- How to install campervan windows
- How to fit a campervan skylight
- How to install campervan solar panels
The process for installing any of these products is similar, and usually starts with cutting or drilling a hole in your van! For this reason, we always recommend triple checking all of your measurements.


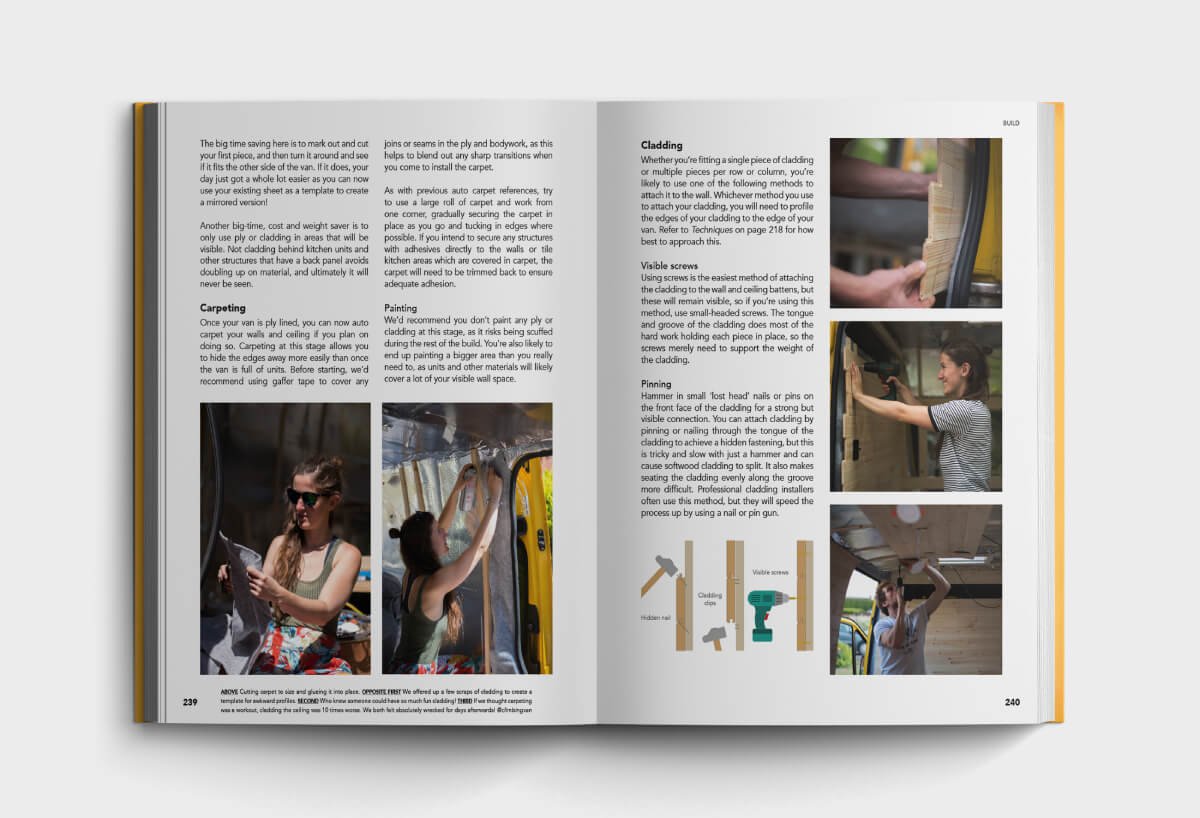
The 'Build' chapter includes step by step instructions on how to convert a campervan, including illustrations and photographs.
Insulation
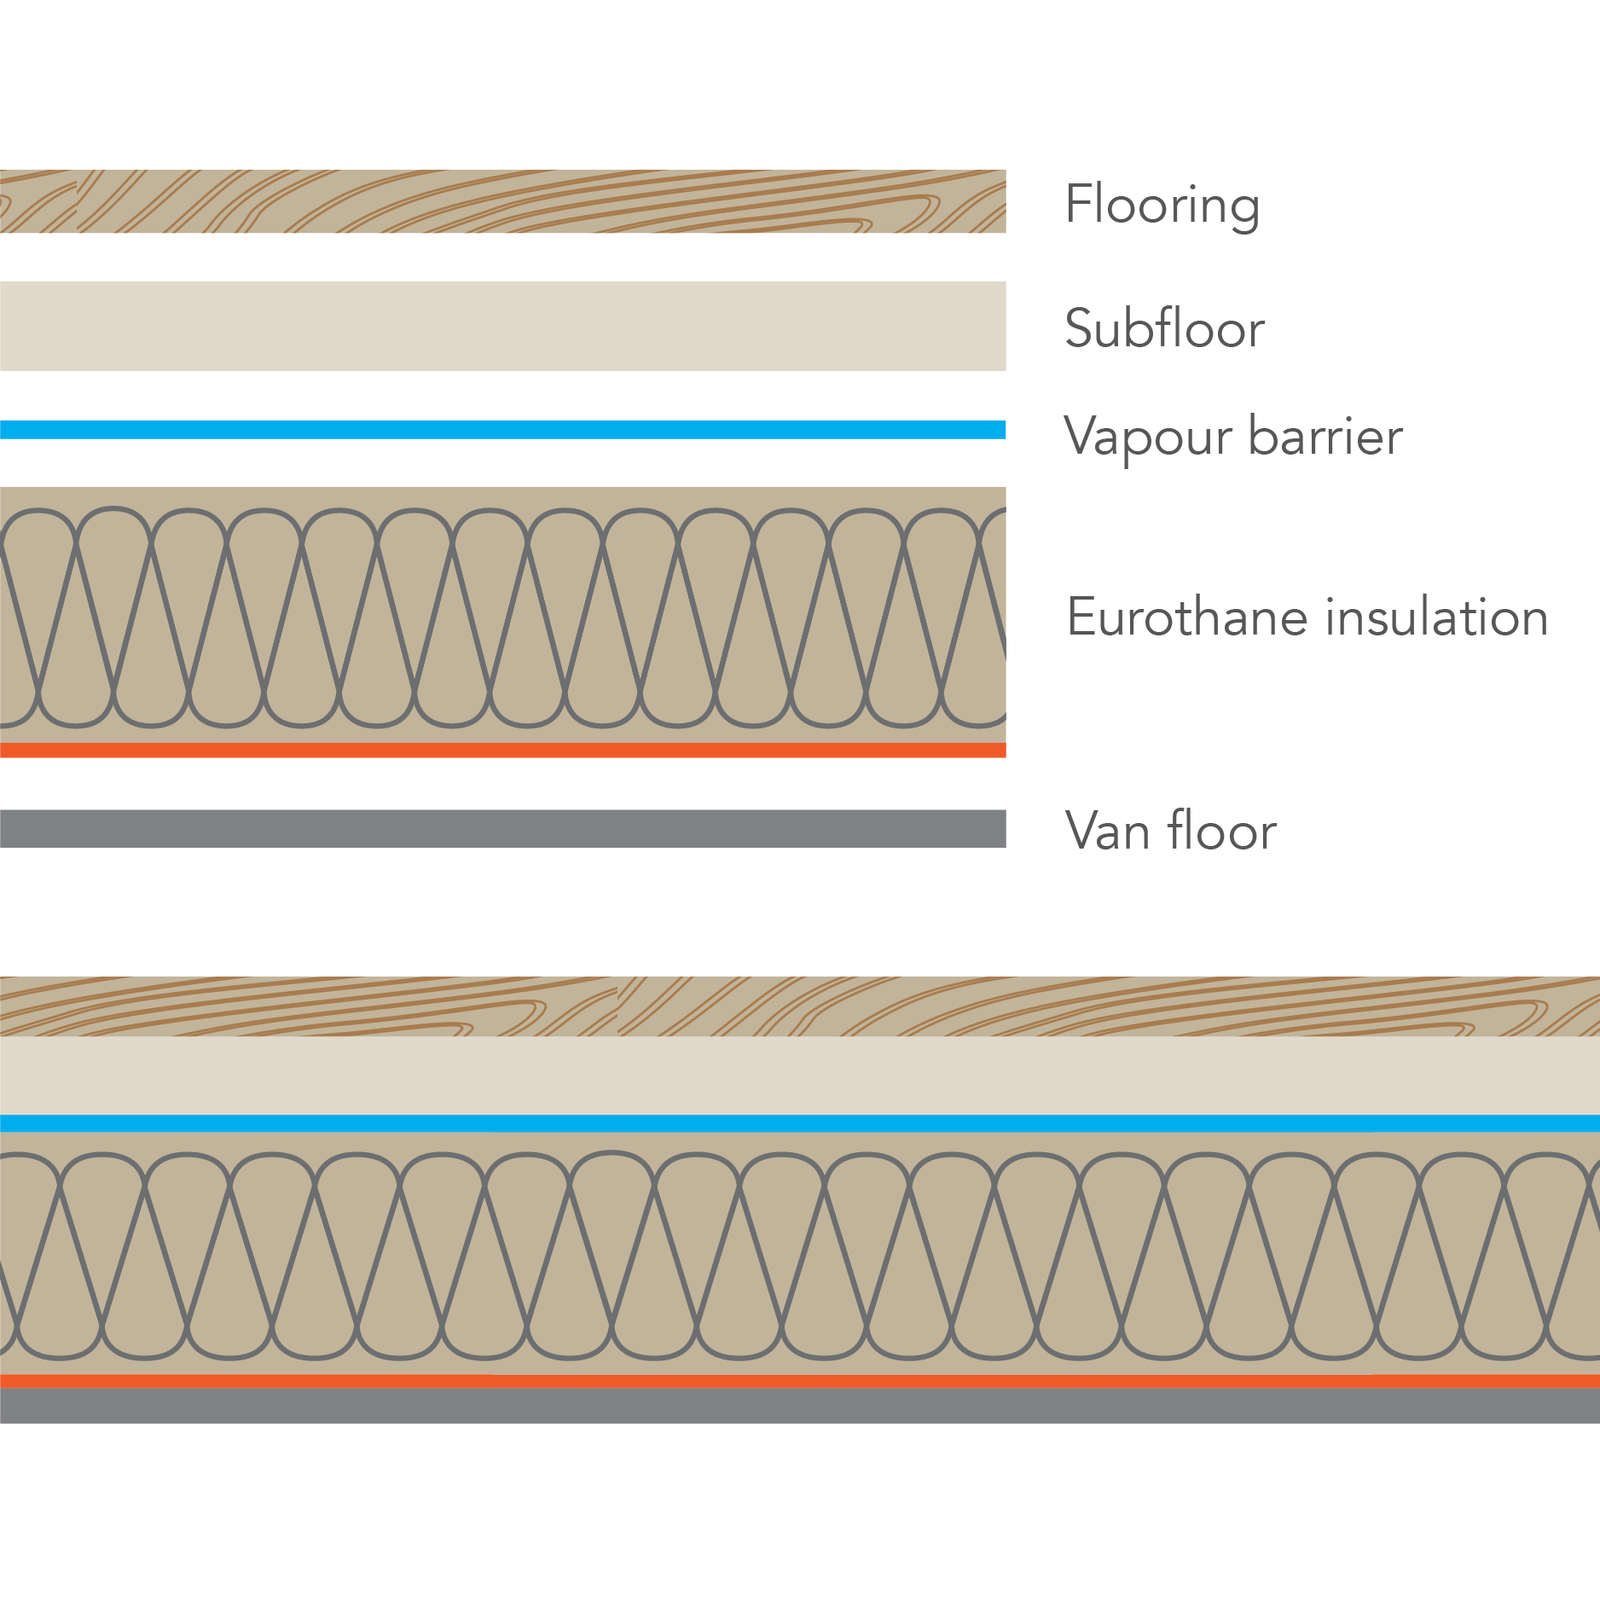
Although your insulation will end up completely hidden, it is arguably one of the most critical jobs when converting a campervan. But why is insulation so important? Insulating your van well will ensure that it stays cosy in winter and cool in summer. We recommend using a mixture of eurothane insulation board such as Celotex, combined with a loose fill polyester (recycled bottle) wool. The insulation board can be used to quickly fill large cavities, and the loose fill wool can be packed into any harder to reach areas such as the metal pillars found along the length of the van. These materials have the best combination of thermal performance, cost and weight.
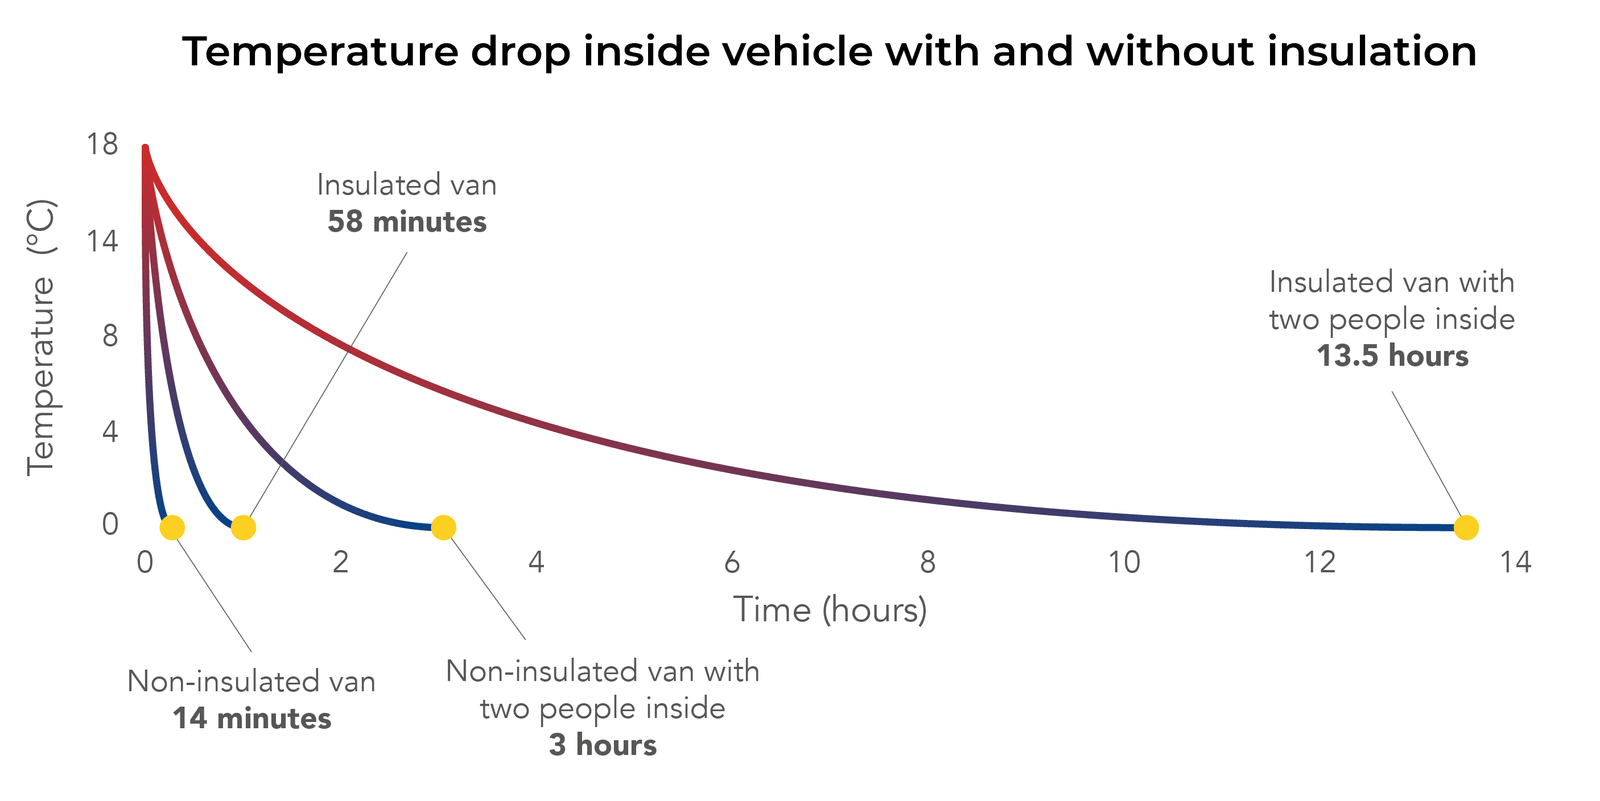
In our book, we use a theoretical heat loss calculation to compare an insulated campervan versus a non-insulated campervan. We calculate the time it would take for the two vans to drop from 18 degrees celcius inside the van to the ambient outside temperature of a chilly 0 degrees. The insulated van has the insulation mentioned above, along with a vapour barrier.
Based on these factors, the insulated van would take 58 minutes to drop from 18 degrees 0 degrees, compared to only 14 minutes for the uninsulated van. Once you introduce two people at rest into the van, the radiant heat they produce increases the time taken for the temperature to drop. In the insulated van, the time would increase to 13.5 hours, and in the non-insulated, it would increase to three hours. This highlights the importance of insulating your campervan!
Once you’re done stuffing every cavity with insulation, you’ll need to attach a vapour barrier to prevent condensation build up. Using spray glue to hold it in place, an aluminium foil bubble wrap material can be used to completely cover the van, and make sure to seal all of the gaps with an aluminium tape. This will leave your van looking like a spaceship (or a conspiracy theorist’s hideout!).
For a more detailed explanation of the process of how to insulate your campervan, read our article Insulating a van conversion.


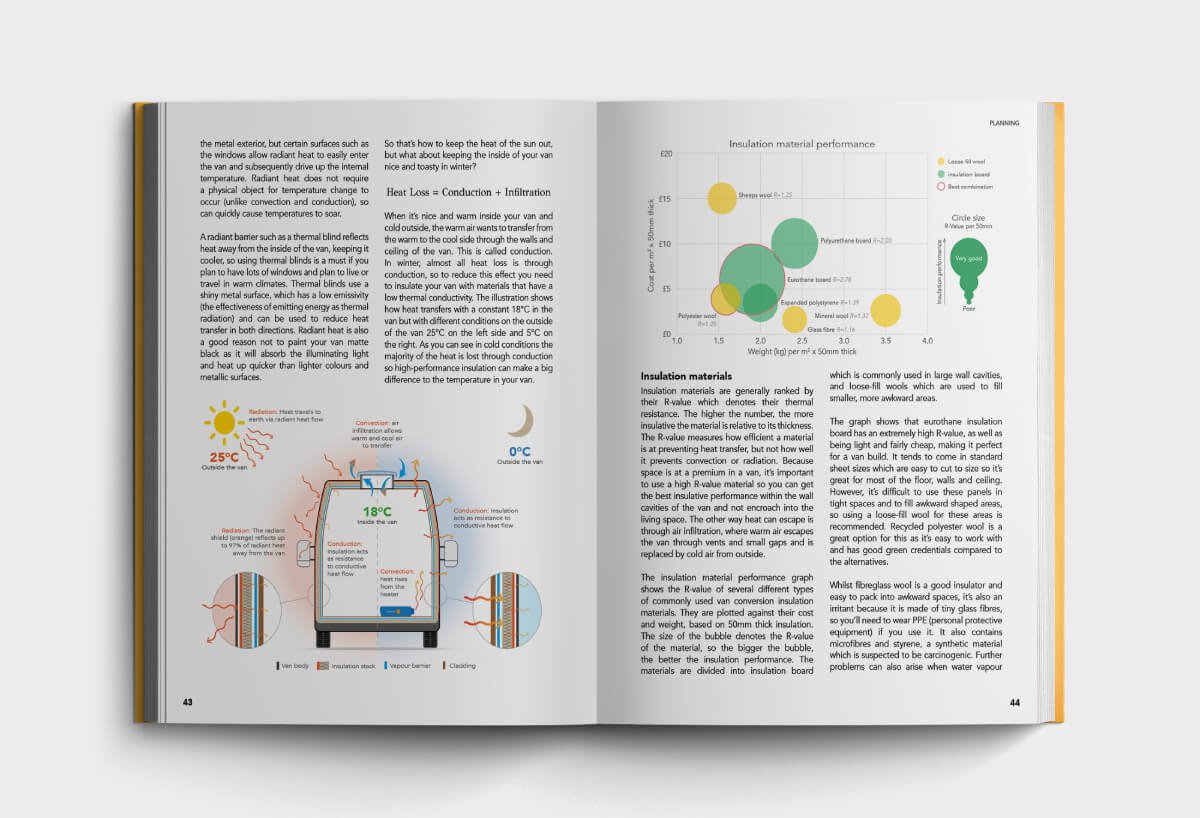
The 'Planning' chapter explains which insulation materials have the best thermal properties so you can ensure your campervan is cosy in winter and cool in summer.
Floors & walls (inc. cladding)
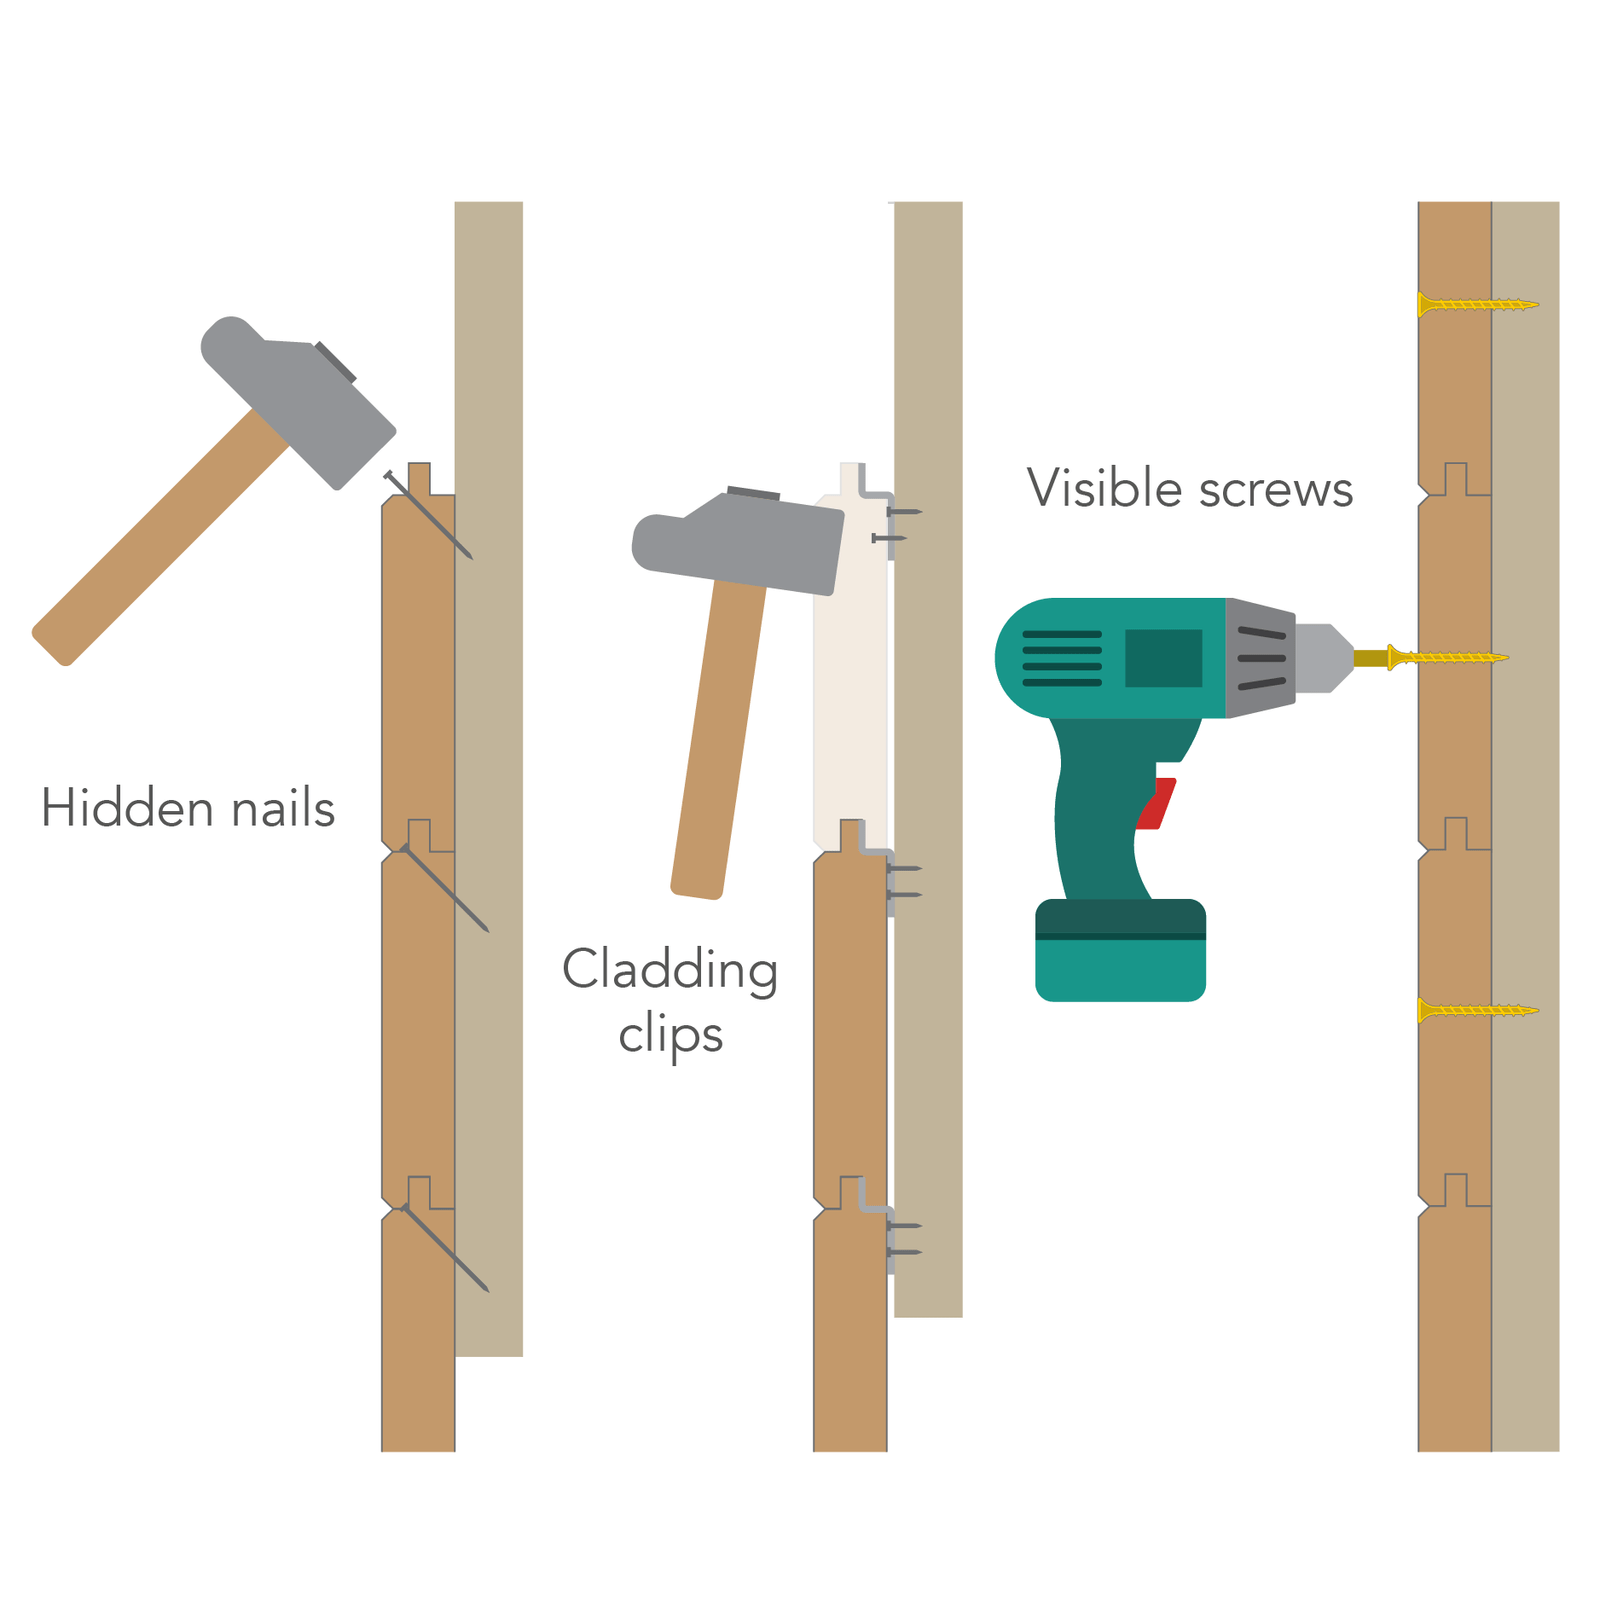
In many ways, you almost have more choices for your campervan walls than you would in a house! Whether you want a cosy cabin on wheels, a clean and bright minimalist aesthetic, a soft and practical carpeted finish or anything in between, it’s possible to mix and match cladding, ply and carpet to achieve your desired finish.
If you opt for strips of cladding, there are a number of ways to install this. You can opt for either hidden nails or cladding clips if you don’t want any visible fasteners (best if you aren’t painting your cladding). Alternatively you can use visible screws (simply add filler and then paint to hide these).
When installing your flooring, you should install a subfloor over your insulation and vapour barrier. You can then lay your flooring over the top of this.
Cladding quickly turns your van from spaceship mode to the beginnings of an actual campervan. We went for painted cladding in our own van with the walls painted white and the ceiling left natural to create a Scandinavian inspired interior. If you do plan to paint your cladding, you should save this job for the end, as if you paint early on, you will inevitably end up getting everything dirty and having to repaint later down the line!
For details of exactly how to install cladding in your conversion, have a read of our article: How to clad a campervan.


Whether you want to clad your campervan with cladding or ply, we explain exactly how to do this with a variety of methods so you can pick the best option for you.
Electrical system
The campervan electrical system is for many the most daunting part of a camper conversion. It’s typically the most expensive and there are so many factors to consider! You will need to delve deep into understanding solar panels, charge controllers, campervan inverters and how to size one, if you want to include electric hook up, lithium leisure batteries, which battery monitor you should use…the list goes on!
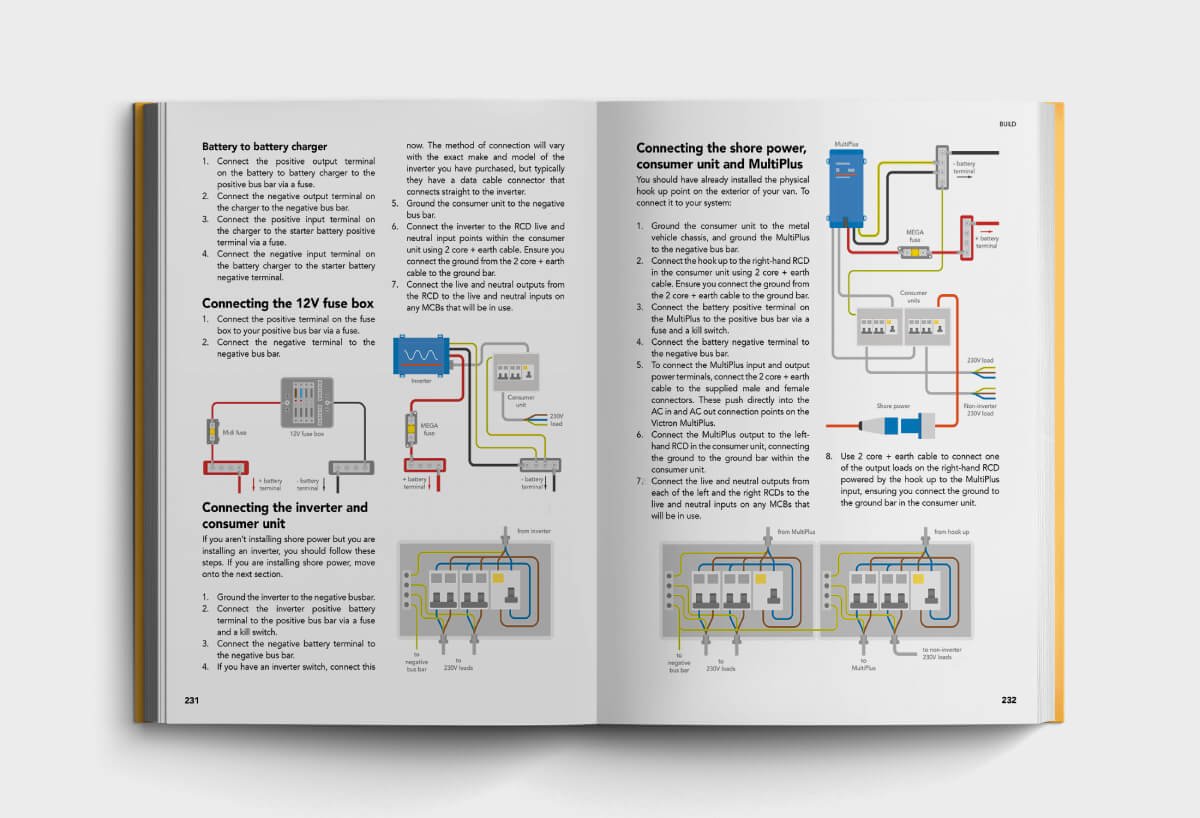
Once you’ve figured all of this out, you should create yourself a wiring diagram. This should include all of your major components as well as any fuses and kill switches. You should also make a note of the fuse sizes and cable sizes for each part of the system.
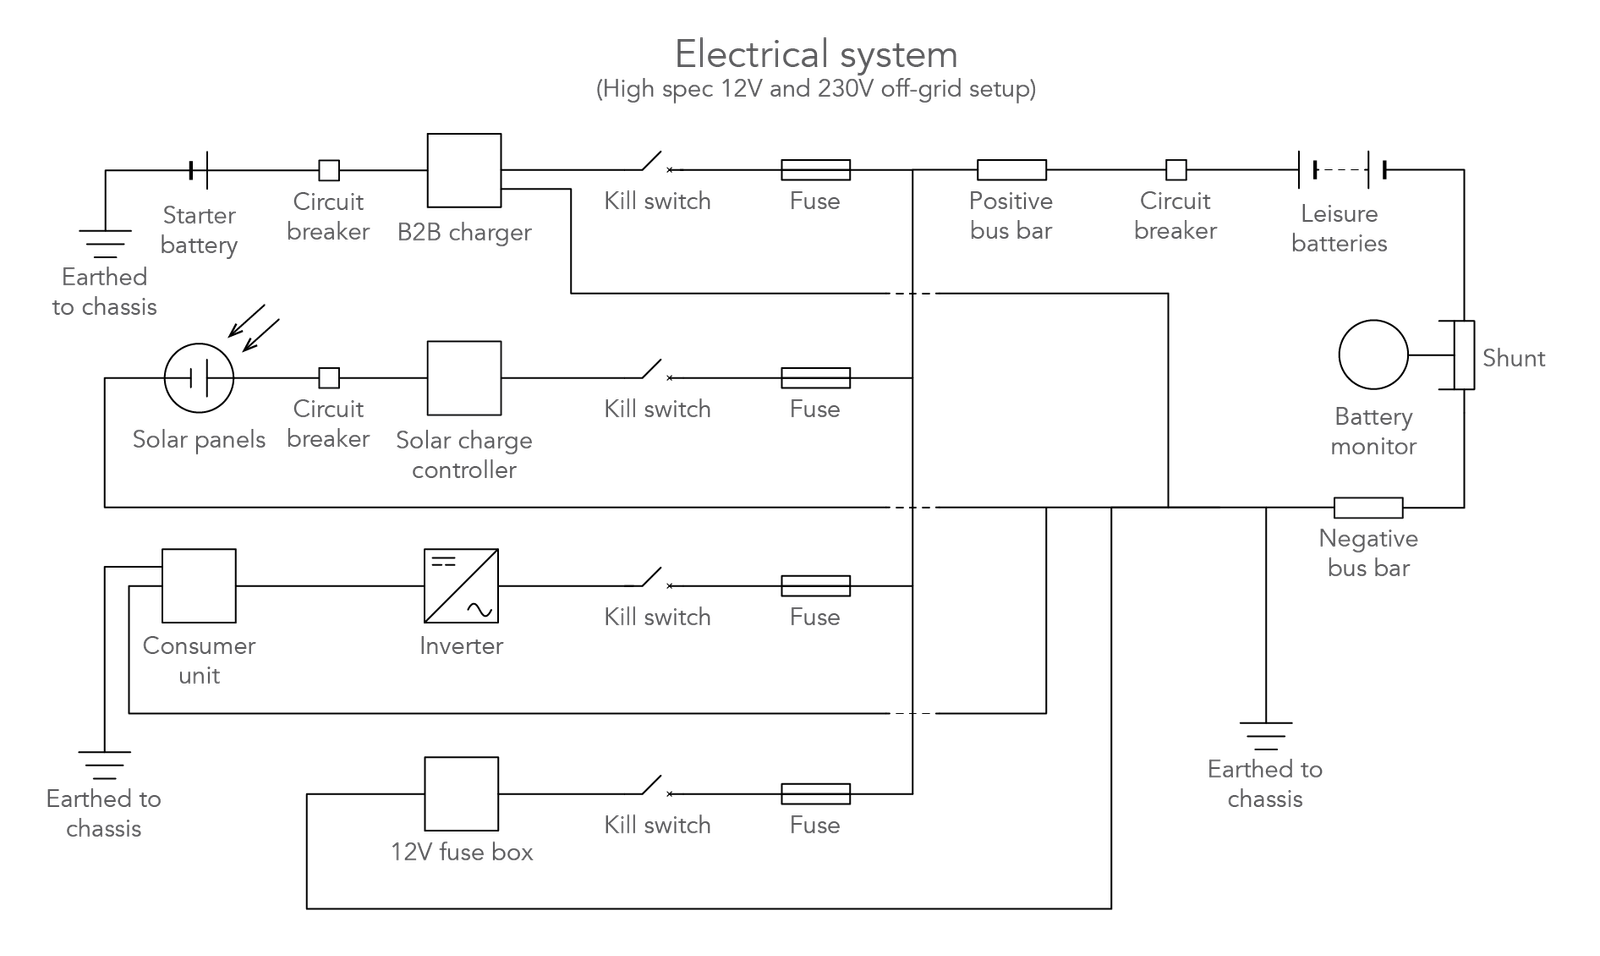
An example simplified wiring diagram for our electrical system.
Luckily, the installation process itself is rather simple. Each product will be connected to the system using the relevant thickness cable, and all components will be connected to a central negative and positive busbar, which in turn are connected to the leisure batteries. All products should be correctly fused to protect both them and the leisure batteries from any current spikes. Have a read of our article How to wire a campervan electrical system for more details on the installation process.


If you’re worried about tackling the electrics yourself, use our electrical system design service. When we first published our book, we started to receive lots of questions from people specifically about the electrical system, and it quickly became apparent that this was the area people needed the most help with. We hope that Nohma can alleviate stress around campervan electrics and instead make off-grid energy simple and fun.
Campervan electrics leaving you confused?


We explain how to size all of your electrical system components, as well as providing detailed wiring diagrams of all of the subsystems.
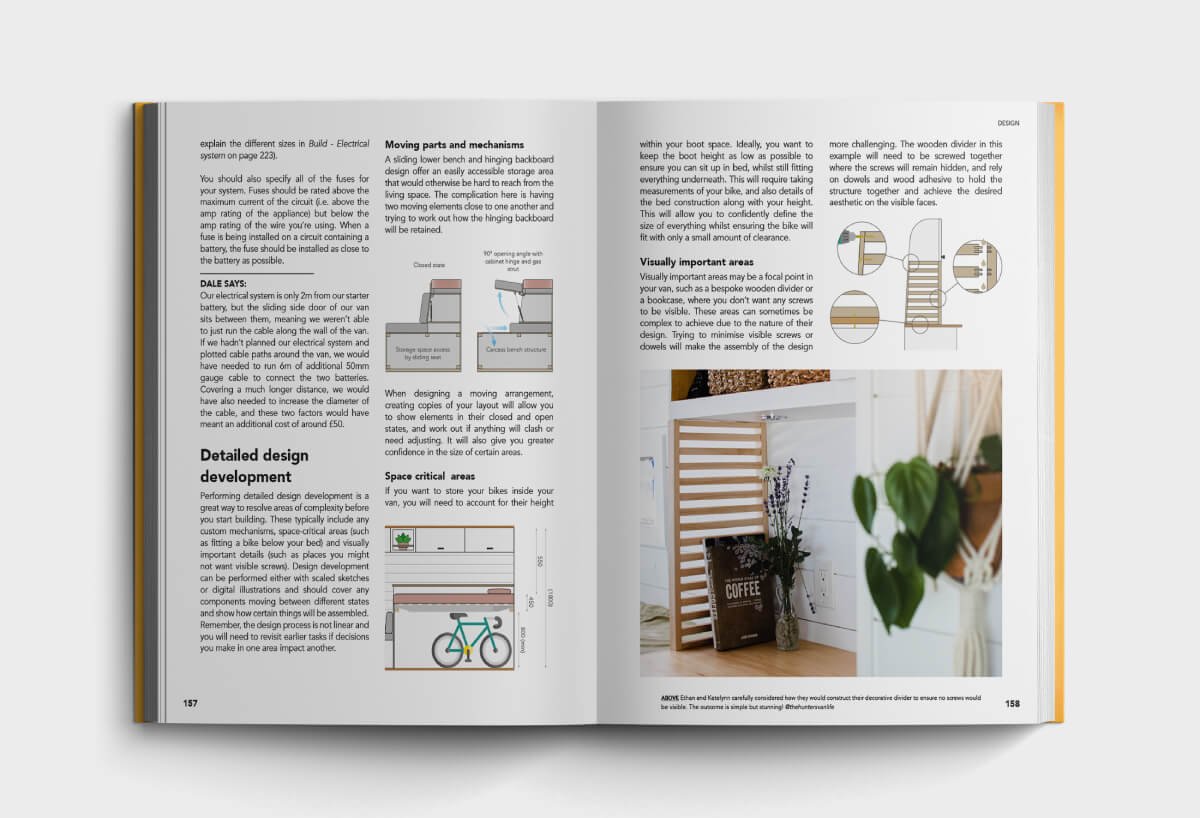
Layout construction
When you convert a campervan, the ‘layout construction’ phase involves building all of the internal structures in your van, such as beds, kitchens and seating. It’s at this stage that you will see your vision slowly come to life. Using wooden battens and sheet plywood, you can create beds, kitchen cabinets, seats, even shower cubicles!
There’s a few different construction methods you can use to build your structures: carcassing, partial carcassing or cabinetry. Carcassing involves building a framework out of battens and then cladding with ply. Partial carcassing involves cutting the ply before the battens, and using the battens to connect the ply together. Both these methods use a drill and screws. Cabinetry uses a router and allows you to slot the ply together like a jigsaw puzzle, avoiding the need for battens or screws.


Make sure to measure everything out first – it’s a good idea to use masking tape to mark out your layout on the floor before you start construction. This way you can quickly find out if everything is going to fit as expected before you spend lots of time building something that doesn’t quite fit!
We’ve documented the details of designing and constructing our kitchen in this article: Van tour: our campervan kitchen.


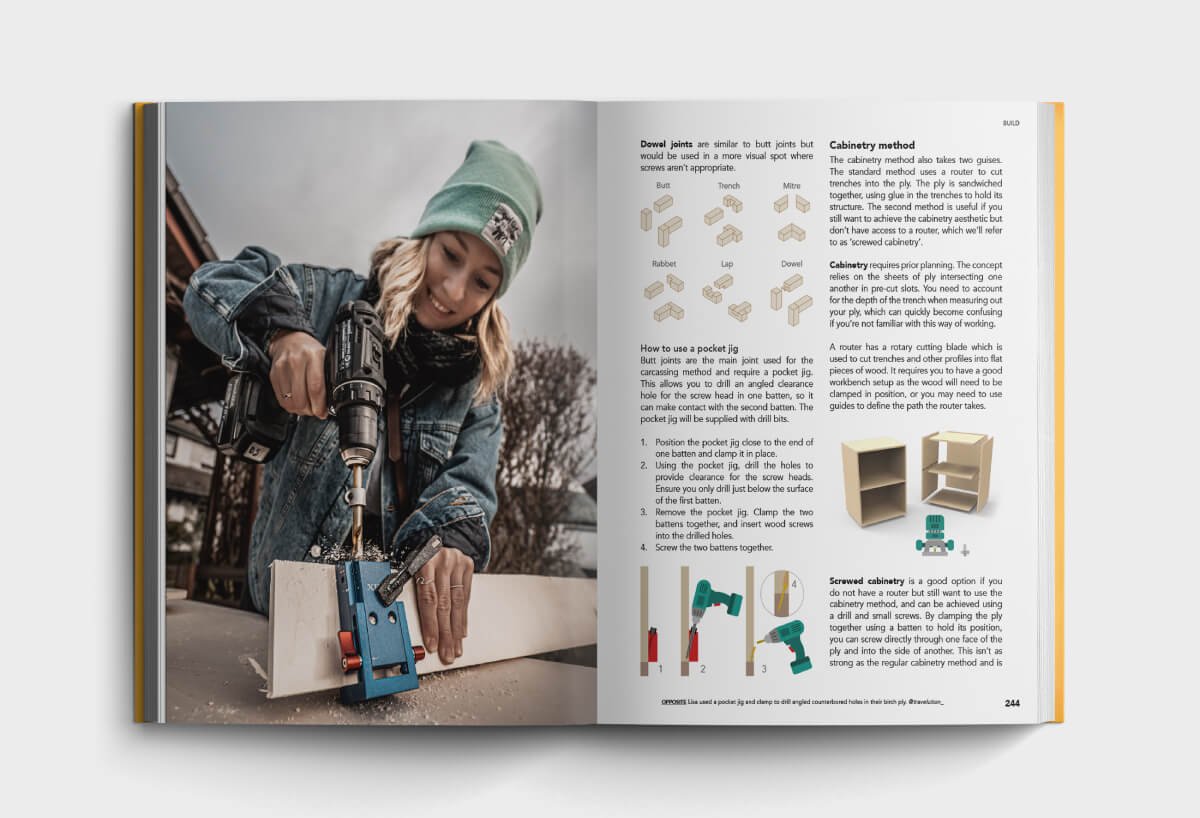
Read detailed explanation of how to use different construction methods, so you can pick which one suits you for each aspect of your build.
Water, gas & heating
When it comes to water and gas, these systems can be as complicated or as simple as you want them to be. When you convert your van, you will need to decide whether you’re happy with a basic system such as a simple jerry can, a washing up bowl and a portable gas stove, or whether you want your van to function like a mini house! If so, a full 4 ring hob, a combi boiler and an indoor shower might be on the wishlist. If you don’t quite have the room for an indoor shower, you might consider an outdoor shower setup.
One of the biggest questions most van lifers get asked is about where they go to the toilet! Deciding whether or not to include a loo in your campervan can be tricky. We decided to build our own DIY composting loo so that we could spend our time fully off-grid and not have to worry about finding somewhere suitable to go to the loo!
For a detailed explanation of the water system installation process, have a read of our article: How to install a campervan water system.
When you’re installing your gas system, remember that any internal gas bottles should be mounted in a sealed metal locker, and drop out vents need to be installed next to any potential leak spots such as pipe connections and appliances. We installed an underslung gas tank in our own campervan conversion, and we’d definitely recommend this option as it saves valuable space inside your campervan. We’d recommend getting a GasSafe engineer to check your system before testing any appliances.


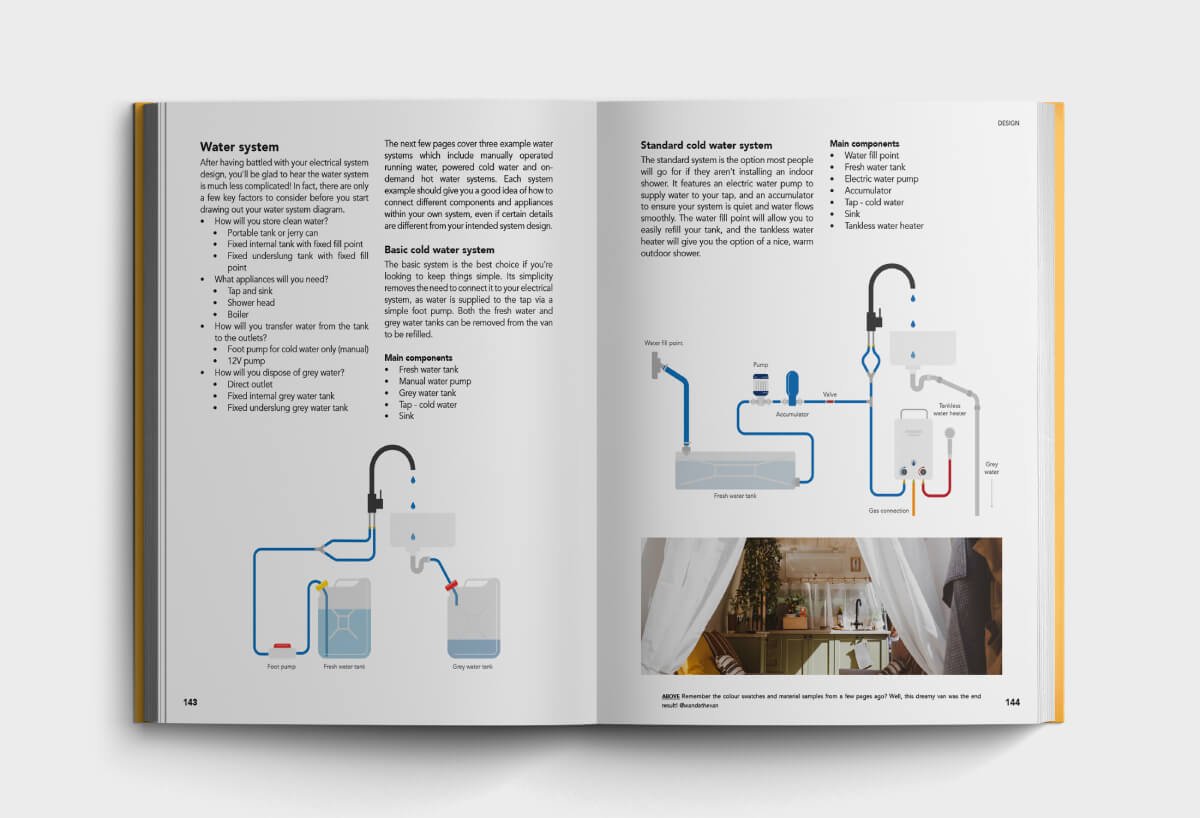
The 'Design' chapter includes lots of example systems so you can pick which one is closest to your usage and use it to help you design the perfect system for you.
Decorating & furnishing
Now comes the exciting job! You can turn your van build from an almost finished campervan into a little rolling home by painting and upholstering, putting up shelves and hooks, adding a few plants and pictures. The magic of converting your own van is that you really can do anything, so put your own mark on your camper and make that vision in your head a reality.


As well as practical explanations on how to build certain visual features or approach tasks such as tiling, we cover lots of ideas about how to design your interior.
Preparing for van life
There’s more to how to convert a campervan than just the process of physically building it. Once your conversion is finished, it’s important to take it from 90% to 100% so you’re ready to hit the road.
Security & technology
It’s important to consider campervan security to protect the home on wheels that you’ve just spent so long converting. Read our campervan security article for tips and ideas to protect your camper.
You might also want to consider what technology you want to take your conversion to the next level. Whether you need campervan WiFi so you can work remotely as a digital nomad, or you just want to include a campervan projector so you can have a mini-cinema inside your van, some campervan tech can help you get your van conversion to 100%.


Responsible van life
It’s important to not just know how to convert a campervan, but also how to use your campervan responsibly once it’s finished. We’ve come up with ‘The Rules of Van Life’ to make sure we protect our freedom to travel and enjoy the world:
Leave it better
As well as taking all your litter away, leave each spot you visit better than you found it as a way of giving back.
Plan ahead
Check local rules so you know where you are and aren’t allowed to stay, and don’t ignore ‘no overnight parking’ signs!
Be considerate
Whether it’s blocking a farmers gate or playing loud music late at night, don’t do something to give the van life community a bad rep!
S**t responsibly
If you don’t have a campervan toilet, dig a hole at least 15cm deep and 50m away from water sources. Take away any toilet paper and dispose of it properly in a bin.
Be a force for good
Use natual products, cut down on single use plastics and support communities you travel to by buying locally.
Give back
If you see someone in need, give them a hand. Empower others to do the same.
It's so important to protect these beautiful areas we're lucky enough to visit.
The Van Conversion Bible: how to convert a campervan
So, now you know the basics of how to convert a campervan, all you need to do now is take the plunge and commit to your own campervan conversion! The Van Conversion Bible can give you the confidence to take the first steps in making your van life dreams a reality.
Be the first to comment!